Replaces
This part doesn’t fit a . Select from parts that fit.
Frequently bought together
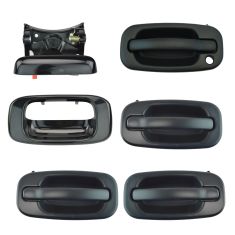
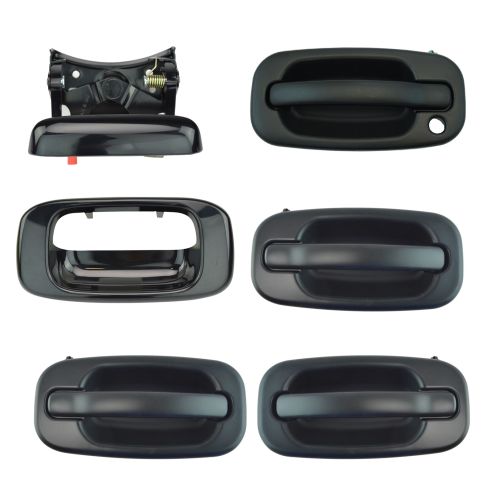
Part Details
Paint To Match Note:
"Paint-to-match finish" refers to a smooth, paintable surface. This item is not painted. Paint offers better coverage and adhesion, but it is not necessary for installation.
Item Condition:
New
Attention California Customers:
 WARNING: This product can expose you to chemicals including Lead and Lead Compounds, which are known to the State of California to cause cancer, and birth defects or other reproductive harm. For more information, go to www.P65Warnings.ca.gov.
Lifetime Warranty
This item is backed by our limited lifetime warranty. In the event that this item should fail due to manufacturing defects during intended use, we will replace the part free of charge. This warranty covers the cost of the part only.
FREE Shipping is standard on Orders shipped to the lower 48 States (Contiguous United States). Standard shipping charges apply to Hawaii, Alaska and US Territories. Shipping is not available to Canada.
Expedited is available on checkout to the United States, excluding Alaska, Hawaii and US Territories as well as P.O. Boxes and APO/FPO/DPO addresses. Final shipping costs are available at checkout.


Created on:
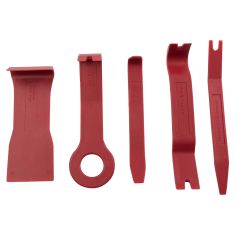
Tools used
Brought to you by 1AAuto.com, your source for quality replacement parts and the best service on the Internet.
Hi, I'm Don from 1A Auto. I hope this how-to video helps you out, and next time you need parts for your vehicle, think of 1AAuto.com. Thanks.
In this video, we're going to show you how to replace the exterior door handle on this 2002 Chevy Suburban. We show you on the passenger side but the driver side is the same procedure. The items you'll need for this are a new exterior door handle from one 1AAuto.com, a flat blade screwdriver, an 8 and 10 millimeter socket and ratchet with an extension, and a 10 millimeter wrench.
Start off by prying up your switch panel and then pushing the tab on the harness and disconnecting it. Next remove this eight millimeter bolt, this eight millimeter bolt right here, and this eight millimeter bolt at the bottom of your door panel. We'll just fast forward as Don removes those three bolts. Pull out on this triangle panel and then pry out on this panel from the outside and then slide it over the handle and out. Now, lift the door panel up and pull it free. Next, pry out your courtesy light and just push it through the door panel, and then pry out on the tab and disconnect the harness. Push the tab on this harness and disconnect it. Then, pry out on the tab on this harness and pull it free. There your door panel is free.
Using a flat blade screwdriver, just pry this clip off your door handle rod, and then pull the rod out. Now, remove this 10 millimeter bolt. Now slide the door handle towards the inside of the vehicle and out. Then just carefully pull back the water shield, making sure you don't damage it. I'll fast forward as Don does this.
Then, pry out this cap. In here, you'll see a 10 millimeter nut, right there, and there's another 10 millimeter nut right inside here, as you can see straight back behind by that green clip, and then there's one more 10 millimeter nut on the back side of the door handle, up in the top left corner. We'll fast forward as Don removes these. You want to use that 10 millimeter wrench for that one in the top left corner, and then, for the other two, through those holes, you can just use a socket and ratchet. Now flip this green clip off the door handle rod and then pull out this lock rod by disconnecting the clip the same way as the green one, and then just angle the door handle down and out. You'll have to swap over your lock, so just pry out this clip and then pull the lock free.
On the left, is the old door handle. On the right, is the new one from 1A Auto. You can see they're identical and they'll fit exactly the same. If you want it to match your vehicle, then you want to just take the door handle to an auto parts store, the paint department, get a can of matching paint, and paint it to match your vehicle.
Push your lock into your new door handle, and then, feed the door handle into place. We'll fast forward as Don replaces those three 10 millimeter nuts. Now re-clip your lock rod and door handle rod and replace this cap. Now, replace your water shield, making sure all the harnesses are pulled through. Put your door handle rod back into place in the interior door handle and re-clip it, and then push the tabs on the door handle back into the door, and slide it back towards the outside of the vehicle. Then replace that 10 millimeter bolt.
Now, to make putting the door panel back on easier, it helps to just pry out your manual lock switch. It just pulls right out. Then you want to reconnect your harnesses, and then pull your courtesy light harness through the door panel and reconnect your courtesy light. Then push it back into place in the door panel. Then put those hooks into those bottom slots and then slide the door panel back in place. Make sure all the clips are lining up, your harnesses are pulled through, and that it's fully back in place. Now line up the rod with the manual lock, and push it back in, and then, replace those three 8 millimeter bolts. Now, you want the inside of this panel to go in first, so slide it over your door handle, and then, tuck that inside end in first, then the middle tab, and then, the back tab. Replace this triangular panel and then reconnect your switch pack harness, push the back end and then push the front end, and you're all set.
We hope this video helps you out. Brought to you by www.1AAuto.com, your source for quality replacement parts and the best service on the Internet. Please feel free to call us toll-free, 888-844-3393. We're the company that's here for you on the Internet and in person.
Tools used
Okay. So, what we need to do first is remove our door panel. Grab yourself a nice plastic trim tool. Come right up along here or even up here and just try to pry this away. You're going to see it's got a couple of little clippy-dos. We're going to move along to this right here. Come down along here with your trim tool, pry up on all this. Disconnect all of your wiring. Just going to use the smallest pocket screwdriver. If you press right here, there's a little piton, and then you can pull this down and remove this as well. Let's get this trim piece off of here as well. Now, if you look right up onto your handle, you're going to see a bolt that's right there. You can either use a 9/32 or even a 7-millimeter socket, whichever you have. Next, we're going to get this little door lock bezel out of the way. I'm just going to use my small pocket screwdriver just to kind of get this started and I'll use my trim tool. Pop it right off. That exposes our screw that's out here as well. Now we're going to remove this little cap right there. You can use anything, a small pocket screwdriver, whatever you've got. Pops right off. Underneath there, you're going to see a T20. Remove this screw. There it is. On the far end, we'll go ahead and remove this push clip as well.
So, now if you feel along the bottom, you're going to find this bolt right here. Once again, either use a 7-millimeter or 9/32. Get that out of there. Go ahead and grab onto your door panel, lift it straight up, and draw it away from your vehicle. Just use your small pocket screwdriver. Come right underneath this area right there, and you should be able to draw the wire out. There we go. The next thing we need to do is get behind this vapor barrier here. You can do this without removing your handle, but for me, it's much easier just to get the handle off and out of the way. That way there, I can peel this right back and have a nice clear view. I'm going to take my small pocket screwdriver. I'm going to pry on this little clip and move it away from the rod. Once I've done that, I can lift up, and now it's unattached. Use your 10-millimeter socket. Remove this bolt. Now we'll just go ahead and grab onto that handle, slide it forward and get it out of the way. Let's carefully pull back on this vapor barrier so we can get right back here. An idea of what's going on inside the door here because it's very hard to see, you're going to have three mounting areas. You're going to find a nut right there, one right here, and one right there. You're also going to find a lock cylinder here that's going to have a little hooky-do that looks like this. That's the lock. When you find that, go ahead and unlock that and pull the rod off and then do the same thing up top here. I'm just going to use my small pocket screwdriver here, grab onto this red lock, and you should be able to pop it right off of there. Just like that.
Now, grab the rod and slides right out. We'll let that hang down. If you were to follow me down this way, you can follow this rod. That's the rod for the actual handle itself. I'm going to remove this side right here because that's going to make it so I'll be able to pull this right out and it'll be much easier in the long run. So I'm just going to use my small pocket screwdriver, see if I can grab onto that, pop it free, and get the rod right off of there. So, now I'm going to have to reach up inside the door panel here and try to find the forward nut. That's this one right here. That's going to be the hardest to get to, so that's going to be the one that I start with. Use your 10-millimeter and get that right off of there. Now, if you look straight through here, you'll see one of your nuts, and then if you were to pop off this little cover right there with a pocket screwdriver, you'll see the other. Carefully use your pocket screwdriver, pop this off. There it is right there. Grab that handle.
Okay. Grab onto this. Pull it right out of there. Now we need to get this rod off of here. I'm just going to go ahead and pull this tab. Pop that off of there. Move this out. Set that aside. Now we're going to grab our new handle. Obviously, I'm not going to put it down on the floor. I don't need to scratch it up. Slide that in. Grab this. You need to make sure you latch it in. That's very important. Okay. So, now it's going to be time to get our lock cylinder out of here. If you were to look at the clip right here, you can come right along there and just kind of pull out on it. At this point, you should be able to push your lock cylinder out. In our case, ours has been in there a very long time and it's stuck there. So, for me personally, I'm going to continue on like this. I'm going to grab this little piece of the clip, see if I can pull it out and around, and just get this clip right out of there. That's going to make things much easier for me. At this point, I'm going to wobble it around and it should want to start pushing out. Almost there. There it is. Now, before we go too much further, let's go ahead and grab our new handle here. It came in this exact same direction. We're going to go ahead and place this right in here like this, and as I push, you'll see this start to lift out and it clips right in. Make sure it's 100% bottomed out and make sure it cannot fall out. This is perfect. Let's get back over to the vehicle.
So, now it's going to be time to put the handle into the truck. I'm going to go ahead and put this long shaft down in there, and then, of course, once I push this all the way in, we're going to put this shaft right into the red, bring this around, and lock it in. That goes right in here like that. I've got my red. Put it in there, lock it in. I heard it click. That's perfect. I'm just going to come down and under like this and it should all just want to slide right into place. That's perfect. Let's go ahead and start putting on these mounting nuts here. Just put it right on my socket. Find my stud. Make sure it's nice and snug. We'll do the same to all. Okay. That's nice and tight. That's all three. Make sure you put this cover back on. Let's go ahead and get our lower shaft on there now. Just kind of place it in. Make sure you latch it in. Here we are. Just going to give that handle a nice tug. I can see it's functioning perfectly. Okay. Let's grab this rod, we're going to go right through this little hole right there. Bring this up, and then we're going to stick it right back to where we got it from. Make sure that you have your bolt holes out in the open. Give that wire a nice little tug. There we are.
If for some reason it's not sticking, you can get yourself some more butyl tape or, of course, you can use other tape if you have that. Now looking at the inside door handle, we can see we have a little hooky-dos. We're going to put this on, slide it in, and then, of course, we'll put in our bolt. Grab this, line those up. Slides right in. Put the rod in there. Make sure it's locked. Okay. Put on the screw. Go ahead and tighten it right up. Let's get this light reconnected. Slides right in. Coming up here, we want to make sure we grab all this wiring, pull it right through like this. Now we've got our handle. It's going to come right through this hole. Now, as we push in the panel, you're going to see you have hooky-dos all coming down along here. You have one here, there, there, and then a couple along the bottom. All those need to fit into their slots that are on the door. Once you have them so they're starting in there, we'll slide them all down. Put our screws in here. Get this one right here. Nice and short. Right there. The long one goes right underneath this handle. Tight. Get this one. Put it right back in there. Get our little cover, push that right on there. Get our push clip.
Now it's time to put back on our lock. Make sure you've got the red area facing towards the rear of the vehicle. If you were to look at the backside, you're going to see there's a hooky-do here, and then there's a couple of little ones right there. This forward end needs to go in first and then you roll the backside in. There it is. Make sure it's unlocked, of course. Now it's time to get this back on there. If you were to look at this, you're going to see there's a little hooky-do. That needs to slide in there. So, we'll just go right over the handle, put in that forward side first with the hooky-do, and then go ahead and clip this in. Perfect. Put this back on there, get another hooky-do, goes down, and then, of course, the pitons push right in. Let's get this back reconnected now. If you look at the backside, you can see, of course, the colors. Black, we're going to skip one and go blue. We'll take that green. Take the big one, slide it right in. Make sure it's locked in. Grab this, put it on. Now when you put this in, there should be like a little hooky-do here that's going to go under there, and then there should be a little clip that's going to force down in there. Both of ours are broken, so you're just going to have to imagine I'm going in from the front, sliding it down, making sure my wiring is where it needs to be. There we are. Just retest this real quick. It opens. I'm going to lock it, unlock it. Perfect.
Tools used
First things you're gonna wanna do is make sure that your tailgate is down. Once you have it open and down, you're gonna see these three bolts right there. Remove those using a 13-millimeter socket. It's nice and tight. All right. Let's get these out of here. Wiggle this handle around, so it's nice and free. With this black bezel, the next thing you're gonna wanna have is one of these nice plastic trim tools. The reason why we're gonna use plastic is because we're gonna come in between the bed and the plastic shroud right here. Just go ahead and come right here. Push it. Do the same thing right there. Once you have the top broken free, just go ahead and lift this straight up and draw it away.
Go ahead and come in between here with a nice flathead screwdriver. Pull that clip down. Grab this rod, and slide it out. Do the same to the other side. Let's go ahead and get the handle out of here. Let's go ahead and get this handle in here. Weasel it in. There we are. Now, you're gonna grab your connecting rods here. Slide it in, and then lock it down. Slide it in. Bring this around. Lock it in. Give it a nice shake. Do the same to the other side.
So, now with this nice and loose, we can continue on to installing this. If you were to pay attention, on the backside, you're gonna see that you have a couple little pitons. And then, right here, you have some hooky-dos. When you go to install this, you're gonna put the bottom in first, so that the pitons go down into here. They'll latch in, and then just roll it in, and it'll latch. Just like this. In.
So, now from inside the bed, you can see the backside of the tailgate. We're just gonna kinda wiggle the handle around until we can see our bolt holes. Grab your bolts. Go ahead and start all three of them in before you tighten any of them down. Let's go ahead and snug them up. Let's give it a test. Perfect.
Tools used
Okay, friends, to get started on this handle, it's gonna be very simple. We're gonna remove this mounting bolt right here and this one right here. To do that, you'd use a socket that looks just like this, it looks like a star. It's a Torx bit. You want a T30. There's our first bolt, and our second, and there's our handle. Once you've compared your new handle to your old and you know everything matches up perfectly, it's time for the install. This right here goes down along the bottom. Let's put it right in there. Start in both of the bolts and then we'll snug them up. Okay. Let's test it. It's definitely latched. Perfect.
Tools used
Brought to you by www.1AAuto.com. Your source for quality replacement parts and the best service on the internet.
Hi I'm Mike Green. I'm one of the owners of 1A auto. I want to help you save time and money repairing and maintaining your vehicle. I'm going to use my twenty plus years experience restoring and repairing cars and trucks like this to show you the correct way to install parts from 1aauto.com. The right parts installed correctly, that's going to save you time and money. Thank you and enjoy the video.
In this video we'll be doing a tailgate handle on a 2004 GMC Sierra. Same as any 99-06 Sierra Silverado. Only tools needed are a half inch wrench and an Exact-o knife if you have a Rhino liner in your truck. Also if you're going to order the tailgate handle we do recommend ordering the bezel as it's kind of difficult to get off without breaking it and actually we found on our truck it had already been broken. So it'll just save you a little time.
Okay, so to remove your tailgate handle the first thing you want to do it is remove this bezel. Basically there are two pins that go down and then it clips in. So you want to push down on top and then pull out, this is interesting. This truck has already been damaged and somebody used two sided tape to put it in there. See the close up, the tabs are broken off. It commonly happens. Two sided tape is okay for awhile, the problem is what happens is these trucks, the dirt just kind of swirls up and around here and sooner or later the two sided tape is going to let go and this thing's going to look like that.
Here on the tailgate you've got three bolts, you can see ones already loose because I was experimenting a bit. This truck's got a Rhino liner in it and a lot of trucks do now. If you don't obviously you can just take these bolts off but if you do have a Rhino Liner you want to use a knife and you just basically want to cut very carefully, so you don't cut your fingers off, cut each hex. I'm trying to do this quick. If you don't cut this off you won't be able to get your wrench on there. You could probably force your wrench on there but this is the best way not ruin your bolts. Just kind of back it in there and peel it off. You don't have to get it all off, it doesn't have to be perfect but you definitely need to get enough off so that you can get your wrench on there. Okay it's a half a inch, you push down and the bolt comes up and out. You want to remove these three bolts.
As I was taking these out I wasn't filming because you don't really need to see me tearing out but something funny, this has washers and the Rhino Liner has actually trapped the washers in there but that's okay. You can just remove it to that point and you'll still be able to remove your handle. You just back it out and you can hear my handle just dropped down there's. We're going to put our bolts on our 1A Auto magnetic tray.
Okay here's your handle and there's two rods right here held in by clips and basically you just need to move these clips down. Okay and the rod pulls out and then there's your tailgate handle. New handle, see it's all basically the same as the old handle. Okay what you want to do always, is lubricate. Any point where it might pivot, spray them with a bunch of stuff. Put it in here and it'll attach. This goes that way. Push them in. Push these rods into the clips. They don't want to go easily, there's it goes, it's kind of working in a little bit. You basically do it one side at time, just kind of grab the rod, push on the tailgate. Grab this rod, push on the tailgate and it'll open up.
Okay then down here and we'll take the handle and we can line it up by and I'll need my wrench here. These washers are kind of stuck in here. Get that bit with no problem. The last one here. As far as tightening, it doesn't have to be incredibly tight. Holding it with my fist, and that's good. So we have our new bezel here and here's the old one, you can see the little teeth that are broken off. Remove some of the two sided tape because it needs to bite under the metal and that will just get in the way. Basically this just goes in. Push down on it and there you go all set.
This video was brought to you www.1AAuto.com. We hope we helped you out. We are your source for quality replacement parts and the best service on the internet. Feel free to call us toll free 888-844-3393 we're here for you on the internet and in person. Thank you very much.
Tools used
Hi, I'm Mike Green, I'm one of the owners of 1A Auto. I want to help you save time and money repairing and maintaining your vehicle. I'm going to use my twenty plus years of experience restoring and repairing cars and trucks like this to show you the correct way to install parts form 1AAuto.com. The right parts installed correctly, that's going to save you time and money. Thank you, and enjoy the video.
In this video we're going to show you outside front door handle replacement on this 2002 GMC Sierra, same as any Sierra, Silverado, also the Yukon, Tahoe, and Suburbans. This does pertain to '99 to '02, '03 and up is a little different to get the door panel off. Tools you'll need are a 7mm and 10mm socket with ratchet and extension, and a flat bade screw driver.
Remove the door panel, pull off that trim panel there. On these '99 to '02s, you can lift it up a little bit, then if you look through you'll be able to see a little metal tab, press on that tab, lift up, that comes up and off. You press on a lever here to disconnect there, disconnect there, use my screw driver. There's a little tab, push in and pry up on the tab at the same time. Disconnect that. With the screwdriver, pop off your lock, and then pop off this panel here around the door handle, and then the back and the light here. Disconnect that light. There are two 7mm bolts, one right here, and then one down under the arm rest. I'm going to fast forward here as I remove those two 7mm bolts that hold on the door panel. Once those are removed, just push your wires through, lift your door panel up and off, and then there is a speaker lead right back here. Press, there's a little tab, press on the tab, pull that apart, and the door panel's off. You can see I've pulled my water shield down, I've got some tape on the window to make sure it stays up. Now I'm going to loosen up two bolts, 10mm, one's right in there, and the other one is right there. Turn your key on, notice I've got my window hooked back up. Now I can move that down.
Remove this window stop right here, it's right above the speaker. Now you can let your window come down. If you've noticed, I've taken the tape off the window now. Bring your window down carefully, all the way. You can actually grab onto the front of it and slide it forward. Three bolts that hold this window regulator rail in, remove them. I'll speed this up as I remove those three bolts. You have to take these bolts out to get the window regulator rail out so you can move it forward and get to the nut on the door handle. Reach in, lift that regulator rail up, you can move the side a little bit. There are three bolts, one right there, you've got two right in through here. One right there. Pry off this cap, and there's one right in there. I'm going to fast forward again as I remove those three 10mm nuts that hold the door handle onto the door. Do your best not to drop them down in the door, but if you do drop them you can just pull your water shield back a little more, reach down in there and get them.
Now your handle's going to come out, and you can see right down here there's a little clip. Reach your finger in and flip the clip off, and then push that rod ... I'm going to reach in from this side. You can push it off easily enough, and just reach in from that side. Up here there's another clip, right there. Reach in, just using my thumb to pull it off. There's your handle out. Pry out this clip here. Once you've pried that out you can work your lock cylinder out. Here's my new handle from 1A Auto. This goes in this way, like I said, the clip's already in there, so you just put it in and press it. You put it in and press it in. I'm going to put the bolt on, and spin this around, and lock it on. Slip that in there, push it in. It's in, push our clip right down, and lock it on. You'll notice I took the chance, while it was off, to clean up around the door handle. I actually put a coat of wax on it too. What you saw me do there is I put the nut into the socket, then fed it in there and started it. I'm just going to fast forward as I start the other two, then I tighten them up with my ratchet. You want to tighten them up snug, but you don't want to over tighten them.
Test to make sure it closes and opens. You want to do that soft because you don't have your window rail in place yet. Fast forward here as I re-hang and then bolt that window regulator rail with the three bolts. Same thing, when you tighten this up you want to make sure that it's tight, nice and firm, but you don't want to over tighten the bolts. You want to take the window, lift it back up, right up, bring it through here. Carefully slide it up into place. Ensure that it's in the right spot. Now we can put this stop back in. We'll use the fast forward button again as we replace that window stop, or the guide, and put the 10mm bolt in and tighten it up. Again, nice and snug, don't over tighten. Turn the key back on, and first make sure that your window is all the way up, nice and tight into your weather strip, then run the regulator up. These go back up in place. Tighten up these two bolts. The key is still on, make sure you still have a working window. Put your water shield back up in place, and then disconnect your switch plate again. Don't forget to put that access plug back on.
Put your door panel back on, that through there. Right down here you can see the tab in the door, so it rests like that on those two tabs. Now you can reconnect your speaker, and put it back on that clip. Make sure the wires are through, and push the door panel on and down. A little fast forward again as I put those two 7mm bolts in that hold the door panel on. Reconnect these harnesses. I kind of surprise myself here as I connect it. Since I hit the door locks the truck must have thought that I was trying to steal it as I reconnected the switch plate, so it just took me a second to find the keys, turn the truck on, and stop the alarm from going off.
We hope this helps you out. Brought to you by www.1AAuto.com, your source for quality replacement parts and the best service on the internet. Please feel free to call us toll free, 888-844-3393. We're the company that's here for you on the internet and in person.
Tools used
Brought to you by 1AAuto.com, your source for quality replacement parts and the best service on the Internet.
Hi, I'm Mike Green. I'm one of the owners of 1A Auto. I want to help you save time and money repairing or maintaining your vehicle. I'm going to use my 20-plus years experience restoring and repairing cars and trucks like this to show you the correct way to install parts from 1AAuto.com. The right parts installed correctly: that's going to save you time and money. Thank you and enjoy the video.
In this video, we're going to show you how to replace the rear outside door handle on this 2002 GMC Seirra Crew Cab, same as a Silverado as well as the same as the rear doors on Suburban. The only tools you'll need are flat blade screwdriver, a 7mm socket, a 10mm socket and then a ratchet and extension.
There are two 7mm screws that you have to remove or bolts: one right in there and then one down in the bottom corner, here. Then, as well, you need to pry out this trim panel, pry out your lock button and pry out your window switch and disconnect it. First put your fingers under it. Pull up that bezel. Take a regular screwdriver stick in the front there, pull out your lock button and on this switch, also pry up gently there. In front of it, there's a little tab. Use your screwdriver, push on it and pull the connector down and out. You can also pry out your light and reflector and disconnect it. Take your 7mm socket and ratchet and extension. We'll just speed up here as we remove those two 7mm bolts. Once everything is unbolted, then you just lift up on your panel and it comes off. Peel your water shield carefully, and pull it back some.
Now inside there's a rod that runs up to the door handle here and you can easily just use your thumb to push that clip off. Disconnect the rod and there's three bolts: one there, one there and then one that's a little bit more difficult, right up in there. For two of them, use a 10mm socket with a ratchet and extension. We'll just speed it up here as I take those two nuts off that are pretty easy to see. Then take my extension off and put my ratchet right up in. We'll speed it up here again as I take that nut off. Take that, and now, your handle pulls right out. You can see this is rusty. What happens is this breaks or sometimes this pin breaks.
Here's my original handle and a new handle from 1A Auto. You can see it's all the same. It doesn't hurt if you want before you put it in, to spray it with some penetrating oil or white lithium grease. You can see that this gets pretty corroded and gets sticky especially if you don't use the doors a lot and that's how the handle can break. The new handle just installs like the old one came out. Put it right in. Use your original nuts. We'll just speed it up here as I start those three 10mm nuts and then use my socket, ratchet and extension to tighten them up. You want to tighten them up firm; they don't have to be extremely tight, though. Reach up in there, connect the rod back into place. Put the clip back down.
Put your plastic water shield back into place. Put your door handle back on, make sure you bring this right up through here, bring your courtesy light through. The white plastic legs down there, get them resting in the door like that. Push the panel against the door. It should slide down nice and easy. Get this bolt next to the armrest. I just put that in backwards.
We hope this video helps you out. Brought to you by www.1AAuto.com, your source for quality replacement parts and the best service on the Internet. Please feel free to call us toll-free, 888-844-3393. We're the company that's here for you on the Internet and in person.
Tools used
Tools used
Hi, I’m Mike from 1A Auto. We’ve been selling auto parts for over 30 years!
Going to replace this handle, tailgate handle, on this Chevy pickup truck. The bezel has already broken off on this vehicle. It's pretty common for them to break off. This is a brand new bezel from 1AAuto.com.
The way it fits in here if this truck had the bezel, these two little tabs on the bottom slide in these two little holes here. There’s push tabs up top here. And it would sit in like this. These tabs would lock underneath the sheet metal. If you were trying to remove it, carefully take a small screwdriver and push it in here on either side to release these tabs. Most likely if this bezel is old, it's just going to break on you if you're trying to replace this handle. You should probably have one of these on hand before you try to replace this handle.
Let's get into replacing this handle. After I sprayed some rust penetrant on these clips so that they'll move more freely, I'm going to push them down with my index finger. I'm not going to pull the rod out of this yet. It will just slide out, but I want to leave it in there, because I need the latch to work still. But it's easier to pop these off while this latch is attached to the sheet metal so it's not moving around on me. Now I can still open the latch and lower the tailgate.
There's two bolts here, and there's a third bolt that's hidden under this plastic bed liner, which is held in with these Phillip head screws that are all around it. I'm going to remove these, take off the plastic bed liner, and get to these three bolts that are back here. Use a Phillips head screwdriver to remove these. If you had a painted on bed liner, you may have to take a razor blade and cut around these bolts, but since this is a plastic one this plastic piece has to come off. These are the final two bolts.
I've removed all the screws that are holding this plastic on. These bolts are also holding the top of the latch. Start by taking these out. This is a 13mm socket. Lift this plastic up, put it in the bed of the truck so it's out of the way. And you'd see the final bolt. I'm also just going to hold onto the latch, because it's going to be pretty loose. Lift up the tailgate.
Since I've already freed these, I'm going to pull the rods out that go to the latches. This latch will slide right out of the opening, and you just have to maneuver it out. It's a little tight.
This is our old handle. This is our old handle from the vehicle, and here's our brand new one from 1AAuto.com. See, same exact design, same three bolt holes, same spring, same style black textured plastic. This will fit great and work great for you. This is a brand new bezel from 1AAuto.com. It goes around the tailgate handle like this, matches, same black texture.
If yours is broken off, this will replace it and make your truck look new again. Take our new handle, slide it up into place, align it up with the original bolt hole and go inside the bed. I'm going to capture this bolt here so that it doesn't move too much around on me. I'm not going to fully tighten it, I'll just leave it loose. I just want the handle in place.
Now I can push these little control rods up here that work the latches on either side, and get this one in to move that around a little bit. It's going to slide right back in there, pushed in. Then this goes up to lock it in place. Same thing on the other side. Adjust this over, can move this around a little bit, and do that. These are a little rusty. Push them in place, flip this around, and lock. Now I can open the tailgate again.
I can see the handle is lined up with the holes here. See it moving there? I'm going to hold it where I want it. I'm going to tighten this one, because once I put the plastic over it. I won't be able to get to it. Once it feels tight, I'm going to stop. We can lay out plastic bed liner back down, fits right into place. I'm going to replace these two bolts, tighten up the last bolts, real tight. I'm just going to stop, same thing with the other one.
And go and replace the rest of the Phillip head screws that are holding the plastic bed liner trim in. With the bed liner reinstalled, I can close the tailgate. Now would be a good time while you can get in here, to spray some lubricant on the hinge. That works really well. I'm just going to wipe up some of this oil that spilled. We can install our new bezel, and put the two tabs in these bottom openings here, and then snap it into these two top tabs, flip it up and over, just like that. You can open the handle a little bit. Whoops. A little tricky. New bezel is installed.
Thanks for watching. Visit us at 1AAuto.com for quality auto parts, fast and free shipping, and the best customer service in the industry.
Tools used
First thing you're going to want to do is make sure that your tailgate is down. Once you have it open and down, you're going to see these three bolts right there, remove those using a 13-millimeter socket. Nice and tight. Let's get these out of here. Wiggle this handle around so it's nice and free. With this black bezel, the next thing you're going to want to have is one of these nice plastic trim tools. The reason why we're going to use plastic is because we're going to come in between the bed and the plastic shroud right here. Just go ahead and come right here, push it, do the same thing right there. Once you have the top broken free, just go ahead and lift this straight up and draw it away.
We can continue on to installing this. If you were to pay attention on the backside, you're going to see that you have a couple little pitons, and then right here you have some hooky-dos. When you go to install this, you're going to put the bottom in first so that the pitons go down into here, they'll latch in and then just roll it in and it'll latch. So with this, in. So now from inside the bed, you can see the backside of the tailgate, we're just gonna kind of wiggle the handle around until we can see our bolt holes. Grab your bolts, go ahead and start all three of them in before you tighten any of them down. Let's go ahead and snug them up.