Replaces
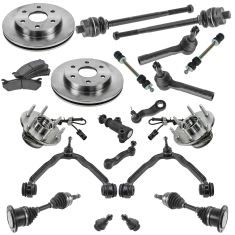
Replaces Chevrolet GMC Cadillac Front Steering, Suspension, & Brake Kit TRQ PSA64825
$709.95

Replaces Chevrolet GMC Front & Rear 21 Piece Steering, Suspension, & Drivetrain Kit TRQ PSA38054
$634.95
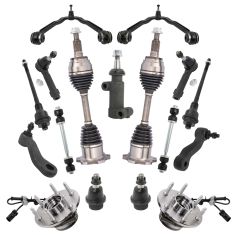
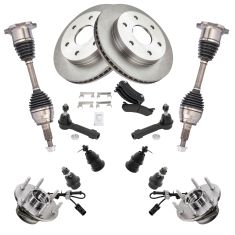
Replaces Chevrolet GMC Cadillac Front 17 Piece Steering, Suspension, & Drivetrain Kit TRQ PSA69967
$579.95
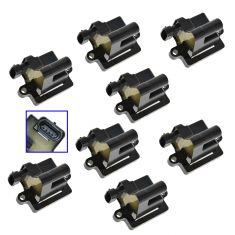
Replaces Chevrolet GMC Cadillac Hummer 8 Piece Ignition Coil Set ACDelco ACERK00006
$540.95
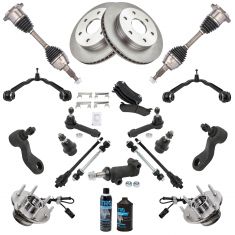
Replaces Chevrolet GMC Cadillac Ceramic 22 Piece Steering, Suspension, & Brake Kit 12oz TRQ PSA72850
$519.95
Replaces Chevrolet GMC Cadillac Front Steering, Suspension, & Brake Kit TRQ PSA72857
$474.95
Part Details
Trusted Quality: Trail Ridge Truck Accessories are developed and built with a promise to provide high quality, durable parts for your truck; backed by the best warranty in the automotive industry. Manufactured from the highest quality materials and constructed to meet or exceed OEM standards. Every Trail Ridge part is rigorously tested ensuring superior fit, function, and durability. Quality, trusted value, and hassle-free installation backed by our 100% satisfaction guarantee.
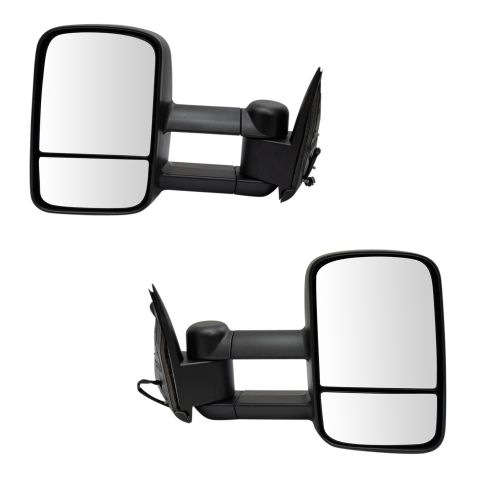
Exact fit - To obtain proper fit and function confirm your vehicle has the exact mirror options listed.
Attention California Customers:
 WARNING: This product can expose you to chemicals including Chromium (Hexavalent Compounds), which is known to the State of California to cause cancer, and birth defects or other reproductive harm. For more information, go to www.P65Warnings.ca.gov
Lifetime Warranty
This item is backed by our limited lifetime warranty. In the event that this item should fail due to manufacturing defects during intended use, we will replace the part free of charge. This warranty covers the cost of the part only.
FREE Shipping is standard on orders shipped to the lower 48 States (Contiguous United States). Standard shipping charges apply to Hawaii and Alaska.
Shipping is not available to a P.O. Box, APO/FPO/DPO addresses, US Territories, or Canada for this item.
Expedited is available on checkout to the United States, excluding Alaska, Hawaii.
Final shipping costs are available at checkout.


Created on:
Tools used
Brought to you by 1AAuto.com, your source for quality replacement parts and the best service on the Internet.
Hi, I'm Mike from 1A Auto. I hope this how-to video helps you out, and next time you need parts for your vehicle, think of 1AAuto.com. Thanks.
This is a follow-up to our tow mirror upgrade. This is a 2002 GMC truck. On these '99s to '02s, we offer the signal, but you do have to wire it into your truck yourself. I show that in the other video, but with the kit that's going to be in production, there are a couple of little differences. One is that, for the ground wire, the kit will come with an eye to crimp onto that wire, so I show you that. Also, the colors of the wires coming out could be different. In the original video, I run a red wire across the truck, and the production mirrors are probably going to have a different color, possibly a blue wire or a white wire. I just show you how to identify which wire lights which light so that you can wire them correctly.
As a follow-up to our other video, you can see I'm installing the black mirrors on my truck now. These are more the production version. There are going to be a couple of slight differences. First of all, your ground is still going to be the black wire, but in the kit, what now is going to be supplied is a loop to put either around that bolt or around this bolt. What you want to do is run your ground wire up there. Needle-nose pliers will work. They have a little wire-cutting edge. Cut the wire. Then you want to strip about a quarter to a half an inch of the wire off. You can try and cut it just lightly. Then squeeze lightly, and pull it. Twist the wire, and then fold it over itself. What you're going to do is put the wire into the eye. What I do first with my needle-nose is I bend over these crimps. Then I bend the wire ones as well. Now when you put it in there, the wire hits and squeezes nice and flat. When that wire hits the second set of crimps, it's in there nice and firm. Then you just take your needle-nose and squeeze down really hard there. Squeeze down really hard there. Then you've got a pretty good crimp. Now I'm going to remove this bolt. Put it through that eye. Reinstall, and you've got a nice solid ground now
The other things is you always want to make sure that you know which wire is which. Before you cut these, you could test them to see which one lights which light. Obviously, you want to run the one that lights the lower running light you want to run to your switch here. The one that lights the blinker, you want to run into the inside of the car. The easy way to test them is I've just stripped off a little bit of the end. Now, this may feel a little dangerous to you, but it's actually not. You're just going to take the wire, and you're going to touch the back of the lead here into your courtesy light. When I do that, you can see that the blue wire lights the signal light there. I'm just touching it intermittently. The red wire, if I touch that to the back, you can see it lights the running light. For this application, the red wire we want to run to our switch, which is the running light. The blue wire, we want to run inside the truck. I'm not going to redo all that. I just wanted to show you the upgraded eye that comes with this, and that it's a little different because I know in my video, I ran a red wire inside the truck, which I'm just going to splice here because I don't want to rerun the whole wire. I'm going to actually splice the blue wire with the red wire. What you'll actually do is run this blue wire into your vehicle or whatever is appropriate. Then I'm going to run this red wire over to the switch just like I did before.
We hope this video helps you out. Brought to you by www.1AAuto.com, your source for quality replacement parts and the best service on the Internet. Please feel free to call us toll-free, 888-844-3393. We're the company that's here for you on the Internet and in person.
Tools used