Replaces
Part Details
Product Features
TRQ drivetrain kits are manufactured using premium raw materials to restore original performance. Each TRQ drivetrain component is designed to be a direct, maintenance-free replacement to the stock unit. To extend the service life of your drivetrain, TRQ recommends replacing wheel hubs, bearings, and constant velocity (CV) drive axles at the same time to ensure even wear of components and improved ride comfort. All products are fit and road-tested in our Massachusetts R&D facility to ensure we deliver on our promise of Trusted Reliable Quality.
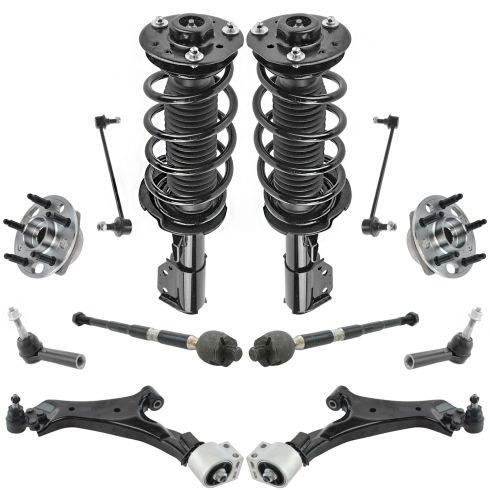
Replacing struts used to require specialized tools to compress, remove, and transfer the old spring and mount. Our Pre-assembled, complete strut & spring assemblies come with all new parts and make the job much quicker and easier for the do-it-yourself mechanic.
Strut & spring assembly contains:
Install Tip: When replacing steering components, have a professional alignment performed afterwards. This ensures proper tracking and even tire wear.
Our steering and suspension components are pre-greased and sealed for long life and do not require the extra maintenance typically required by greaseable versions.
Item Condition:
New
Attention California Customers:
 WARNING: This product can expose you to chemicals including Chromium (Hexavalent Compounds), which is known to the State of California to cause cancer, and birth defects or other reproductive harm. For more information, go to www.P65Warnings.ca.gov
Lifetime Warranty
This item is backed by our limited lifetime warranty. In the event that this item should fail due to manufacturing defects during intended use, we will replace the part free of charge. This warranty covers the cost of the part only.
FREE Shipping is standard on orders shipped to the lower 48 States (Contiguous United States). Standard shipping charges apply to Hawaii and Alaska.
Shipping is not available to a P.O. Box, APO/FPO/DPO addresses, US Territories, or Canada for this item.
Expedited is available on checkout to the United States, excluding Alaska, Hawaii.
Final shipping costs are available at checkout.


Created on:
Tools used
Hi, I'm Mike from 1A Auto. We've been selling auto parts for over 30 years. We're dedicated to delivering quality auto parts, expert customer service, fast and free shipping, all backed by our 100% satisfaction guarantee. Visit us at 1AAuto.com, your trusted source for quality auto parts.
Before you jack up the vehicle, you want to crack all of these lug nuts loose, because that way the wheel won't spin when you're trying to turn the lug nuts. You can use a 22 millimeter socket to do this, or if you want to use the lug nut wrench that comes with the car in the spare tire kit, you can use that as well.
The first step to do the hub on this is to remove the center cap of the wheel, as strange as it sounds, I'll show you why in just a moment. Once you have the center cap out, you'll notice that there's a very large nut in here, it's a 35 millimeter nut, and we're going to loosen that nut. With the wheel on the ground, it'll make it a little bit easier to loosen the nut on the center of the hub. We'll put our 35 millimeter socket on there and we'll use a nice long breaker bar, and hopefully we can crack it loose, just like that.
You can use a jack and jack stands to lift the vehicle in a driveway situation or a garage, but we have a lift to make the video shooting a little bit easier, so we're going to go ahead and raise it up on the lift. Now we can pull the wheel off of the vehicle. Now we're going to finish taking off the 35 millimeter nut. You can spray a little rust penetrant on here to make the nut come off a little easier, and if you live in a climate where there's no rust, it probably won't be an issue. But now we can just spin this nut off with the socket.
So, normally you can just push these axles right out, in our case it's a little bit stuck just because it's a little rusty, so what I'm going to do is I'm going to put the nut back on just a little bit, just so it's flush with the end of the axle, and then I'm going to take a mallet that has rubber on the end, that way I won't damage any of the end of the axle or the nut, and we're going to tap it. There we go, now the axle's loose and we can slip the nut right back off.
We're going to take off the 14 millimeter caliper bracket bolts, right here, with a 14 millimeter wrench. There's the top one, there's the bottom one, you can pull them out by hand after you crack them loose. If the caliper is stuck on there, if you can kind of hang on it like this a little bit and compress the piston, then it'll come right off just like that. Then what you want to do is you want to hang the caliper with some mechanics wire or a bungee cord, that way you won't damage the brake hose right here, 'cause if you just hang it from the brake hose, it will undoubtedly damage it.
Now we're going to take out the two caliper bracket bolts, these are 18 millimeters, so I'll use an 18 millimeter wrench, or you can use an 18 millimeter socket. You can get them loosened up and taking them out. Once you crack them loose, hopefully you can spin them right out. Now you can pull the caliper bracket off with the pads.
Right here we have a T30 Torx bolt holding the rotor to the hub, and we're going to remove that. This has brand new brakes on it, so I know that this bolt is going to come right out, but a lot of the time it'll be rusted in place, and when you try and turn it, the whole thing will spin like this. If that's the case, you can put a wrench on it just like that, and then hold it with one hand and turn it with the other. That will allow you to pull the bolts out, put a little more force on it and get it out in one piece, hopefully. Now we'll pull the brake rotor off, just like that.
Right on the back side of the knuckle is the ABS sensor, so we’re going to put a 10 millimeter socket on it and crack that loose. Then you can pull the bolt right out, just like that. Then with the bolt out, you should be able to just pull the sensor right out of the knuckle, just like that. Now we're going to pull the three bolts out of the hub that go through the knuckle into the hub. We'll start with this easy one on the bottom, it's a 13 millimeter and I'm using an extension and a swivel to try and get in there a little bit easier, on a ratchet.
Up at the top is another 13 millimeter which will also use the short socket, the swivel and the extension to remove. Now we'll do the rearmost bolt, and it looks like the extension's probably not the right tool for this, so we're just going to skip the extension and use the swivel and the 13 millimeter. There's the third one. The hub should be able to be removed from the knuckle now, so we are going to actually hit the back side of it with a hammer to try and release it from its grip. It is coming loose, so I'll tap it from the other side. Try and wiggle it out. There we go. There we are.
Here we have the old hub and the new hub. You can see they're essentially identical; they have the same holes in the same spots. It has the bolt for the rotor, same splines on the inside, the bolts on the backside are also the same, so it's going to mount up and fit properly. It's basically exactly the same in every way and it is going to look and fit and function just like the original one.
Right here you'll see some corrosion, and before we put the new hub in place, we want to get rid of this corrosion that's in here. So, what we're going to do is spray it down with some brake clean, like so, and then we're going to scrub it with our wire brush. Try and get all the corrosion out of there.
Now that we've cleaned the corrosion, I'm going to put a little grease around here, just because I'm going to try and prevent the corrosion in the future and make sure that the bearing goes in nice and smoothly. It's also not a bad idea to put some grease on these splines, that way the splines will go in easily as well.
Now we can put this in place and slide the hub over the axle. Get it lined up as best we can. Then you can take one bolt and slide it into the hole to try and get everything to sit in place. Now we'll slide the upper bolt in and put it in by hand. Then we'll do this front-lower bolt, and we'll put that in by hand as well. Now we can use our 13 millimeter short socket, swivel and extension, to start tightening the bolts up. We'll start with the top one. You want to make sure that you go around and tighten them evenly so that the hub goes in the knuckle straight.
Now we're going to tighten up the three hub bolts to 74 foot-pounds with the torque wrench. Fitting the ABS sensor is very similar, you can come over here and slide the ABS sensor into the hole in the knuckle. On the ABS sensor itself, there is a 10 millimeter screw that needs to be put back in, so we'll put it in by hand first, that way we don't cross-thread anything. Then you can use your quarter drive ratchet and your 10 millimeter to tighten it down. There we are.We can now take the axle nut and thread it on by hand.
Using a 35 millimeter socket and a half inch drive ratchet, we'll tighten it up as much as we can with it off the ground. Now it's tight and we'll be sure to torque it once we get it back on the ground.
Now we're going to reinstall the rotor, being sure to line up this bolt hole with this hole in the rotor. Now we can put this Torx bolt, this is the T30 Torx, we'll thread it in by hand first, then we'll go back and we'll tighten it down with a ratchet and a T30 Torx bit.
Now we can put the caliper bracket on with the brake pads, and we'll take the two bolts, and slide them right through the knuckle and start threading them in by hand. Alright, these two 18 millimeters need to be torqued to 140 foot-pounds, which is quite a lot, so we're going to tighten them up evenly and then torque them.
Now we're going to remove the caliper and the bungee cord. If the caliper piston needs to be compressed, you can compress that with a C-clamp, most likely it's not going to need to be, because when you pulled it off, it should have been fine. So we'll slide it right over and then we'll reinstall the two 14 millimeter bolts that hold the caliper on. Once they're tightened by hand, you can come in here with a torque wrench and torque them to 20 foot-pounds.
We'll slide the wheel over the lugs and then we can come in here and we'll tighten up the lug nuts by hand. Now we'll put the 22 millimeter socket on here with a half inch drive ratchet, and we'll tighten them up as best we can with the vehicle in the air, and then once we get it on the ground, we will tighten it up and torque it properly.
Now we're going to lower the vehicle right back down to the ground. Now we're going to torque the wheel in a cross pattern to 125 foot-pounds.
We're now going to torque the axle nut to 151 foot-pounds, and it's really important to torque this properly and not just use an air gun or something like that, because this actually does put pressure on the bearing, and if you torque it to the wrong spec, it may damage the bearing prematurely. So we're going to go ahead and torque to 151 foot-
pounds. With that torqued, we can now put the GMC center cap right back in wheel.
Thanks for watching. Visit us at 1AAuto.com for quality auto parts, fast and free shipping, and the best customer service in the industry.
Tools used
Hi, I'm Mike from 1AAuto. We've been selling auto parts for over 30 years! We're dedicated to delivering quality auto parts, expert customer service, and fast and free shipping, all backed by our 100% satisfaction guarantee. So visit us at 1AAuto.com, your trusted source for quality auto parts.
In this video we're going to be working with our 2008 Chevy Equinox. We're going to show you how to remove and replace your front strut assembly.
If you like this video, please click subscribe. We have a ton more information on this and many other vehicles. If you need this part for your car you can follow the link down in the description over to 1AAuto.com.
Here are the items you'll need for this repair: socket metric set, ratchet, socket extensions, full wrench metric set, locking pliers, torque wrench, breaker bar, rust penetrant, bungee cords, jack and jack stands
Using a 19mm socket and a breaker bar, break all of your lug nuts loose about one turn to make it easy to get them off once our vehicle is in the air. Raise and support your vehicle. We're using a lift to make it easier to show you what's going on, but this job can easily be done in your driveway or garage at home on a jack and jack stands. Finish removing your lug nuts and remove the wheel and tire from the vehicle.
After removing your wheel and tire, grab on to the steel on the back side of your sway bar with a pair of locking pliers, and remove the 17mm nut with a socket and ratchet. Remove the nut to remove the sway bar link from the strut. You can see where I've grabbed onto it with the locking pliers there. Remove the 13 millimeter bolt securing the flexible brake hose and ABS sensor harness onto the side of the strut. Do this with a 13 millimeter socket and ratchet.
Remove the bolt. Remove the bracket. Using the 15 millimeter open-end wrench on the head of the bolt, because of the style of this bolt we can't use a six-point contact, and a 21 millimeter socket and a breaker bar on the other side, loosen up and remove the two bolts securing the bottom of the strut into the spindle. Now, that bolt head is not turning, so it's possible that these are splines. Sometimes they do that to keep them from turning when you're doing something like this. Where it's so high torque and those splines have been in there for so long it's possible that they will strip out, so it's a good idea to have that wrench handy. We also pretreated these and soaked them in penetrating oil before we started shooting the video to give it some time to soak in and help free that up. I've left this nut flush with the end of the bolt because we're going to use that to safely tap it out without risking damaging the hardware. Once we get it to that point, we'll repeat the same process on the bottom bolt. Now that you have the nut flush with the end of the bolt, we can give it a good tap and not worry about mushrooming the end of the bolt over and making it so the nut won't come off or go back on again. Tap those studs out of the spindle.
You can see on this one, what I was talking about with those splines. Now we'll just start turning these out a little more, and tapping them a little farther, and turning, and tapping until they're completely out of the spindle. Now that those splines are out, you might need that 15 millimeter wrench to hold the bolt while you turn the nut. Now the majority of the tension is off the bolt, so you should be able to just gently tap the end and not worry about pinning that bolt over. Push in a little. You may have to rock the spindle to get the bolt out. Repeat these steps on the bottom. Remove the three 13 millimeter bolts on the top of the strut tower with a socket ratchet and extension. When removing the last bolt, reach down and support the strut. Once the bolts are out you can remove the strut from the vehicle.
Reinstall the strut into the vehicle. Watch out for all the suspension components underneath there when you place it in. You're going to want to keep a bolt in your hand so you can line up the bolt pattern at the top and throw one bolt in, just a couple of threads by hand, to keep it in place while we line up the rest. Once you've got all the bolts started, you can hang the strut there safely while you tighten everything down with your 13 millimeter socket and ratchet. Torque the strut mount bolts to 18 foot-pounds.
Reinstall the spindle into the strut. You may have to lift up on the suspension a little, kind of work it in. Once you have everything lined up, reinsert the bolts with the splines at the front and the threads coming out at the rear of the strut. Now we'll take a hammer and just gently tap the splines back in. Now you'll see that the bolt isn't fully set in, but as long as those splines have got some bite into the spindle, we'll be able to get the nut on and tighten them down in.
Get both nuts started on there and tighten them down with a 21 millimeter socket and ratchet. Torque the nuts to 136 foot-pounds. Reinstall the 13 millimeter bolt that secures the bracket for your flexible brake hose and ABS sensor harness. Make sure that this tab sits over the strut and locks into place. We'll tighten it down with the 13 millimeter socket and ratchet.
Reinstall the sway bar link into the strut. Start the 18mm nut on by hand. Clamp the back with a pair of locking jaw pliers like you did to remove it. Make sure you bite as far back as you can to make sure that you don't prevent it from tightening down fully. We'll snug it up with an 18mm socket and ratchet. Torque the top nut on the sway bar link to 63 foot-pounds.
Remove your locking jaw pliers, and reinstall your wheel and tire. Get all of your lug nuts on as tight as you can by hand. Lower the weight of your vehicle back onto the tires. With the partial weight of your vehicle back on the tires, then tighten up your lug nuts to 100 foot pounds in a cross pattern.
Thanks for watching. Visit us at 1AAuto.com for quality auto parts, fast and free shipping, and the best customer service in the industry.
Tools used
Tools used
Tools used
Tools used
Tools used
Tools used
Tools used
Tools used