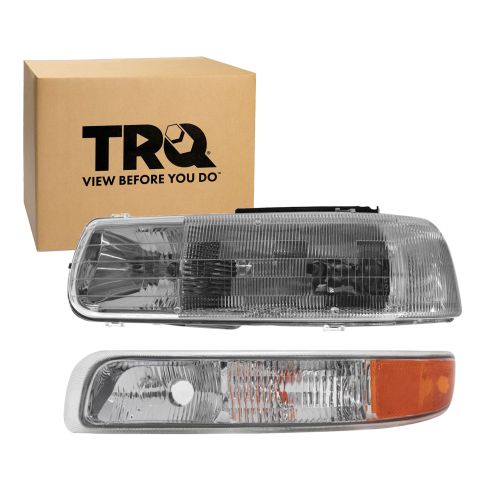
Complete Repair in One Purchase - Stop searching for parts individually and complete your repair with a customized kit or set from DIY Solutions.
High-Quality Parts from Trusted Brands - DIY Solutions' kits and sets are selected from the best automotive brands and include hard-to-find and even obsolete parts you may need for your vehicle.
Guaranteed Fit - DIY Solutions ensures its selected parts are quality-tested to guarantee fit and function.
Assemblies include test bulbs that should be replaced before installation.
Features and Benefits
Direct Fit - No vehicle or wiring modification necessary
DOT, SAE, and FMVSS Compliant - Meets on-road use regulations
Matching set for a restored look
Item Condition:New
Attention California Customers:
WARNING: This product can expose you to chemicals including Chromium (Hexavalent Compounds), which is known to the State of California to cause cancer, and birth defects or other reproductive harm. For more information, go to www.P65Warnings.ca.gov
Lifetime Warranty
This item is backed by our limited lifetime warranty. In the event this item should fail due to manufacturing defects during intended use, we will replace the part free of charge. This warranty covers the cost of the part only.
FREE Shipping is standard on orders shipped to the lower 48 States (Contiguous United States). Standard shipping charges apply to Hawaii and Alaska.
Shipping is not available to a P.O. Box, APO/FPO/DPO addresses, US Territories, or Canada for this item.
Expedited is available on checkout to the United States, excluding Alaska, Hawaii.
Final shipping costs are available at checkout.
How to Replace Parking Light 2000-06 Chevy Suburban
How To Replace Turn Signal Parking Light Assembly 2000-06 Chevy Tahoe
How to Replace Headlights 2000-06 Chevy Suburban 1500
How To Replace Headlight Housing 2000-06 Chevy Tahoe
Created on:
Tools used
Flat Blade Screwdriver
Phillips Head Screwdriver
10mm Socket
Ratchet
1. Removing the Head Light
Push the locking rods from the headlight in and pull them up
Pull the headlight out
Push the parking light tab in
Remove the parking light
2. Servicing the Bulbs
Twist the bulb socket counterclockwise out of the light
Pull the bulb off of the socket
Push on the new bulb
Twist the bulb clockwise into the light
3. Installing the New Parking Light
Push the inner parking light tab into its slot first
Push the parking light into place
Push the lock rods in their slots on the headlight and turn inwards to lock them
Brought to you by 1AAuto.com, your source for quality replacement parts and the best service on the Internet.
Hi, I'm Don from 1A Auto. I hope this how-to video helps you out, and the next time you need a part for your vehicle, think of 1AAuto.com. Thanks.
In this video, we're going to show you how to service the bulbs, as well as replace the entire parking light assembly on this 2002 Chevy Suburban. It's the same part and similar process on these Suburbans from 2000 to 2006. We show you on the passenger's side, but the driver's side is a similar procedure. The items you'll need for this includes new parking lights from 1AAuto.com, a flat blade screwdriver, a Phillips screwdriver, and a 10mm socket and ratchet.
Start off by removing your headlight. To do that, you just push these rods in, and then lift them up and out. Now you can pull your headlight out. Just reach down behind it, and you can see there's a tab right here on the parking light, just push that in, and your parking light will pop out.
To service the bulbs, you just push the tabs on the socket and turn it. It's counterclockwise to remove it. The bulb pulls straight out. You can push your new bulb in and twist it back into place clockwise to lock it. This middle one is the same, and the one on the end, just pulls straight out, bulb pulls out, new one goes in.
Now, to replace the entire assembly, remove all three of your sockets from the light. On the bottom is the old parking light; above it is the identical match from 1AAuto.com and above that is a performance version we offer. Both parking lights will fit exactly the same as the stock parking light.
Now twist your sockets into your new parking light assembly and push this last one in. Then push this tab in first into this slot right here, and then just push the parking light straight back into place. Line up your headlight and push it back into place. Then push those rods back down in, turn them back inwards to lock them, and you're all set.
We hope this video helps you out. Brought to you by www.1AAuto.com, your source for quality replacement parts and the best service on the Internet. Please feel free to call us toll-free, 888-844-3393. We're the company that's here for you on the Internet and in person.
Tools used
Phillips Head Screwdriver
All right. There's these little retainers right here. Slide this out, and slide these straight up. You can grab the light assembly. It slides straight forward. Disconnect the connector right here. There's two tabs. Just slide up on the two tabs, and then the connector comes out, and same with this one. And there's a release clip right there. Just take a long screwdriver, push that down. As you push that down just slide out on the light. And you can push down on these tabs right here, and twist it. Twist the socket counterclockwise, just like that. And this last one, just twists counterclockwise.
And take the light assembly, and put the sockets in, and twist them to the right. Just line it up. And twist it to the right. There we go. And you might have to push the wires back in. You want to slide the front of it in first, and line the clip up, and lock it in place. And you can line it up with the plugs. Connect the bulb, and connect the high beam bulb, and just line this up. And take the pins. Get both pins started first. All right. Push the pins, lock them in place.
Tools used
No Tools Needed
1. Removing the Headlight
Remove the two rods from the headlight bracket
Pull the headlight out by maneuvering it from the grille
Disconnect the two headlight wiring harnesses
2. Servicing the Bulbs
Twist the bulb socket counterclockwise out of the light
Pull the bulb off of the socket
Push on the new bulb
Twist the bulb clockwise into the light
3. Installing the New Headlight
Reconnect the two wiring harnesses to the headlight
Push in the outside end, pull back on the grille, and push in the inside end of the headlight
Slide the two rods into the headlight bracket
Brought to you by 1AAuto.com, your source for quality replacement parts and the best service on the Internet.
Hi, I'm Don from 1A Auto. I hope this how-to video helps you out, and the next time you need a part for your vehicle, think of 1AAuto.com. Thanks.
In this video, we're going to show you how to service the bulbs, as well as replace the entire headlight assembly on this 2002 Chevy Suburban. It's the same part and similar process on these Suburbans from 2000 to 20006. There are no tools required for this procedure.
Just pull out on these rods and then lift them up and out, and now your headlight will pull free. You do have to maneuver it by pulling out on your grill a little bit. Just lift up on these tabs and pull these harnesses free. Now to service the bulb: you just twist the socket counterclockwise and pull it out. Then twist your new one in clockwise to lock it. Both bulbs are the same procedure.
On the left is the old headlight assembly; on the right is the new one from 1A Auto. You can see they're identical, and they're going to fit exactly the same. We also have a couple performance options at 1AAuto.com that will also fit just as well.
Take your new headlight and reconnect those two harnesses. Then push the outside end in first, pull back on your grill, and push in the inside end. Once you have it back in place, you want to just slide that rod back down in. Once the headlights lined up properly, it'll slide right down, and just push it in to lock it. Do the same thing with this one and then you're all set.
We hope this video helps you out. Brought to you by www.1AAuto.com, your source for quality replacement parts and the best service on the Internet. Please feel free to call us toll-free, 888-844-3393. We're the company that's here for you on the Internet and in person.
Tools used
1/4 Inch Socket
E8 Inverted Torx Socket
All right. There's these little retainers right here. Slide these out and slide these straight up. You can grab the light assembly, slide straight forward. Disconnect the connector right here. There's two tabs. Just slide up on the two tabs and then the connector comes out. And same with this one. And there you go. Now with the new light assembly, these are test bulbs so you want to take these out. Replace the bulbs. Twist this to the left, slide it out. And this bulb is HB4U. Slide this in position. Same with this one. This is the high beam. Twist to the left. Slide it out. This bulb is an HB3U. And twist it to the right and you can line it up with the plugs, connect the bulb, and connect the high beam bulb. Just line this up. And take the pins. Get both pins started first. All right. Push the pins, lock them in place. After you're done, you're going to want to make the adjustments. There's an adjuster right here. This one is going to move the headlight sideways left to right and then to go up and down you're going to go down here. You're going to use a E8 socket. It's like a star. You can go down there, and if you don't have an E8 socket, you can actually just use a 1/4-inch socket. That'll work as well. And adjust accordingly.
This is going to be a general tutorial on how to aim your brand new TRQ headlamp assemblies. Okay. So looking at your brand new TRQ headlamp assembly, you're going to see where your low beam is, and you'll see a little dot right in the center. And that is the access point, okay? So what we're going to do is we're going to mark that with an erasable marker just so it's easier to see. Next, what we need to do is measure from the level ground up to this point and take note of that measurement. Now we're just going to pull the car up to our wall. On our vehicle, we remember that the measurement was 28 inches for our access point. Your vehicle may be different, but that's where I'm going to put this tape, just above that 28 inches. We'll do the same on the other side. Okay. So let's just back the vehicle up straight back 25 feet from the wall. And now that we moved our vehicle 25 feet back from the wall, we're going to start with our measurement here. That's where the headlamp center is. We're gonna go down 4 inches on the driver side. On the passenger side, we have our line here. What we need to do is go down 2 inches. To adjust the driver side, we're going to cover our passenger side headlamp. If you look at the backside of your headlamp assembly, you're going to see something that looks like this. This is the adjustment. Some of these headlight assemblies have one, two, or even more of them, but you should at least have one. This is how we're going to adjust the headlight beam. Now we're going to lower the top part of the beam down to just below this line. When you turn the adjustment to the right, it brings the beam up, and if you turn it to the left, it'll bring the headlight beam down. And this is this way on most vehicles. Let's continue on to doing the passenger side. All right. We properly aligned our TRQ headlamp assemblies. Okay. And on the quality TRQ headlamps for a pickup truck, the procedure is going to be the same. You're going to find your center dot, mark it, and then you'll measure from the level ground up to your dot.
So once your headlamps are properly adjusted, it'll be time to adjust your fog lamps. You'll notice on the driver side, the focal point is all the way at the bottom right now. I would like to bring it up so it meets up with approximately the bottom of the focal point of the headlight. Some fog lamps have an adjuster, others don't. The ones that do have an adjuster, you would just turn the adjustment to the left or to the right to adjust the beam up and down to where it needs to be. Now with your TRQ headlamps and fog lamps properly aligned, you can drive down the road safely.
LHT04187
In Stock
Product Reviews
Loading reviews
4.00/ 5.04
4 reviews
5 Stars
4 Stars
3 Stars
2 Stars
1 Star
3
0
0
0
1
Quality products & services
Dennis
July 31, 2018
Ordered complete new lights for my 2002 Tahoe. They arrived on time well packaged & nice quality. Headlight group included new bulbs installed.
Fit Perfectly
Rich
March 26, 2021
Needed a replacement after a minor accident. This product fit just right and matched a 20+ year old truck perfectly. I recommend this product and as well as1Aauto. Their service and products are hard to beat. Thanks guys!!!
Terry
April 26, 2022
Fit like a glove
marc
December 26, 2022
loose does not line up holds water leak leak leak
Customer Q&A
No questions have been asked about this item.
Customer service
877-844-3393
Monday - Friday 8:00am - 9:30pm ET Saturday - Sunday 8:00am - 4:30pm ET