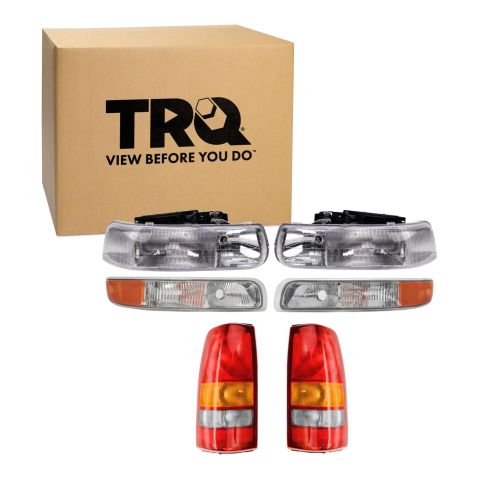
Complete Repair in One Purchase - Stop searching for parts individually and complete your repair with a customized kit or set from DIY Solutions.
High-Quality Parts from Trusted Brands - DIY Solutions' kits and sets are selected from the best automotive brands and include hard-to-find and even obsolete parts you may need for your vehicle.
Guaranteed Fit - DIY Solutions ensures its selected parts are quality-tested to guarantee fit and function.
Assemblies include test bulbs that should be replaced before installation.
Features and Benefits
Direct Fit - No vehicle or wiring modification necessary
DOT, SAE, and FMVSS Compliant - Meets on-road use regulations
Matching set for a restored look
Item Condition:New
Attention California Customers:
WARNING: This product can expose you to chemicals including Chromium (Hexavalent Compounds), which is known to the State of California to cause cancer, and birth defects or other reproductive harm. For more information, go to www.P65Warnings.ca.gov
Lifetime Warranty
This item is backed by our limited lifetime warranty. In the event this item should fail due to manufacturing defects during intended use, we will replace the part free of charge. This warranty covers the cost of the part only.
FREE Shipping is standard on orders shipped to the lower 48 States (Contiguous United States). Standard shipping charges apply to Hawaii and Alaska.
Shipping is not available to a P.O. Box, APO/FPO/DPO addresses, US Territories, or Canada for this item.
Expedited is available on checkout to the United States, excluding Alaska, Hawaii.
Final shipping costs are available at checkout.
How to Replace Tail Lights 2004-06 GMC Sierra
How To Replace Headlight Housing 2000-06 Chevy Tahoe
How To Replace Turn Signal Parking Light Assembly 2000-06 Chevy Tahoe
How to Replace Headlights 2000-06 Chevy Suburban 1500
How to Replace Parking Light 2000-06 Chevy Suburban
Created on:
Tools used
10mm Socket
Ratchet
1. Removing the Tail Light
Lower the tailgate
Remove the two 10mm bolts on the side of the tail light assembly
Pull the light out, twist out the bulbs
Unplug the wiring harness
2. Installing the New Tail Light
Transfer the wiring to the new tail light
Twist in the bulbs
Plug in the wiring harness
Insert the tail light into place
Insert the two 10mm bolts
Close the tailgate
Brought to you by 1AAuto.com, your source for quality replacement parts and the best service on the internet.
Hi, I'm Mike Green. I'm one of the owners of 1A Auto. I want to help you save time and money repairing or maintaining your vehicle. I'm going to use my 20-plus years experience restoring and repairing cars and trucks like this to show you the correct way to install parts from 1AAuto.com. The right parts installed correctly: that's going to save you time and money. Thank you and enjoy the video.
In this video we're going to show you how to replace the taillight, either replace the taillight bulb or the procedure for replacing the entire tail light. The only tool you'll need is a 10mm wrench or a socket wrench with ratchet and maybe a pair of pliers and a flat-blade screwdriver.
Starting with your tailgate, open there are two 10mm bolts on each side for each light. You want to remove those 10mm bolts. We'll just kind of speed through removing those. You can use a 10mm wrench or a socket and ratchet like I have.
Once you have those bolts out, pull it firmly. If you're looking to just change your bulbs, turn them counterclockwise. The socket comes out. The bulbs just pull out of the sockets. Your harness goes down into there. Up underneath you want to unplug your connector. There's a tab right here. You press and unplug. Then the connector is held onto the frame. You have to pull it off. Then this clip here that holds the harness on, you pull that off as well. You can get that from 1A Auto. It comes with everything including a harness and plug.
You see my old light is perfectly fine. I'm not going to go through all that changing out of the harnesses and stuff. To reinstall, I'll move it into place and make sure these tabs go into here and then down there as well. We'll fast-forward again as I thread those bolts in by hand first. I might have to push on the light a little bit to get the holes to line up. Tighten them up with the socket by hand. Then tighten them up firm with the ratchet.
We hope this helps you out, brought to you by www.1AAuto.com, your source for quality replacement parts and the best service on the internet. Please feel free to call us toll free 888-844-3393. We're the company that's here for you on the internet and in person.
Tools used
1/4 Inch Socket
E8 Inverted Torx Socket
All right. There's these little retainers right here. Slide these out and slide these straight up. You can grab the light assembly, slide straight forward. Disconnect the connector right here. There's two tabs. Just slide up on the two tabs and then the connector comes out. And same with this one. And there you go. Now with the new light assembly, these are test bulbs so you want to take these out. Replace the bulbs. Twist this to the left, slide it out. And this bulb is HB4U. Slide this in position. Same with this one. This is the high beam. Twist to the left. Slide it out. This bulb is an HB3U. And twist it to the right and you can line it up with the plugs, connect the bulb, and connect the high beam bulb. Just line this up. And take the pins. Get both pins started first. All right. Push the pins, lock them in place. After you're done, you're going to want to make the adjustments. There's an adjuster right here. This one is going to move the headlight sideways left to right and then to go up and down you're going to go down here. You're going to use a E8 socket. It's like a star. You can go down there, and if you don't have an E8 socket, you can actually just use a 1/4-inch socket. That'll work as well. And adjust accordingly.
This is going to be a general tutorial on how to aim your brand new TRQ headlamp assemblies. Okay. So looking at your brand new TRQ headlamp assembly, you're going to see where your low beam is, and you'll see a little dot right in the center. And that is the access point, okay? So what we're going to do is we're going to mark that with an erasable marker just so it's easier to see. Next, what we need to do is measure from the level ground up to this point and take note of that measurement. Now we're just going to pull the car up to our wall. On our vehicle, we remember that the measurement was 28 inches for our access point. Your vehicle may be different, but that's where I'm going to put this tape, just above that 28 inches. We'll do the same on the other side. Okay. So let's just back the vehicle up straight back 25 feet from the wall. And now that we moved our vehicle 25 feet back from the wall, we're going to start with our measurement here. That's where the headlamp center is. We're gonna go down 4 inches on the driver side. On the passenger side, we have our line here. What we need to do is go down 2 inches. To adjust the driver side, we're going to cover our passenger side headlamp. If you look at the backside of your headlamp assembly, you're going to see something that looks like this. This is the adjustment. Some of these headlight assemblies have one, two, or even more of them, but you should at least have one. This is how we're going to adjust the headlight beam. Now we're going to lower the top part of the beam down to just below this line. When you turn the adjustment to the right, it brings the beam up, and if you turn it to the left, it'll bring the headlight beam down. And this is this way on most vehicles. Let's continue on to doing the passenger side. All right. We properly aligned our TRQ headlamp assemblies. Okay. And on the quality TRQ headlamps for a pickup truck, the procedure is going to be the same. You're going to find your center dot, mark it, and then you'll measure from the level ground up to your dot.
So once your headlamps are properly adjusted, it'll be time to adjust your fog lamps. You'll notice on the driver side, the focal point is all the way at the bottom right now. I would like to bring it up so it meets up with approximately the bottom of the focal point of the headlight. Some fog lamps have an adjuster, others don't. The ones that do have an adjuster, you would just turn the adjustment to the left or to the right to adjust the beam up and down to where it needs to be. Now with your TRQ headlamps and fog lamps properly aligned, you can drive down the road safely.
Tools used
Phillips Head Screwdriver
All right. There's these little retainers right here. Slide this out, and slide these straight up. You can grab the light assembly. It slides straight forward. Disconnect the connector right here. There's two tabs. Just slide up on the two tabs, and then the connector comes out, and same with this one. And there's a release clip right there. Just take a long screwdriver, push that down. As you push that down just slide out on the light. And you can push down on these tabs right here, and twist it. Twist the socket counterclockwise, just like that. And this last one, just twists counterclockwise.
And take the light assembly, and put the sockets in, and twist them to the right. Just line it up. And twist it to the right. There we go. And you might have to push the wires back in. You want to slide the front of it in first, and line the clip up, and lock it in place. And you can line it up with the plugs. Connect the bulb, and connect the high beam bulb, and just line this up. And take the pins. Get both pins started first. All right. Push the pins, lock them in place.
Tools used
No Tools Needed
1. Removing the Headlight
Remove the two rods from the headlight bracket
Pull the headlight out by maneuvering it from the grille
Disconnect the two headlight wiring harnesses
2. Servicing the Bulbs
Twist the bulb socket counterclockwise out of the light
Pull the bulb off of the socket
Push on the new bulb
Twist the bulb clockwise into the light
3. Installing the New Headlight
Reconnect the two wiring harnesses to the headlight
Push in the outside end, pull back on the grille, and push in the inside end of the headlight
Slide the two rods into the headlight bracket
Brought to you by 1AAuto.com, your source for quality replacement parts and the best service on the Internet.
Hi, I'm Don from 1A Auto. I hope this how-to video helps you out, and the next time you need a part for your vehicle, think of 1AAuto.com. Thanks.
In this video, we're going to show you how to service the bulbs, as well as replace the entire headlight assembly on this 2002 Chevy Suburban. It's the same part and similar process on these Suburbans from 2000 to 20006. There are no tools required for this procedure.
Just pull out on these rods and then lift them up and out, and now your headlight will pull free. You do have to maneuver it by pulling out on your grill a little bit. Just lift up on these tabs and pull these harnesses free. Now to service the bulb: you just twist the socket counterclockwise and pull it out. Then twist your new one in clockwise to lock it. Both bulbs are the same procedure.
On the left is the old headlight assembly; on the right is the new one from 1A Auto. You can see they're identical, and they're going to fit exactly the same. We also have a couple performance options at 1AAuto.com that will also fit just as well.
Take your new headlight and reconnect those two harnesses. Then push the outside end in first, pull back on your grill, and push in the inside end. Once you have it back in place, you want to just slide that rod back down in. Once the headlights lined up properly, it'll slide right down, and just push it in to lock it. Do the same thing with this one and then you're all set.
We hope this video helps you out. Brought to you by www.1AAuto.com, your source for quality replacement parts and the best service on the Internet. Please feel free to call us toll-free, 888-844-3393. We're the company that's here for you on the Internet and in person.
Tools used
Flat Blade Screwdriver
Phillips Head Screwdriver
10mm Socket
Ratchet
1. Removing the Head Light
Push the locking rods from the headlight in and pull them up
Pull the headlight out
Push the parking light tab in
Remove the parking light
2. Servicing the Bulbs
Twist the bulb socket counterclockwise out of the light
Pull the bulb off of the socket
Push on the new bulb
Twist the bulb clockwise into the light
3. Installing the New Parking Light
Push the inner parking light tab into its slot first
Push the parking light into place
Push the lock rods in their slots on the headlight and turn inwards to lock them
Brought to you by 1AAuto.com, your source for quality replacement parts and the best service on the Internet.
Hi, I'm Don from 1A Auto. I hope this how-to video helps you out, and the next time you need a part for your vehicle, think of 1AAuto.com. Thanks.
In this video, we're going to show you how to service the bulbs, as well as replace the entire parking light assembly on this 2002 Chevy Suburban. It's the same part and similar process on these Suburbans from 2000 to 2006. We show you on the passenger's side, but the driver's side is a similar procedure. The items you'll need for this includes new parking lights from 1AAuto.com, a flat blade screwdriver, a Phillips screwdriver, and a 10mm socket and ratchet.
Start off by removing your headlight. To do that, you just push these rods in, and then lift them up and out. Now you can pull your headlight out. Just reach down behind it, and you can see there's a tab right here on the parking light, just push that in, and your parking light will pop out.
To service the bulbs, you just push the tabs on the socket and turn it. It's counterclockwise to remove it. The bulb pulls straight out. You can push your new bulb in and twist it back into place clockwise to lock it. This middle one is the same, and the one on the end, just pulls straight out, bulb pulls out, new one goes in.
Now, to replace the entire assembly, remove all three of your sockets from the light. On the bottom is the old parking light; above it is the identical match from 1AAuto.com and above that is a performance version we offer. Both parking lights will fit exactly the same as the stock parking light.
Now twist your sockets into your new parking light assembly and push this last one in. Then push this tab in first into this slot right here, and then just push the parking light straight back into place. Line up your headlight and push it back into place. Then push those rods back down in, turn them back inwards to lock them, and you're all set.
We hope this video helps you out. Brought to you by www.1AAuto.com, your source for quality replacement parts and the best service on the Internet. Please feel free to call us toll-free, 888-844-3393. We're the company that's here for you on the Internet and in person.
LHT04277
In Stock
Product Reviews
Loading reviews
4.32/ 5.031
31 reviews
5 Stars
4 Stars
3 Stars
2 Stars
1 Star
20
6
2
1
2
Worked great except for one thing
Jody
May 30, 2018
The lights were ordered and delivered promptly. The headlights and turn lights installed easily.
Everything had the proper form, fit and function.
The only issue was the center turn light on the taillights. Usually when you install the lamp it's a 90 degree turn to install. These had to be installed 180 degrees out and then turned past the notches to lock into place.
No biggie. Just took time to figure out.
One suggestion. The headlights came with new lamps, the rest I had to go to auto store and buy. Maybe include them with the item.
Tail lights were defective
G
May 31, 2018
1A Auto did an excellent job correcting my order. It was not their fault the tail lights were defective from the manufacturer.
I will do business with them again.
Thanks for the great service.
Greg in Pawleys Island SC
Head light/tail lights for a 2000 Chev 1500
Larry
September 15, 2019
Had them installed at a auto repair shop while other work was being done. The mechanic and the office person both commented as to their quality and ease of installation.
Thanks for selling great products.
Affordable, decent bundle, OEM look alike.
J
November 23, 2019
Lighting kit came within a week. Looks just like the original. Came with High/low beam lamps. Affordable and well priced. I would buy them again.
1ALHT00261-Chevy Lighting Kit 6 Piece Set
Jeff
November 25, 2019
All light assemblies fit as asdvertised. Very easy installation.All work well.
Easy Install
Jerry
December 2, 2019
Lights look good and easy to install, we will see how they stand up to the UV rays.
Headlights an taillights
B
December 15, 2019
We replaced the headlights and taillights on our 2000 Chevy Silverado. Items received on time and were packaged well! Didnt take long to switch out the old with the new! Much nicer driving at night now! Thanks
Light set
W
January 26, 2020
Great fit and looks great, very satisfiedWrite
Easiest fix ever.
T
May 7, 2020
I was a little concerned given the price difrence, but was I wrong.
Unit slide right in and even came with new headlight bulbs attached.
Great price and got all 6 assemblies 4 front 2 rear for $200.00. WOW!!
HIGHLY RECOMMENDED.
Great parts
D
June 30, 2020
I recieved my parts about two weeks ago and installed 5 of the 6 within. 15 minutes. The parts where a exact fit.The 6the one was the wrong side.I called and of course being a Saturday the warehouse had just closed.But after one call and one email with pictures of the wrong part.I received the correct one within 3 days.And it to fit perfectly. I will definitely or from 1a auto again.
2002 Chevy light ki
Kirk
October 21, 2020
My 6 puce light kit fit great and was here quickly. I would use you again in the future. Thanks
2002 Chevy Silverado lights
M
October 31, 2020
I love the fact that you guys have parts fit just like the originals you're the only place I go for parts now 100% satisfied with you guys customer care service technical support and I love your online videos for the best ones I've seen professionalism and details and showing and telling what tools and parts I need to do the job right is perfect for the things I need to do with my vehicles thank you
seeing clearly
K
November 6, 2020
I feel this is a good value for 6 lights. Easy install factory replacement lights
2001 Chevy HD
M
November 20, 2020
All the lights seem good quality. Time will tell if they stay sealed and keep moisture out.. Price was pretty decent
as well. The tailgate bezel seemed to be cracked in the tension tabs. Once I got it fastened in it appeared cracked on one of the tabs. Hopefully it will stay in place with the other tab..
Good Replacement of OEM
Larry
November 24, 2020
All the parts are good quality with good fit on a 2002 Chevy 2500 HD Silverado. The driver's side headlight took some "persuasion" to seat a retaining pin.
2001 1500hd light replacement
Daniel
December 8, 2020
All 6 lights, head lights. Signal lights and tail lights were excellent! They installed quick and easily and amazing difference in the light they projected !
Cool
Steve
September 27, 2021
Worth every dollar.....great improvement !!!!!
Works for me
Eugene
October 13, 2021
Fit is good and a whole lot better than what I had!
Doug
October 29, 2021
Nice pieces, look great.
Professional, responsive and fair.
Damon
November 13, 2021
I have no complaints with their products or service. The parts all fit really well. Unfortunately, the six part set had tail lights not compatible for my Fleet Side 1500. The picture clearly showed this and I missed it. My recommendation is to send them your VIN and part pictures so they can ensure consistency. Im absolutely certain your dealings with 1A Auto will be easy and pleasurable if you take my recommendation. They are very professional and fair.
allen
December 27, 2021
Nice,easy install..
DAVID
May 21, 2022
this kit is great.
Great fit and look good
Robert
June 13, 2022
I ordered a full set of replacement lights for my older 2001 Chevy pickup. They all fit with out any modifications and look good. As mentioned they did come with headlights but, they are no good. You need to use your own existing lights or plan on buying new ones.
Buy the lights, dude!
Stephen
July 16, 2022
Im really glad I ordered these. I didnt encounter any problems and the fitment worked out fine. Make sure you order a new third brake light to tie it all together.
Austin
July 27, 2022
Marker light leaks has water
Kirk
September 18, 2022
very good
2001 SILVERADO 2500 HEAD LIGHTS
David
October 10, 2022
SUPER SIMPLE INSTALL, ONLY TOOK ABOUT 20 MINTUES TO DO THE WHOLE KIT! MAJOR IMPROVEMENT
Leaks less than a week after install
Patricia
October 18, 2022
One of the parking lights is leaking less than a week after installation. I bought from this company thinking they would have decent quality
Kevin
November 6, 2022
The light kit fit perfectly I have no problems with it easy to install looks beautiful works great thank you very much
2002 chevrolet silverado 2500 hd. 4 pc replacement headlights.
[{"url": "https://wac.edgecastcdn.net/001A39/prod/media/pNISJll75W64CYGsite/5119495124fcd2f5c9992d3d23fb3b0e_1667844808958_0.jpeg", "caption": "Leaking assembly -lower"}, {"url": "https://wac.edgecastcdn.net/001A39/prod/media/pNISJll75W64CYGsite/7a33277043b18c3ed26f23f1c9d049f1_1667844808958_1.jpeg", "caption": "Drivers side is sealed correctly"}]
Rodney
November 7, 2022
1st off, adjusters and frames are junk. Had to retro fit my old frames and adjusters. Tried ones that came with new lights, headlights were vibrating when driving. Mounts not rigid, too flexible. Lower driving and blinker assembly always gets moisture in it when rains or carwash. Not sealed correctly.
2001 Chevy light kit
Ryan
March 5, 2023
Might of been that I didn't read the description thoroughly or it wasn't on there but the only lights that came with bulbs was the headlights. I was expecting each one to have bulbs with them. Other than that I am very satisfied with my purchase. They fit perfectly and had no issues. Thanks
Customer Q&A
the lower headlights with the daytime running lights what is the light on the inside right below the high beams?September 15, 2019
David K
10
The blinkers it has a orange bulb in the clear part
September 16, 2019
M B
10
Thats the turn signal light. An orange bulb will go in there.
September 16, 2019
Tawnya R
10
I believe it is the fog light that is optional equipment..my HD2500 doesnt have the fog light switch so that bulb doesnt come on. Theres potential that its used in the automated low light condition that is standard equipment but Im not sure of that.
September 16, 2019
Michael C
10
The inner bulb is a DRL, the middle bulb is a turn signal lamp, and the outer bulb is a side marker lamp.
September 17, 2019
M N
10
That is the DRL. The one under the low beam is the turn signal. The orange part is the side marker bulb.
September 19, 2019
Sam C
Will this set fit a step side ?October 6, 2019
Darrell B
10
This set is only correct for the Fleetside bed. Thank you for the inquiry!
October 6, 2019
Andra M
Are these new lenses?July 25, 2020
L E
10
Yes they are brand new
July 26, 2020
Fidel A
10
Thank you for your inquiry, Gary. Yes these lenses are brand new, just like all of the parts we sell!
July 28, 2020
T I
Has any had these for a while? Just wanted to know how they are holding up and do the get moisture inside like the OEMs do!September 20, 2020
Brian C
10
Thank you for the inquiry. These lights have a very low return rate. If we do hear from customers with moisture issues it is because they did not replace the bulbs when installing these. Our lights, if bulbs are included were put in by the vendor for testing purposes only and should be replaced before install.
September 23, 2020
Christa R
Customer service
877-844-3393
Monday - Friday 8:00am - 9:30pm ET Saturday - Sunday 8:00am - 4:30pm ET