Replaces


Frequently bought together
Part Details
Product Features
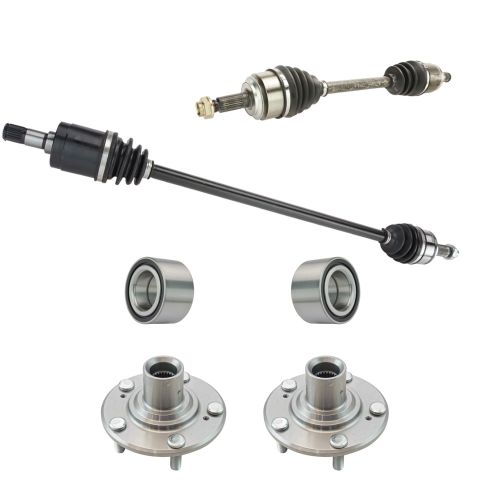
TRQ drivetrain kits are manufactured using premium raw materials to restore original performance. Each TRQ drivetrain component is designed to be a direct, maintenance-free replacement to the stock unit. To extend the service life of your drivetrain, TRQ recommends replacing wheel hubs, bearings, and constant velocity (CV) drive axles at the same time to ensure even wear of components and improved ride comfort. All products are fit and road-tested in our Massachusetts R&D facility to ensure we deliver on our promise of Trusted Reliable Quality.
CV axles are designed to transmit the power from your vehicle's drivetrain to the wheels while being able to flex and pivot to the demands of the steering and suspension systems. If your vehicle is making clicking noises at lower speeds or when making turns, it may be time to replace your CV axles with our 100% brand new assemblies.
Our steering and suspension components are pre-greased and sealed for long life and do not require the extra maintenance typically required by greaseable versions.
Attention California Customers:
 WARNING: This product can expose you to chemicals including Lead and Lead Compounds, which are known to the State of California to cause cancer, and birth defects or other reproductive harm. For more information, go to www.P65Warnings.ca.gov.
Lifetime Warranty
This item is backed by our limited lifetime warranty. In the event that this item should fail due to manufacturing defects during intended use, we will replace the part free of charge. This warranty covers the cost of the part only.
FREE Shipping is standard on orders shipped to the lower 48 States (Contiguous United States). Standard shipping charges apply to Hawaii and Alaska.
Shipping is not available to a P.O. Box, APO/FPO/DPO addresses, US Territories, or Canada for this item.
Expedited is available on checkout to the United States, excluding Alaska, Hawaii.
Final shipping costs are available at checkout.

Created on:
Tools used
Hi, I’m Mike from 1A Auto. We’ve been selling auto parts for over 30 years!
With the vehicle on the ground, I'm going to use a 19 millimeter socket and a breaker bar to loosen the lug nuts. With the lug nuts loosened, now we're going to raise and support the vehicle. With the lug nuts loosened, I should be able to use just the socket and finish removing them. Then I can take the wheel off. All right, last lug nut removed, I can take the wheel off.
You need to remove the axle nut. It's been staked in place. Going to take an old flathead screwdriver that fits in the opening. I'm just going to tap it in to bend that metal out. If you do have someone that can help you, they can get inside the car and step on the brake and hold this to keep it from spinning while you remove it. Or you can take your wheel, pop the cap out, reinstall the wheel, lower the car back down, and then with the vehicle on the ground, we can loosen the axle nut through the opening on the wheel.
I'm just going to install the lug nuts. These don't have to be torqued, just loosely tightened down so the wheel doesn't move, because we're only going to put the car down on the ground. We're not going to drive it anywhere. Lower the vehicle back down to the ground. Alright, with the vehicle on the ground, I'm going to use this 32 millimeter socket and a breaker bar, and we will loosen the axle nut. See how loose it is.
All right, now I can put the car back up in the air and take the wheel off. With this axle nut loosened, I'm going to remove the wheel again. You can loosen the bolts and the two nuts and the studs holding the lower ball joints and control arm. Once these are loose, you can swing the whole knuckle brake suspension assembly out and away from the axle. This will allow us to remove it from the transmission.
This is a 17 millimeter socket and a breaker bar I'm going to use to loosen these. Get them all loosened first. Now I'm going to take a pry bar and just pry the lower ball joint apart from the control arm. Pop it out like that. Make sure this nut is loosened up. I want to make sure that this axle will come out of the hub assembly, so I just take a dead blow mallet and just tap it. It's going to move pretty freely.
We got lucky with this one. Just tap it some more, but it should come free. That's going to come right out. I'm going to grab hold of the knuckle assembly, and the whole suspension assembly, put one hand on the axle and just guide this off. Just push it out like that. Lay the axle aside over here. We're going to put a drain pan in place because when I pop this axle shaft out of the transmission, some transmission fluid may leak out. I'm going use a pry bar to reach up underneath the joint. You don't want to pull on the joint; you want to pry on it carefully over here. Work that in. There it is. I'm going to try to pull it out as straight as possible not to damage the transmission seal. Let's see here. There we have our axle.
Here's the original one from our vehicle, and a brand new one from 1AAuto.com. No core charge on this. It’s similar in design. Same style splines and snap ring. It has the same outer splines and same style locking nut. This should fit great and work great in our vehicle.
Take our new axle shaft and guide it up into the opening of the transmission. Bend it a little bit. Guide it in, and do not nick the seal. You can kind of turn it in a little bit. It will find the splines and slide in. Get that in place. You need to seat it in the transmission so it feels like it's caught on the splines. Yup, it's caught on the splines. I've got the axle nut out here. Take our dead blow mallet, give it some taps, and that will drive into the transmission. Then I can see it's seated itself.
I'm just going to grab our suspension assembly, just pull it aside. Lay that down for now. Take this axle nut off now. Keep it nearby. Take our suspension assembly, push it out. Take our axle, line it up. It should slide right in there. Spin this and get the splines to line up. There it is. Take out our axle nut and just capture it so it doesn't back out. Then I need to reinstall the ball joint into the lower control arm. Push this arm down, pull this over. I'm just going to use a pry bar to get in here, pry this down. Get those in place. I have to move it a little bit. Okay, caught. Tighten down.
Use a ratchet just to bring these down snug. There is an order to torque these down. The torque will be 43 foot pounds. You'll start with the front nut, the rear nut, and then the bolt. Take our axle socket and just snug this axle nut down. I'm going to spin this so this is facing up because I'm going to put the wheel on it, I'm going to torque it, and then I want to be able to punch it down where I can reach it.
Reinstall the wheel. Use the socket, snug these up. Put the vehicle back down. I'm going to torque the lug nuts first to 80 foot pounds using a cross pattern. Now we've got a torque wrench and our 32 millimeter socket. The torque wrench is set to 134 foot pounds to torque the axle nut. Now with the axle nut torqued, we need to stake it in place. I'm going to take a punch and a hammer and fold it into that little opening in the axle shaft. You don't have to go too crazy. Finally, reinstall your center cap by just pushing it in.
Thanks for watching. Visit us at 1AAuto.com for quality auto parts, fast and free shipping, and the best customer service in the industry.
Tools used
Hi, I’m Mike from 1A Auto. We’ve been selling auto parts for over 30 years!
Use a 19 millimeter socket and a breaker bar to loosen the lug nuts while the vehicle's on the ground. Raise and support the vehicle. These lug nuts loose, I can take just a socket and remove them all. I'll put the wheel and tire aside. We need to unstick the axle nut. So I can actually turn the whole assembly up this way.
Take a screwdriver that fits in here, or a punch. This is an old screwdriver. Just going to pump it in here. Just pry it up a little bit—it doesn't take much. You just need to make it so that this will now turn. Looks like somebody's punched it down here. It shouldn't be too much of a problem though.
Going to reinstall the wheel and then lower the vehicle to the ground to loosen the axle nut. If you've got somebody to help you, you can have them put their foot on the brake and keep this from turning while you try to remove the axle nut. Or, if you're working by yourself, you can do this with the wheel. So just flip it around, take the end of a hammer or a screwdriver, and just pop out this cap. We'll put that aside and put the wheel back on. Just got to thread the lug nuts back on. They don't have to be super tight. We’re just going to lower it back down to the ground so the wheel is going to hold the axle for us. And then we can loosen the nut.
We're going to lower the vehicle back down to the ground. Take a 32 millimeter socket and a large breaker bar and free up this axle nut. Now we can put it back up in the air and take the wheel off. Just going to remove the wheel again. Take some rust penetrant, just spray these before I remove them. Just using the towel so it doesn't drip all over the floor, spray the top of that bolt. There's two nuts and a bolt that needs to be removed. Using a breaker bar and a 17 millimeter socket, loosen these nuts and the bolt. These are on there pretty tight, so I switched to a bigger breaker bar for more leverage. That's all it needed. I just switched to a ratchet to make removing these quicker.
Need to separate this lower ball joint from the control arm. Put a pry bar in here, and pry it up through here. There you go. Actually easier to push it towards the back of the car. Let's see. Put the pry bar in here. I'm struggling a bit to get this out of here because the axle shaft hasn't been pushed out of the hub yet, so I'm just going to thread out the nut a bit. If you get a punch, you can hit it right in this little center hole. If not, just thread the nut out and use a dead blow hammer. That should start to move.
You don't want to hit directly on the end of the axle shaft in case you mushroom it out, and then it won't come out of the hub. That's why you want to hit on the nut. I'm going to take the nut out now. That seems like that's going to move. Go back to our pry bar and the lower control arm. Pry this down and pull the suspension assembly out. Grab on the axle shaft here, push out, rip it out like that, and we'll just let that sit just like that.
A drain pan ready for any transmission fluid that might drip out when we remove the axle from the transmission. So goes into the transmission up here. Going to use this pry bar and slide it underneath the edge of this. Going to pop it out. Just kind of pry it out. Free from the transmission, you want to pull it straight out. This is kind of in the way. It's pushing on it, so you got to push that up, kind of lift this out. You might have to reach in under here and grab the axle shaft with the other hand and just guide it out. You want to come out as straight as possible as to not damage the seal on the transmission. And just guide this out from underneath the car. It's really big.
Here's our original axle shaft, and our brand new one from 1AAuto.com. There's no core charge to this. A similar design, has the same splines and circle clip. Follow it out, the outer part is the same on both, comes with a new axle nut, which should fit in the vehicle and work great for you.
Going to guide the axle shaft into the engine compartment, being careful not to rip the boot. Have to reach in with your hands and guide it in. I'm going to go underneath here and look at the transmission opening and the seal. I want to guide it in nice and straight so I don't damage the seal. I'm happy that those splines are lined up in the transmission. Going to take our axle shaft and a dead blow mallet with a nut on the end. If I can see where it's going on the transmission, I'll give it some taps to seat it. And there it is. Seated in place. Take the axle nut off, put this aside.
Put the CV axle into the hub. Just going to pull it out with my arm and might have to bend this a bit, like that. And then take a little bit of pushing and strength. Just going to line this up. Might have to spin this a little bit. It's lined up nicely. Actually, pull it out a little bit. And now I want to spin this this way because I need to lower this.
I'm going to use the pry bar and lower the pry bar and push down on the lower control arm, and spin this up, get it kind of lined up. See if we can tap it up a little bit. Let's see. There you go. I'm just going to capture the new axle nut on here so the axle doesn't back out of the hub. Install the bolt. Install which ever one's easier.
If it's easier to install these nuts first and pull the ball joint down; if it's easier to afterwards install this bolt, either way will work. Just going to spin them down. Just going to use the ratchet to snug these down. With these snugged down, I can torque them to 43 foot-pounds. I'm going to start with the front nut, the rear nut, and then the bolt. I'm just going to use the socket with the axle nut, and just snug this down with the ratchet.
Going to reinstall the wheel, still with our center cap removed, because with the wheel and tire on the ground, we'll torque the axle nut and then stake it in place. Torque the lug nuts in a cross pattern to 80 foot-pounds. Now I'll torque the axle nut to 134 foot-pounds. Now we need to punch the nut down into this opening in the axle that will lock it and keep it from spinning off. That's better. That's where I wanted it. Finally, reinstall your center cap, just pops into place.
Thanks for watching. Visit us at 1AAuto.com for quality auto parts, fast and free shipping, and the best customer service in the industry.

CSA80105