Replaces


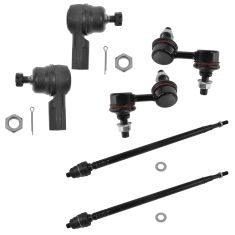
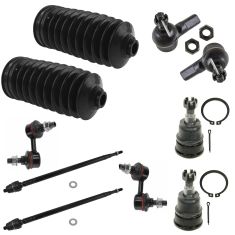
Part Details
Specifications
About TRQ:
TRQ is a trusted brand dedicated to making every repair a success story by combining premium parts with easy installation. Each TRQ part is engineered by a team of automotive experts to meet or exceed OEM standards, delivering enhanced performance and maximum longevity. With rigorous in-house testing, the brand ensures superior fit and function across every product line. TRQ also provides customers with best-in-class, step-by-step installation videos—so you can complete repairs with confidence, whether you're a first-time DIYer or an industry professional.
Our steering and suspension components are pre-greased and sealed for long life and do not require the extra maintenance typically required by greaseable versions.
Attention California Customers:
 WARNING: This product can expose you to chemicals including Lead and Lead Compounds, which are known to the State of California to cause cancer, and birth defects or other reproductive harm. For more information, go to www.P65Warnings.ca.gov.
Lifetime Warranty
This item is backed by our limited lifetime warranty. In the event that this item should fail due to manufacturing defects during intended use, we will replace the part free of charge. This warranty covers the cost of the part only.
FREE Shipping is standard on orders shipped to the lower 48 States (Contiguous United States). Standard shipping charges apply to Hawaii and Alaska.
Shipping is not available to a P.O. Box, APO/FPO/DPO addresses, US Territories, or Canada for this item.
Expedited is available on checkout to the United States, excluding Alaska, Hawaii.
Final shipping costs are available at checkout.

Created on:
Tools used
Hi, I'm Mike from 1A Auto. We've been selling auto parts for over 30 years!
Hi, everyone. Sue here from 1A Auto. Today, on our 06 Honda Element, I'm going to show you how to replace front sway bar links. If you need those parts or any other parts for your car, click on the link below and head on over to 1aauto.com.
To remove the tire, you need a 19 millimeter socket. The vehicle has weight on it so that I can loosen up each lug nut as I go around. I'm using a two post lift. At home, you can use jack and jack stands. Now, I have it up in the air, I'm just going to remove all the lug nuts. Beautiful. We can discard the hubcap.
14 millimeter wrench and a number five Allen head socket, and I'm going to put the 14 millimeter wrench on the sway link nut, and then I'm going to install the Allen head in the stud with the cut out, and I'm going to loosen up. You get yourself at a good spot and you feel like a ratchet wrench is going to work, then you can move on to that. Take the Allen head socket off and you should be able to get this right off. I'm going to take a pry bar and see if can pull that right out of the cut out. There we go. Nice.
I'm going to break the inner nut free on that sway bar link. It's a 14 millimeter like the lower. There we go. Now we can put the Allen head, which is a number five Allen head socket. Put it right in the center. There's not much room for the ratchet, I mean for the wrench. I'll use the ratchet to back that off. There you have it. Here we go. There is the sway bar link.
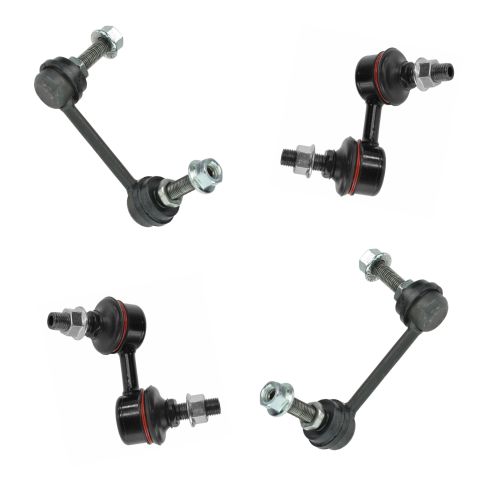
Here we have our new sway bar link for the front of our 06 Honda Element from 1A Auto. And, here we have the factory sway bar link that I just took out. They're both a sealed units. They both have no grease fittings. They're both offset, so there is a left and a right for the front. The new ones from 1A Auto come with lock nuts. You can see how they're oval shaped to make sure they go on one at a time, and that's it. The difference is the factory has an Allen hole, so you put the nut on, and obviously the spindles that spin, and then you got to put Allen head in there and mess with that. The new upgrade from 1A is a wrench. You put a 14 millimeter wrench on the inside, a 14 millimeter there, and you can hold that stiff, tighten that down the way you want to and not have to worry about a stripped hole on the Allen head. If you need this part or any other part for your car, click on the link below, and head on over to 1aauto.com.
I'm going to put my new sway bar link in. I'm going to put in the bar first, and I'm going to start the nut in the back. You can only go on so far with the your hands, because of the oval shape to it. It's oval. That's the way it's made from the factory, so that it locks down and doesn't fall of on you. So, 14 millimeter wrench to hold the inside of the stud, and a 15 millimeter socket go on the lock nut. I'm just going to start tightening up.
Okay, the torque specs on these sway bar links is the nut on the sway bar itself is 16 foot pounds, and the nut on the control arm is 29 foot-pounds. I don't make it. I just read it. Let's see if I can get the wrench back on there. That's tight. I'm going to take a pry bar and I'm going to slide it up through here so that I can lift that up and line up the sway bar. Beautiful. Put the new nut on. I'm going to tighten this down. Now, we're going to torque the nut to 29 foot pounds.
Mount the tire again. The reason why I put the tire on before I tighten the top of the strut is because I want the weight of the vehicle on the suspension to ensure that I'm not pulling up on that cap, the strut cap, and that can warp the studs on the outer edge. I want the vehicle weight down holding it up, and then I can get a true torque and tightening of it. Grab your hubcap, because this particular Honda does not have extra wide cut outs for three lug nuts. Set the rim up on the hub and put your lug nuts on. The wheel torque, now I've got the weight of the vehicle down on the tire, and I'm going to torque up the wheels. The wheel torque in a factory's spec is 80 foot pounds.
Thanks for watching. Visit us at 1aauto.com for quality auto parts, fast and free shipping, and the best customer service in the industry.

PSA55841