Replaces
This part doesn’t fit a . Select from parts that fit.
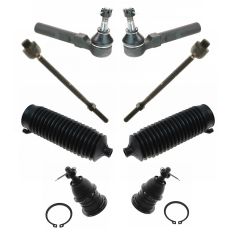
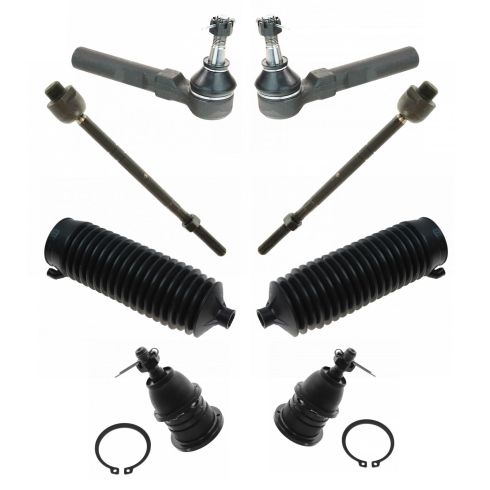
Frequently bought together
Part Details
TRQ suspension kits are manufactured using premium raw materials and coatings for extended service life. Each TRQ suspension component is designed to be a direct, maintenance-free replacement to the stock unit. To extend the life of your steering and suspension components, TRQ recommends replacing components in pairs, sets, or kits. All products are fit and road-tested in our Massachusetts R&D facility to ensure we deliver on our promise of Trusted Reliable Quality.
Product Features
Install Tip: When replacing steering components, have a professional alignment performed afterwards. This ensures proper tracking and even tire wear.
Our steering and suspension components are pre-greased and sealed for long life and do not require the extra maintenance typically required by greaseable versions.
Item Condition:
New
Attention California Customers:
 WARNING: This product can expose you to chemicals including Lead and Lead Compounds, which are known to the State of California to cause cancer, and birth defects or other reproductive harm. For more information, go to www.P65Warnings.ca.gov.
Lifetime Warranty
This item is backed by our limited lifetime warranty. In the event that this item should fail due to manufacturing defects during intended use, we will replace the part free of charge. This warranty covers the cost of the part only.


Created on:
Tools used
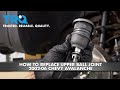
All right. So one of the first things you need to do is safely raise and support the vehicle. Once you've done that, you're gonna remove all six of your lug nuts. Remove your wheel. Now what we're gonna do is we're gonna get the ABS wire out of the way. The last thing we wanna do when we're doing any of the work on this upper control arm is to put a tug or damage this in any way. If you were to follow it up, you'll be able to see right where the connector is. I'm gonna remove that connector from the frame using my forky tool. Pull it down to where you can see it. Grab this tab. Lift it. Pull it off. These right here, you can remove. Just use a small pocket screwdriver or whatever you might have. Get right in between this area right there. We'll do the same down the line. Let's work on getting this brake hose off of the control arm now. We're gonna remove this 10-millimeter headed bolt. That's very common for them to break. Kinda wiggle it around. Get it off of there. The next thing we need to do is come right down here. We need to remove this upper ball joint nut. Once we remove that, we're gonna break the knuckle free from the upper ball joint control arm. There we go. Get that off of there. Put that nut on there. Just a couple threads and I'll show you why in a second.
The next thing we're gonna do is use our pickle fork and our hammer, then we're going to come right in between this joint and separate the two. When it separates, the knuckle is gonna wanna drop and move away. If it dropped and moved away, there's a possibility that it could put a tug on your axle or even maybe something such as your brake hose. We don't want that to happen. That's what this nuts for. It's a safety nut. Leave that there for now. So now I'm just gonna use a bungee cord or pretty much anything that you might have that can prevent this from falling down because we need to get that nut off there but we still wanna make sure we have control of this. There we are. Carefully set that aside. Let's spray this down with some penetrant. Take a peek right under here and make sure that you don't have a snap ring. A lot of vehicles won't, yours may. Now it's gonna be time to get our ball joint press set up on here. You're gonna need a cup that fits directly over the top of that ball joint up all along that control arm. You're gonna need a piece like this that has a spot in the center that the driver's gonna sit right into. Now we'll just go ahead and put this right over that ball joint stud and then we'll snug this up.
Now we're just gonna go ahead and tighten this up. And we're trying to press the ball joint up and through the control arm. You can't really see much of what's going on but what should be happening is the ball joint's gonna be coming up and separating. So it looks like that's working pretty well. I can see it starting to separate right there. So what I'm gonna do next is I'll loosen this back up and now I'm gonna try using something else as a spacer to continue driving this up. Get that boot off there. And there it is friends. Just a quick overview of the new ball joint before we go ahead and install it. If you were to look at it, it pretty much looks the same all the way around unless of course you took the boot off and then you took a peek underneath. If you look, you're gonna see there's a flat edge there and a flat edge here. You need the pivot point, which would be the opened areas of this ball joint, to be facing in and out of the vehicle or to the left and the right, not front to back. You don't want this to pivot front to back. That's not the way it needs to go. It would need to go this way so I can pivot in and out or left and right on the vehicle. All right. So we've got our ball joint here. You can see it comes with a little hole on the top. We're just gonna line that up facing straight out towards us. That looks pretty great.
Now I'm gonna take my ball joint press kit and I'm gonna use the piece that looks like this. That's gonna sit right over the top and that's where the driver is gonna go down against. You need to have something covering this ball joint. You cannot press directly against it. I'm gonna use a cup that has a hole in it on the bottom for the lower part. Come right in just like this. And having the hole in the bottom is gonna make it so that the stud will be able to come through as the ball joint presses in. Start that right on there. Now I'm gonna snug this up. All right. Let's go ahead and bottom this out. We're gonna bring the ball joint right down to the control arm. As we do this, you wanna make sure the ball joint's going as straight down as possible. If it seems as though it's going off-kilter in any direction, you need to stop, try to fix the ball joint, straighten it out. Now I'm just gonna take a look. I can see the ball joint is hitting directly against the control arm. I'm gonna double check to make sure it's all the way around. That looks perfect. While we still have the press on here and it's giving it a lot of force, I'm just gonna bonk on this control arm a couple times just to cause a little bit of vibration and maybe set this in if it's just got a little bit more to go. That's great. Let's get this out of here.
It's super important to make sure that you put your snap ring on here. The snap ring is gonna keep this ball joint from eventually or potentially working its way out of the control arm. Grab some pliers that look like this. They're gonna have two little pitons on them and they're gonna fit right inside the holes on the snap ring. Once you spread them, you'll notice that it opens up. We're gonna come right over the ball joint and we're gonna put it up into that lip that's up near the control arm. We've got that over there. Double check to make sure it's seated all the way around. It needs to be in there completely. That looks perfect. Let's grab the boot. So let's turn over our boot and take a little look right here. You're gonna see where the stud comes through. It has a little area that looks different than the rest. That area needs to be facing in-board or towards the inside of the vehicle. So we'll put that facing just like that and it's facing towards the frame. Now we can take some pliers or whatever you might have and we need to get the boot so it's sitting up on top of the ball joint. Double check the boot. Make sure it's sitting perfectly all the way around. As long as it is, now we're gonna grab the knuckle. Bring it up. We're gonna put the stud through. We're gonna need a little bit of leverage though.
I'm gonna use a nice long pry bar. Come across the top of the control arm here/ball joint and under the frame. I'll pull it down and then I'll start in the nut. Give this a little turn. Bring it up. Okay. Let's get our pry bar. Bring that ball joint down and into the knuckle. There we are. Let's start the nut on. Just go ahead and get this thing so it's snugged up. Okay. The torque for this nut is 37 foot-pounds. Will you be able to get a socket and a torque wrench in between here? Probably not. 37 foot-pounds isn't really very much but it is definitely tight. So bottom it out, give it a little bit more, and then we're gonna definitely make sure that the cotter pin hole is gonna line up between the nut and the stud. Okay. So now I'm just gonna take a peek and I can see where the slot and the nut is, and I can see where the hole and the stud is. You wanna line those up. Put the cotter pin through just like that. Now we'll just peen this down and then curl it over. This is gonna make sure that there's no way that that nut can loosen up on its own. At this point, we don't need this on there anymore. Let's get that ABS wire back connected. Give it a nice tug. Make sure it's completely connected and now make sure it's secured to the frame. The next thing you would wanna do is make sure you secure your brake hose.
Go ahead and put that bolt back in, assuming yours didn't break. If it did, you need to make sure you secure it with something such as maybe a tie of some sort, or even drill out the hole and re-tap it if you needed to. Now before we go ahead and put the wheel back up on there, just double-check everything. Make sure that your ABS wire is connected. Make sure your ball joint's sitting flush. The boot's on the way that it needs to be and you definitely have a locking cotter pin holding that nut on the stud. Now let's go ahead and torque our lug nuts to 140 foot-pounds. Center cap, go ahead and pop it on there. Now that you've finished your service, go ahead and take it for a road test and make sure you get it down to a local reputable alignment shop.
Tools used
Tools used
Now one of the first things you're gonna wanna do before you start any job is to make sure you're safe as possible. You wanna have safety glasses and hand protection at all times. The next thing you're gonna wanna do is safely raise and support your vehicle so that your wheels are off the ground. Next, if there's a center cap, remove the plastic center cap and that will expose your lug nuts. Remove all 6 using a 22-millimeter socket. Remove your wheel. Now that we have a nice clear view of our tire rods, I'm gonna spray down this area right here. This is the adjustment area. Use a little bit of penetrant. That's gonna help you along. Using some nice long pliers, I'm gonna grab right onto this and I'm gonna turn it clockwise. That'll break free this jam nut. Okay, that broke free. Let's remove the nut that holds the outer tie rod end to the knuckle.
Now we're gonna hit right here on the knuckle to break our outer tie rod end free from the knuckle. Turn your outer tie rod end counterclockwise and count the amount of times it turns around as you remove it. One, two, three and so on. Okay. Write down that corresponding number so you can remember. We have our outer tie rod end. Let's go ahead and put that on. And we're gonna count it in the same amount of threads that we counted the original one off. That was one, two, three and so on. Okay. Just bring this so it's close. Get that nut off of there. I'm gonna put this on there. Let's bottom that out. Now we're gonna torque this nut to 48 foot-pounds. All right. So now that we have that torqued, we need to pay special attention to where the slot on the castle nut lines up with the hole in the stud. If it doesn't line up, you need to continue tightening until it does. Okay, so that looks pretty good. Let's try it.
That slides right through. Spin it over. The cotter pin's gonna ensure that there's no way that this nut can come loose. Now it's gonna be time to tighten up your jam nut. To tighten this we're gonna turn it counter clockwise. When you torque it, you would wanna torque it to 37 foot-pounds if you have the ability. Let's see here. Okay. Just make sure that it's nice and snug. By the time you're finished, make sure your outer tie rod end is nice and parallel to the ground or at least as parallel as it can be. Now let's get the wheel back up on here. Okay. Now with the wheel barely on the ground so it can't spin, we're gonna torque the lug nuts to 140 foot-pounds. Torqued. If you have a center cover, put it on there now. Now that you've finished your service, go ahead and take it for a road test and make sure you get it down to a local reputable alignment shop.
Tools used
Tools used
Tools used
Tools used
Now one of the first things you're going to want to do before you start any job is to make sure you're safe as possible. You want to have safety glasses and hand protection at all times. The next thing you're going to want to do is safely raise and support your vehicle so that your wheel is off the ground. Next, if there's a center cap, remove the plastic center cap and that'll expose your lug nuts. Remove all six using a 22-millimeter socket. Remove your wheel.
Now that we have a nice clear view of our tie rods, I'm going to spray down this area right here. This is the adjustment area. Use a little bit of penetrant. That's going to help you along. Using some nice long pliers, I'm going to grab right onto this and I'm going to turn it clockwise. That'll break free this jam nut. Okay, that broke free. Let's remove the nut that holds that outer tie rod end to the knuckle. Now we're going to hit right here on the knuckle to break our outer tie rod end free from the knuckle.
Turn your outer tie rod end counter-clockwise and count the amount of times it turns around as you remove it. One, two, three, and so on. Okay. Write down that corresponding number so you can remember. Now it's going to be time to get the inner tie rod end off of here. Here's the new inner tie rod end. And if you were to look right along this edge right here, that's the area we're going to need to grab onto, and then turn this counter-clockwise to break it free and eventually remove it. So we'll come right under here with our nice long pliers and get it off of there. There we go.
There it is friends. Now it's going to be time to install our new inner tie rod end. You might notice that there's no grease fitting to be able to grease this. Really there is. The grease is going to come right through that hole right there and that'll happen through here, starting at this point right here at this fitting. Put grease here, it comes right through and then of course it fills up the boot on the inner tie rod end. All right. I put some thread locker on here. I'm just going to go ahead and start this thing by hand. Now that we have that, as far as we can get it by hand, let's go ahead and snug it up with our pliers. Bottomed out. Just give it a teeny bit more. Awesome. Let's remove that jam nut. Let's put a little bit of copper never seize on the inner tie rod end threads, and then we'll just work that jam nut up the inner tie rod end quite a bit here. Now that we have the threaded area coded, we have our outer tie rod end, let's go ahead and put that on. And we're going to count it in the same amount of threads that we counted the original one off. That was one, two, three, and so on.
Okay? Just bring this so it's close. Put that node off of there. Put this on there. Let's bottom that out. Now we're going to torque this nut to 48 foot-pounds. All right. So now that we have that torqued, we need to pay special attention to where the slot on the castle nut lines up with the hole in the stud. If it doesn't line up, you need to continue tightening until it does. Okay. So that looks pretty good. Let's try it. That slides right through, just pin it over. The cotter pin is going to ensure that there's no way that this nut can come loose. Now it's going to be time to tighten up your jam nut. To tighten this, we're going to turn it counter-clockwise. When you torque it, you would want to torque it to 37 foot-pounds if you have the ability.
Okay. Just make sure that it's nice and snug. By the time you're finished, make sure your outer tie rod end is nice and parallel to the ground or at least as parallel as it can be. Now it's going to be time to get the grease fitting out of here. Use your 8-millimeter. There it is. Let's clean off around the area. Grab your new grease fitting. We'll start it right in there by hand, and then we'll snug it up, nice and tight. Let's give it a little grease
Now let's get the wheel back up on here. Okay. Now with the wheel barely on the ground so it can't spin, we're going to torque the lug nuts to 140 foot-pounds. Torqued. If you have a center cover, put it on there now. Now that you've finished your service, go ahead and take it for a road test and make sure you get it down to a local reputable alignment shop.
Tools used
Tools used