Replaces
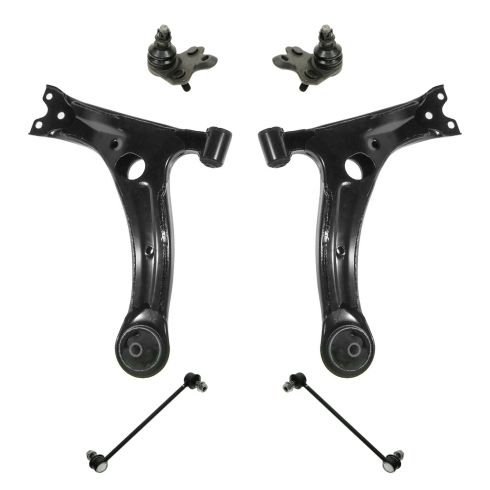
Part Details
TRQ suspension kits are manufactured using premium raw materials and coatings for extended service life. Each TRQ suspension component is designed to be a direct, maintenance-free replacement to the stock unit. To extend the life of your steering and suspension components, TRQ recommends replacing components in pairs, sets, or kits. All products are fit and road-tested in our Massachusetts R&D facility to ensure we deliver on our promise of Trusted Reliable Quality.
Product Features
Our steering and suspension kits are offered in a variety of options to best fit your repair needs and your budget.
Our steering and suspension components are pre-greased and sealed for long life and do not require the extra maintenance typically required by greaseable versions.
Item Condition:
New
Attention California Customers:
 WARNING: This product can expose you to chemicals including Lead and Lead Compounds, which are known to the State of California to cause cancer, and birth defects or other reproductive harm. For more information, go to www.P65Warnings.ca.gov.
Lifetime Warranty
This item is backed by our limited lifetime warranty. In the event that this item should fail due to manufacturing defects during intended use, we will replace the part free of charge. This warranty covers the cost of the part only.
FREE Shipping is standard on orders shipped to the lower 48 States (Contiguous United States). Standard shipping charges apply to Hawaii and Alaska.
Shipping is not available to a P.O. Box, APO/FPO/DPO addresses, US Territories, or Canada for this item.
Expedited is available on checkout to the United States, excluding Alaska, Hawaii.
Final shipping costs are available at checkout.


Created on:
Tools used
Okay, friends. One of the first things we need to do is safely raise and support the vehicle with the suspension hanging. Once we've done that, we're gonna remove our five 21-millimeter lug nuts. Let's get the wheel off of here. Now that the wheel's off, we have a nice, clear view of our lower control arm. To service the lower control arm, if you're not replacing the ball joint at the same time, we're just gonna remove this nut, the bolt, and the other nut right here. Okay. So as you can tell, it's starting to put a pressure right up along here. So I'm just gonna leave this as it is for this second and then we're gonna move along to the front bolts right there. Let's remove this 19-millimeter headed bolt.
All right. If your bolt's stuck inside there and you seem like you're struggling a little bit, it's probably just because there's a lot of pressure still. If you wanted to, you can move along to the rearward bolt. Once that's loose, we should be able to move this around and the bolt might come out a little bit easier. The bolt that you can see from the bottom also comes up along the top area right there. We're gonna use a 19-millimeter wrench to hold that nut and then from the bottom we'll remove the bolt. Now that that rearward bolt's loose, this is much looser. So let's get this right out of there. Now that that bolts out of there, I'm gonna take a nice long pry bar. I'm gonna come through the hole in the control arm so I can move this and we'll finish removing this nut. Okay. So let's pry down and separate those two. Now I'm just gonna turn that ball joint so it's out of the way. You wanna be very careful not to damage the boot in any way. At this point, I can bring this control arm up a little bit just like this and it'll apply less pressure to the bolts and we should be able to take it out. Now let's pull the front area out of the subframe and then, of course, pull out the rear area. Let's spray the area with some penetrant just to help it slide out of there. As you can tell, the bushing area is kind of kinked off to the side. That's, of course, gonna jam things up a little bit. So you're gonna need to use a pry bar, do whatever you can. We're gonna pull it straight out towards the front. There it is, friends.
The next thing we need to do is take a look at the mounting areas where the control arm's gonna go. If it looks like it's got a lot of crud or build up, you need to make sure you get it out of there at least as much as possible because we don't want anything restricting the area. Don't forget about the front one. If you have access to any copper Never-Seez, I always like to put a little bit kind of around where the bolt holes are just to help that control arm bushing slide right in. Do it in the back and in the front if you have some. Okay, friends. Now it's gonna be time to install our brand new lower control arm. To start, I'm gonna kind of line it up approximately with where it needs to go. What you're gonna notice is that the bushing itself is gonna be at a little bit of an angle. So you might have a little bit of an issue pushing it in there but what you can do is use a nice rubber mallet, hit along the front here just to kind of drive it in. If it seems as though the bushing is going at too much of an angle, it's gonna get caught, so just go right along the lip with a pry bar and your hammer and just give it a couple of loving bonks until it slides in. So you can see this is going at a severe angle at this point. I definitely don't wanna let that keep going like that, so I'm gonna go ahead and give it a bonk like I said. To continue, what I like to do is just use a nice bungee cord or whatever you might have for a strap and just try to strap it up so there's no way that it can fall down and potentially hurt you while we continue.
Now, the next thing that we need to do is, of course, line up the bushing with the hole at the mounting point. You can go ahead and use a pry bar. And I also like to have a nice screwdriver like this so I can go up through the hole. Use the pry bar, move it around to any direction that it needs to go to be able to line up the hole. To check it, just go ahead and use your screwdriver, come right up through there, and then, of course, you can wiggle it around a little bit to make sure it's perfectly aligned. At this point, let's go ahead and start that bolt in. If your bolts look like this, let's just go ahead and clean them up. Now that we have our bolt threads nice and cleaned up, let's go ahead and start them in here. To start the bolt into the rearward bushing, you're gonna notice that the bushing's more than likely gonna be at an angle. To help you line it up, you can use a shallow socket, put it right on there, and then a nice long extension, and that'll give you leverage to be able to maneuver the bolt as needed. Start our nut on there. If you wanna use a little bit of threadlocker, we'll call it your prerogative. Now, the next thing you're gonna want is a nice pry bar. We're gonna come through the top hole of the control arm just like this and now we'll be able to twist the control arm to be able to get that bushing into where it needs to go. There we are. It's started. So at this point, let's go ahead and drive this in. Let's go ahead and give this a couple of bonks, try to drive it in. Let's line up that hole. Let's try to line up the hole here. Take your bolt. If you wanna use a little bit of thread locker, like I said, your prerogative. Start that in. Now we're gonna line up the lower ball joint with the control arm. Go ahead and press down on that. Shift this so it lines up. And then, of course, start the studs into the holes. Let's snug them up. I always like to start with the bolt first.
All right. Let's go ahead and torque these to 66-foot-pounds. Torqued. The next thing we need to do before we can start snugging up the inward bolts is to put load on the suspension. What I mean by that is you need to jack up right under here. We just kind of wanna make it so that the control arm is sitting as though the vehicle's on the ground. Obviously, if you're working on jack stands or anything like that, you wanna be very careful because you don't wanna shift the vehicle off those jack stands, you wanna make sure you're safe as possible. Now that we have this raised up, let's go ahead and snug these up so we can torque them. Now we're gonna torque both of these bolts to 101-foot-pounds. Let's get this out of here. Let's get our lug nut off of there, get the wheel up on here. We'll bottom out the lug nuts and then we'll torque them to 76-foot-pounds. All right. Let's torque them in a criss-cross manner. Torqued.
Tools used
Tools used
Okay, friends. One of the first things we need to do is safely raise and support the vehicle with the suspension hanging. Once we've done that, we're going to remove our 5 21-millimeter lug nuts. Let's get the wheel off of here. Now that we have the wheel off, let's just go ahead and put one of those lug nuts on just to hold the rotor so it can't flop around. Now, it's going to be time to remove our axle nut. You're going to want to use a 30-millimeter, and you want it to be a 12-point. If you're working on the ground and you're trying to use a ratchet, you're going to notice that this likes to turn. If that's the case, go ahead and use a nice, long pry bar. Come in between the studs like this. Put it against the ground so you have some leverage, and then continue to remove your nut. Put this on there a little bit. Now, we're just going to give this a couple loving bonks, just to break it free from the wheel bearing. Tiny bit of penetrant. Loving bonk. That's moving freely. Let's get this off of here. Let's go ahead and remove these under here with a 17-millimeter to separate the control arm from the ball joint. This one right here is going to be a bolt. Just be careful because it is going to be under a little bit of tension, so you want to make sure that you're safe as possible. Now, let's take a nice pry bar. We're going to come through the holes in the top of the control arm, just so we can pry down. Turn this so it doesn't resituate itself, and then you can release.
The next thing we need to do is go ahead and pull back on this. As you pull away, you want to make sure that the axle is going to be coming out of the knuckle area. There we are. Set that right aside. Okay. So, the next thing we need to do is get our cotter pin out that's holding the ball joint nut on there. Ours is in very poor condition, so it's not really saveable. I'll try to get it off of there, and then, of course, we'll take the nut off. There it is. I'm going to use a swivel with an extension. Put it right over that nut. For me, personally, I'm going to give it a couple bonks. Okay. Let's try to get this off of here. I'm just going to put that nut on just a couple threads. After that, we're going to separate the ball joint from the knuckle. I like to use a pickle fork. All right. In between like this. Be careful for your brake rotor, of course. Remove that nut. There it is, friends. Now, it's going to be time to install our brand new ball joint.
Now, it's going to be time to get our brand new ball joint into the vehicle. I'm going to start with the ball joint stud into the knuckle. We'll snug it up, and we'll torque it to manufacturer specifications. We're going to go ahead and torque this nut to 76 foot-pounds. Now that we have it torqued, you want to double-check to make sure that the slot on your nut is matched up with the hole in the ball joint stud. If for some reason it isn't, you need to continue tightening until it is. Okay. So, I got this lined up. If it comes towards the knuckle like mine does, just go ahead and peen it up a little bit, and then continue pushing it through. You have to make sure that this is peened completely over so there's no way that this nut can loosen up on its own. Perfect.
Now, I like to use a little bit of copper Never-Seez along the backside of the bearing where the axle is going to be going into. Pull your knuckle away, line up the axle, and then carefully try to put it in there. Once again, be careful for your boot. Make sure it's not going to get caught on anything. Let's line up the lower ball joint with the control arm. Can do that by pulling down. Okay. Grab your mounting hardware. I like to use a little bit of threadlocker on these. Just throw them on there. Next, we're going to bottom these out, and then we'll torque them to manufacturer specifications. Let's torque these to 66 foot-pounds. Let's go ahead and put on our axle nut. We'll bottom it out, and then we'll torque it to 159 foot-pounds.
So, now we need to get the vehicle a little bit closer to the ground. I'm going to take a nice, long pry bar, and I'm going to come across my lug studs, just like this. Once I've done that, I'm going to torque my axle nut to 159 foot-pounds. Remove this. The next thing we need to do is peen over this area right here into that slot. That's going to be the part that locks in this nut so it can't move. If you forget that, it's a very dangerous situation. So, I'm just going to take a nice, flat punch like this, come right here, and then I'll give a couple loving bonks to peen that down. As you can tell, there's definitely a dimple there, and there's no way that this nut could spin. If you want to go a little bit further, it's up to you. I'll give it a couple extra wax because that's my favorite part. Perfect.
Let's get our lug nut off of there. Get the wheel up on here. We'll bottom out the lug nuts, and then we'll torque them to 76 foot-pounds. All right. Let's torque them in a crisscross manner. Torqued.
Tools used
Tools used
Okay friends, one of the first things we need to do is safely raise and support the vehicle with the suspension hanging. Once we've done that, we're gonna remove our five 21-millimeter lug nuts. Let's get the wheel off of here. So I've got my locking pliers holding onto the back side of the stud as tight as I possibly can. Now I'm gonna turn the 17-millimeter nut and try to relieve it. Easy-peasy.
Okay. So now I've got the locking pliers holding on to my stud again, we're gonna start taking off the lower nut for the sway bar link. You're gonna notice that it's gonna be very hard to get to this nut though and remove it. So what I like to do is take a nice pry bar, come in over the tie rod end under the sway bar, and then up and over this area right here just to hold the sway bar up so I can get my socket on there. So now I'm gonna use a swivel and extension, put this right onto the nut.
Okay friends, now it's gonna be time to install our brand new front sway bar link. Let's put it over by the vehicle, slide it right through. We can start on the nut. So I've got my tool holding the stud, and I'm gonna use my ratchet wrench. And I'm just gonna go ahead and tighten up that nut.
Now if you can get your torque wrench down here, go ahead and torque that to 55 foot-pounds. Let's get our bar out of there, bring this over, line it up with your hole. Start the nut on there. We'll bottom it out, and then we'll torque that to 55 foot-pounds as well. Torqued. All right, let's torque them in a crisscross manner. Torqued.