Replaces
Part Details
TRQ suspension kits are manufactured using premium raw materials and coatings for extended service life. Each TRQ suspension component is designed to be a direct, maintenance-free replacement to the stock unit. To extend the life of your steering and suspension components, TRQ recommends replacing components in pairs, sets, or kits. All products are fit and road-tested in our Massachusetts R&D facility to ensure we deliver on our promise of Trusted Reliable Quality.
Product Features
Replacing struts used to require specialized tools to compress, remove, and transfer the old spring and mount. Our Pre-assembled, complete strut & spring assemblies come with all new parts and make the job much quicker and easier for the do-it-yourself mechanic.
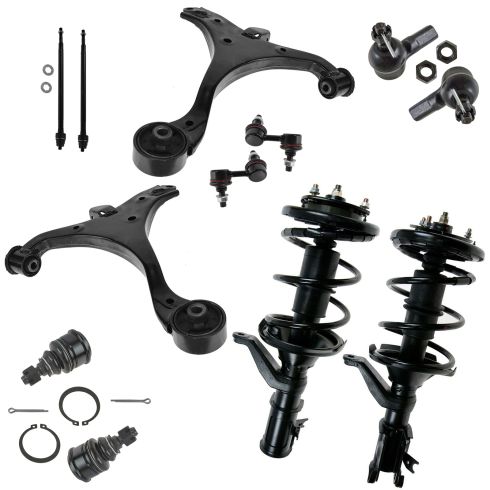
Strut & spring assembly contains:
Install Tip: When replacing steering components, have a professional alignment performed afterwards. This ensures proper tracking and even tire wear.
Our steering and suspension components are pre-greased and sealed for long life and do not require the extra maintenance typically required by greaseable versions.
Item Condition:
New
Attention California Customers:
 WARNING: This product can expose you to chemicals including Chromium (Hexavalent Compounds), which is known to the State of California to cause cancer, and birth defects or other reproductive harm. For more information, go to www.P65Warnings.ca.gov
Lifetime Warranty
This item is backed by our limited lifetime warranty. In the event that this item should fail due to manufacturing defects during intended use, we will replace the part free of charge. This warranty covers the cost of the part only.
FREE Shipping is standard on orders shipped to the lower 48 States (Contiguous United States). Standard shipping charges apply to Hawaii and Alaska.
Shipping is not available to a P.O. Box, APO/FPO/DPO addresses, US Territories, or Canada for this item.
Expedited is available on checkout to the United States, excluding Alaska, Hawaii.
Final shipping costs are available at checkout.


Created on:
Tools used
Brought to you by 1AAuto.com, your source for quality replacement parts and the best service on the Internet.
Hi, I'm Mike from 1A Auto. I hope this how-to video helps you out, and next time you need parts for your vehicle, think of 1AAuto.com. Thanks!
In this video, we're going to show you how to replace the outer tie rod. This is a 2003 Honda Civic. It's the same for the 2001 to 2005 Honda Civic, as well as a couple of other Honda models. We show you this on the driver side, but the passenger side is the same procedure. Items you'll need include a new outer tie rod or tie rods from 1AAuto.com, 17mm to 24mm sockets, wrenches and ratchet, a torque wrench, breaker bar or tire iron, small hammer, needle nose pliers, and some penetrating oil.
Remove the front wheel held on by 19mm lug nuts. If you have a different style hubcap, you'll need to remove that. Just use a breaker bar or your tire iron and loosen your lug nuts while the tire is on the ground. Raise and support the vehicle. Now, remove the rest of the lug nuts the rest of the way, and the wheel and tire.
The outer tie rod is right here; 17mm nuts hold it in here. Remove the cotter pin. Then there's a 21mm lock nut, which we're going to use a nice 21mm wrench. As you're looking at it, you're turning it clockwise. We're just going to turn that about a quarter of a turn. If, when you turn this lock nut, you also turn the inner tire rod, just make note of it so that you can turn it back for the same amount, just so that you can get yourself in a good preliminary alignment. You will want to have your vehicle aligned after you do this repair.
Remove the cotter pin. Normally, the pin should drive out easily, but it's giving us a hard time. We're going to use a little bit of penetrating oil. Let it sit for a bit. You may have to use a set of these cutting pliers. We really get half of the cotter pin off. A lot of times, if you've got it off and pretty well damaged, you can just pull the nut off and it will shear it right off as it comes off. Give the steering knuckle a few good taps with the hammer to break the tie rod free. Now, you can just take your tie rod right off.
Old part from the vehicle, new tie rod in from 1A Auto. You can see it's exactly the same. Take the castle nut off. New part comes with a new lock nut and a cotter pin. If you like, you can grab hold of your inner tie rod, free up your existing lock nut, and take it off. Not necessary though if you can put the new tie rod on and use the existing lock nut that's on there already. Put the tie rod in. It should go right around to about where it was.
Reinstall your tie rod. Put the castle nut on. Tighten the castle nut to 32-ft/lbs. Then tighten it any more you need to get the cotter pin through the hole in the tie rod. I can see the hole there. Probably need to go another 16th of a turn. Insert the cotter pin.
Use a pair of piers and bend it over. Appropriate size wrench to hold the tie rod; in this case, it's an 18mm. Then 24mm to get our lock nut on the back. Tighten it up.
Put your wheel back in place. Start your lug nuts. We'll tighten them preliminarily and then torque them when the vehicle is back down on the ground. Tighten your lug nuts 80-ft lbs and just cross in the pattern.
Thanks for tuning in. We hope this video helped you out. Next time you need parts for your car, please visit 1AAuto.com. Also check out our other helpful how-to and diagnosis videos.
Tools used
Brought to you by 1AAuto.com, your source for quality replacement parts and the best service on the Internet.
Hi, I'm Mike from 1A Auto. I hope this how-to video helps you out, and next time you need parts for your vehicle, think of 1AAuto.com. Thanks!
In this video, we're going to show you front sway bar link replacement. This is a 2003 Honda Civic, it's pretty much the same for a 2001 to 2005 Civic, as well as some other Honda vehicles. We show you on the driver side, but the passenger side is the exact same procedure, and if one side is broken on your car, most likely replacing the other side is a good idea as well.
Items you'll need include new stabilizer link or links from 1AAuto.com, 14mm wrench, a 19mm socket and breaker bar or tire iron, 5mm hex bit, ratchet and extension, and, as you'll see, we used a reciprocating saw, so you might find that you'll need one too.
We'll remove the front wheel, held on by four 19mm lug nuts. If you have a different style hubcap you'll need to remove that, but just use a breaker bar or your tire iron and loosen the lug nuts while the tire is on the ground. Now raise and support the vehicle. Now remove the lug nuts the rest of the way, and the wheel and tire.
For this repair, you want to make sure that you have your vehicle level. You need to raise up the front of the vehicle and support both sides, and you can turn the wheel. Your link is right here.
First thing we're going to do is just use a wire brush and some penetrating oil to try and clean off these threads as much as we can to make it easier to get apart. 14mm wrench, put it on here, and turn counterclockwise. It looks like this is already spinning, so 5mm hex socket. You may want to make sure that your bit's in there, hammer 'til you drive it in.
We've gotten the bottom one loosened up, put the wrench on the top one, and then we'll do the same thing, we'll drive the 5mm hex socket in. We've got it loosened up, and what's happened is what happens a lot on these. These lock-nuts actually bind up more and more as you get them off, and they get harder and harder, and then the 5mm hex strips out. What most shops do is they don't even bother with the nuts, they just cut these off right from the beginning.
Using a torch can be intimidating, so we're going to just show you how to use a reciprocating saw. We've got a set of locking pliers on there just to hold it in place a little bit. Now we'll just cut it off. Now the upper one, again, holding it with my locking pliers.
Here's the new part from 1A Auto. I like this design a little better since it has the hex on the end, but also has bolt head, so you can hold it with a wrench on the backside. We'll go and install that.
Put it in and start the nut on the backside. Put the bottom into the control arm, thread your nut on, and the technical spec on these is 29 foot-pounds. It's easy enough to get a torque wrench on this one, but getting a torque wrench on the inner one is pretty difficult.
Put your wheel back in place, start your lug nuts, we'll tighten them preliminarily, and then torque them when the vehicle's back down on the ground. Then tighten your lug nuts, 80 foot-pounds and just cross in the pattern.
Any time you do work on your brakes, make sure you pump the pedal. Get a nice firm pedal before you test drive the vehicle.
Thanks for tuning in. We hope this video helped you out. Next time you need parts for your car, please visit 1AAuto.com. Also check out our other helpful how-to and diagnosis videos.