Replaces
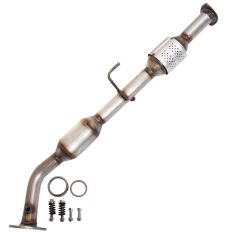
Replaces 2005-20 Toyota Tacoma L4 2.7L Front Catalytic Converter and Pipe Assembly Cateran Inc 33338
$514.95
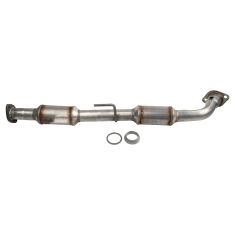
Replaces Toyota Tacoma Catalytic Converter Davico Mfg 18160
$504.95
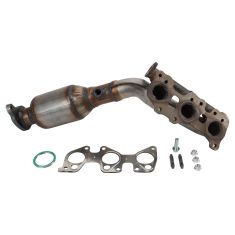
Replaces 2012-15 Toyota Tacoma V6 4.0L with Partial Zero Emissions Vehicle (PZEV) Left Exhaust Manifold Catalytic Converter Assembly Cateran Inc 33340
$449.95

Replaces 2012-15 Toyota Tacoma V6 4.0L with Partial Zero Emissions Vehicle (PZEV) Right Catalytic Converter Cateran Inc 33341
$443.95

Replaces Toyota Tacoma Driveshaft TRQ DSA80137
$416.95
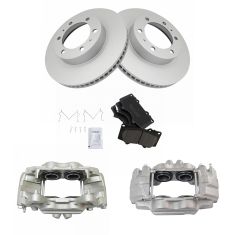
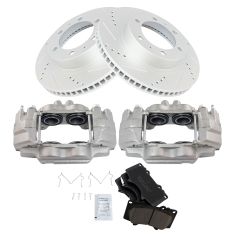
Replaces Toyota 4Runner FJ Cruiser Tacoma Front Ceramic Brake Pad & Rotor Kit DIY Solutions BFS05297
$404.95
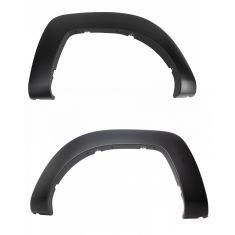
Replaces Toyota Tacoma Rear Driver & Passenger Side 2 Piece Wheel Arch Molding Set DIY Solutions BAS02344
$400.95
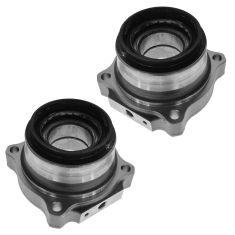
Replaces 2005-18 Toyota Tacoma Rear Driver & Passenger Side 2 Piece Wheel Hub Bearing Module Set Timken TKSHS00508
$395.95
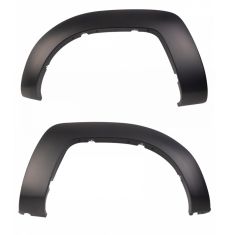
Replaces Toyota Tacoma Rear Driver & Passenger Side 2 Piece Wheel Arch Molding Set DIY Solutions BAS02345
$384.95
Replaces Toyota 4Runner FJ Cruiser Tacoma Front Ceramic Performance Brake Pad & Rotor Kit DIY Solutions BFS05415
$376.95
These parts are authentic Gates brand products that are supplied and packaged by Gates. Some of the components included in this kit may be sourced by Gates from other high quality suppliers such as Aisin, GMB, Koyo & other OEM suppliers. These parts are subjected to the very same testing and quality standards as all Gates products.
Item Condition:
New
Attention California Customers:
 WARNING: This product can expose you to chemicals including 1,3-Butadiene, which is known to the State of California to cause cancer, and birth defects or other reproductive harm. For more information, go to www.P65Warnings.ca.gov.
Lifetime Warranty
This item is backed by our limited lifetime warranty. In the event this item should fail due to manufacturing defects during intended use, we will replace the part free of charge. This warranty covers the cost of the part only.
Wear and Tear
This item is backed by a warranty against defects in materials and workmanship under its intended use. The warranty does not cover normal wear and tear. Please keep your invoice for proof of this warranty.
FREE Shipping is standard on orders shipped to the lower 48 States (Contiguous United States). Standard shipping charges apply to Hawaii and Alaska.
Shipping is not available to a P.O. Box, APO/FPO/DPO addresses, US Territories, or Canada for this item.
Expedited is available on checkout to the United States, excluding Alaska, Hawaii.
Final shipping costs are available at checkout.

Created on:
Tools used
Hey friends, it's Len here at 1A Auto. Today I'm working on a 2007 Toyota FJ Cruiser, and I'm going to be replacing the serpentine belt. It's going to be a very easy job, and I want to be the one that shows you how to do it. If you need any parts, you can always check us out at 1AAuto.com. Thanks.
Okay. I remove both these skid plates. Using my 12 millimeter. Can use a ratchet, can use an air gun, whatever you have access to obviously. Your guns a little bit quicker. There's four bolts, so I got three of them. I'm going to have one left here, so that means the skid plate's going to be ready to come down, so I'm going to get ready to hold that as soon as I get this on.
Here we are. Grab the skid plate, get that out of the way. We'll set it aside. So we'll do the forward skid plate now. There should be four bolts in this as well. One here, one there. One should be there, it's imaginary. One there also, imaginary. On the front of this, it has little hooks that go into the frame right here. It's one. Then the other one's right here. So what you would do is you would start with the forward ones. Take those out. Then you work your way to the East, okay? Once you remove these, the skid plate can come down this way towards you or towards the front. So you want to be careful for your face, but the hooks are going to make it so it can't completely fall straight down.
Okay, bring it down and then and slide it out towards the front of the vehicle. Shouldn't want to slide right out here. Just get this hook out of there. There it is. So here's the hooks I was talking about. You just go right up inside here. Okay, so here we go. We're going to use our 14 millimeter. We're going to go right to the tensioner right there and we're going to turn this counter-clockwise. That's going to relieve tension from the belt so we can slide it off. Just going to come over to this idler pulley. There we are. Let me get it off of the power steering pump too. That's going to give us plenty of slack. There we go. Get the ratchet out of here.
Let's move ahead to the next step. So let's just take a quick peek at the way that the belt goes real quick, we've got our crank here, right? It's the big crank. This is the rear engine crank. Comes around from the bottom of the crank, up over the lower idler pulley around your ac compressor, up to your alternator. Underneath the upper idler pulley. Comes right up over the top of your water pump pulley. That's this right here with your fan. Around to the power steering pump, around the bottom of the power steering pump. It's going to go up over this idler pulley, around under the bottom of the water pump at this point. Up over the top of this idler pulley, back around and to the crank. It sounds complicated. A picture might do you right, but I just wanted to at least verbalize it as well. So yeah, let's do it.
Just pull it all off of here. Once we get it off, we're going to match it up to our new belt just to make sure that we're dealing with the same beast. You want it to be approximately the same length, and of course have the same amount of ribs. If your new belt has more or less ribs, than it's definitely the wrong belt. Okay. Got the belt, just got to go up and over the fan. Here we are. There's our serpentine belt.
All right, so we've got our belts lined up. I'm just going thumb to thumb. They're both approximately the same length, which is great. I'll turn them around. We've got our rib section, got one, two, three, four, five, six, seven, seven ribs. One, two, three, four, five, six, seven ribs on the new belt. Approximately the same width. Perfect. Let's install our new belt. We recycle that, dispose of it properly, whatever you want to say. Now to get it back up over the fan, I just go around a couple of the blades and then I spin the fan and it just draws it around for me. Just like that. Now the belt is up over the water pump. Cool. All right, now with that up there, what I'm going to do, look at it real quick. I'm going to bring it over the power steering. I'm going over this, the left side idler, come around, over to the other idler, bring it back up over the crank, around the crank, over the lower idler, up over here, straight up over the alternator. Under that idler, and then up and over. Okay, cool.
So now with it like this, we're just going to double check to make sure we're sitting in all of our little rungs. All the grooves there, or all the ribs are sitting in the groups. It looks good. Cool. I'm going to grab my 14 millimeter and we'll continue. Okay, so I've got my 14 millimeter and my ratchet up on top of the tensioner. I'm going to turn it counter-clockwise and that's going to relieve pressure. Same way we took off the belt, we're going to do the same thing here. So, now I'm just going to go as far as I can. The tensioner, slide it over my power steering, slowly let it back. I'm going to leave that on there for a second. I'm just going to feel around. It's definitely completely on the power steering. This is a smooth pulley, so you don't have to worry too much about that. Smooth pulley for the tensioner.
Come back around, goes up over this. That feels good around the water pump. Up around the alternator is good. Ac compressor is good. Crank's good. Cool. Okay. It's time to get this skid plate back up. We've got a little hook right there, that's going to go right in this hole right here okay?. What that's going do is to make it so if you had to, you could let go, right? And or you can hold towards the front and you don't have to worry about holding up the whole way to the skid plate. So I'm just going to take my bolts for the forward end of it. Get it started in the hole there. Not going to tighten it down until I get all four started. Alright, nice and easy here. Come around. I can see up there. This one. Perfect. Let's move ahead.
All right, so we've got our forward skid plate. We've got our little hooks on the skid plate. They go right up inside the slots okay? You've got two hooks, you've got two slots, so just bring it so it's straight up and down, line the hooks up with the slots. Now at this point, you can release the front, assuming you have both hooks there, and you can move along to the back where we can get this in and situated. All right. Should be wanting to go up in there. There we go, that one's started. There we go. Just going to blast him up in there. Theoretically, most of these skid plates have four, right? I have two up here too, so if you have those two up there, you're going to want to make sure you start those before you tighten these. There we go, tight. Tight. Very nice.
Thanks for watching. Visit oneaauto.com, your place for DIY auto repairs for great parts, great service, and more content.
Tools used
Hey friends, it's Len here at 1AAuto. Today we're working on a 2007 Toyota FJ Cruiser and I'm going to be replacing the idler pulley. It's going to be very simple and I want to show you how to do it. If you need any parts, you can always check us out at 1AAuto.com. Thanks.
Okay now remove both these skid plates, using my 12 millimeter. You can use a ratchet, you can use an air gun, whatever you have access to. Obviously the air guns a little bit quicker. There's four bolts so I got three of them. I'm going to have one left here so that means the skid plates going to be ready to come down so I'm going to get ready to hold that as soon as I get this on.
There we are. Grab the skid plate. Get that out of the way. We'll set it aside. So we'll do the forward skid plate now. There should be four bolts in this as well. One here, one there. One should be there, it's imaginary, one there also imaginary. On the front of this it has little hooks that go into the frame. Right here is one. Then the other one's right here. So, what you would do is you would start with the forward ones, take those out, and then you work your way to these. Once you remove these, the skid plate could come down this way towards you or towards the front. So you want to be careful for your face but the hooks are going to make it so it can't completely fall straight down.
Bring it down and then slide it out towards the front of the vehicle. It should want to slide right out here. Just get this there. There it is. So, here's the hooks I was talking about and they just go right up inside here. Okay, so here we go. We're going to use our 14 millimeter. We're going to go right to the tensioner right there and we're going to turn this counter-clockwise. That's going to relieve tension from the belt so we can slide it off. I'm just going to come over to this idler pulley. There we are. There let me get it off of the power steering pump too. That's going to give us plenty of slack. There we go. Get the ratchet out of here.
Let's move ahead to the next step. All right. So, here's the idler pulley, the one we're going to be replacing. This is on the passenger side bank. There are actually three idler pulleys on this vehicle. There's this one right here which is bad on this particular vehicle, there's one right here, and then there's one up the top there up above the tensioner, three. But we're just going to replace one but they're all pretty much the same to replace. You just take a 14 millimeter, turn the bolt to the left there. There we are. I'll just take this off of here. Off we go. Let's move to the next step.
So, here is our old, here's our new, just match them up real quick make sure they're approximately the same. It looks good. We'll put this aside so we can recycle it. Grab our bolt with a washer, put it right on there. Bring it up here. Start the bolt into the engine. Almost. There we are. I'm going to grab my torque wrench and we'll torque that up. I'm going to torque this bolt with a 14 millimeter to 28 inch pounds, which is not very much. There we are. Easy peasy. Let's move ahead. So, I've got my 14 millimeter and my ratchet up on top of the tensioner. I'm going to turn it counterclockwise and that's going to relieve pressure. The same way we took off the belt we're going to do the same thing here. So, now I'm just going to go as far as I can with the tensioner, slide it over my power steering, slowly let it back.
I'm going to leave that on there for a second. I'm just going to feel around. It's definitely completely on the power steering. This is a smooth pulley so you don't have to worry too much about that, smooth pulley for the tensioner, and back around. It goes up over this. That feels good around the water pump up around the alternators good, AC compressor is good, the cranks good. Cool. It's time to get this skid plate back up. We've got a little hook right there, that's going to go right in this hole right here. What that's going to do to make it so if you had to you could let go. All right. And or you can hold towards the front and you don't have to worry about holding up the whole way to the skid plate.
So, I'm just going to take my bolts for the forward end of it, get started in the hole there. I'm not going to tighten it down until I get all four started. All right. Nice and easy here. Come around, see if I can see up there. Get this one. Perfect. Let's move ahead.
All right. So. We've got our forward skid plate. We've got our little hooks on the skid plate. They go right up inside the slots. You've got two hooks, you've got two slots. So, let's bring it so it's straight up and down, line the hooks up with the slots. Now at this point you can release the front assuming you have both hooks there and you can move along to the back where we can get this in and situated. All right. It should lined to go up in there. Here we go, that one's started. There we go. I'm just going to blast them up in there. Theoretically, most of these skid plates have four. They have two up here too so if you have those two up there you're going to want to make sure you start those before you tighten these. There we go, tight, tight. Very nice.
Thanks for watching. Visit 1AAuto.com your place for DIY auto repairs for great parts, great service, and more content.