Replaces
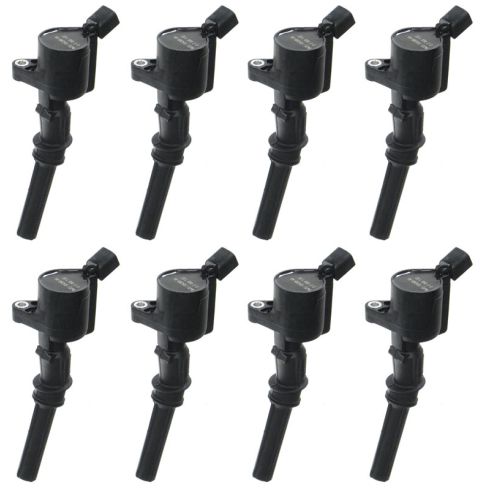
Part Details
Item Condition:
New
1 Year Warranty
This item is backed by our 1-year warranty. In the event this item should fail during intended use, we will replace the part free of charge. This warranty covers the cost of the part only.
Returns: Parts with electrical components cannot be returned once installed.
FREE Shipping is standard on Orders shipped to the lower 48 States (Contiguous United States). Standard shipping charges apply to Hawaii, Alaska and US Territories. Shipping is not available to Canada.
Expedited is available on checkout to the United States, excluding Alaska, Hawaii and US Territories as well as P.O. Boxes and APO/FPO/DPO addresses. Final shipping costs are available at checkout.


Created on:
Tools used
Brought to you by 1AAuto.com, your source for quality replacement parts and the best service on the Internet.
Hi, I'm Don from 1A Auto. I hope this how-to video helps you out, and the next time you need a part for your vehicle, think of 1AAuto.com. Thanks.
In this video, we're going to show you how to replace an ignition coil on this 2004 Ford Crown Victoria with the 4.6 Liter V8 engine. The items that you're going to need for this include a new ignition coil from 1AAuto.com, a 7mm socket and ratchet, and if you're working on the driver's side ignition coils, you're going to need a flat blade screwdriver.
Now, on the driver's side, your ignition coils are covered up by this intake hose. You just have to loosen up those two hose clamps with a flat blade screwdriver and pull it free. Then you can access all four of those ignition coils.
On the other side the ignition coils you can access right now we're going to show you on the easiest one to see so we can show you the process. Just push the tab on this harness and pull it free. Then you want to remove the 7mm bolt. Once the bolt is removed, you just pull it forward, up, and out.
On the left is the old ignition coil; on the right is the new one from 1A Auto. You can see they're identical, and they'll mount exactly the same. Push your new ignition coil down into place, and back. Then replace that 7mm bolt. Once you've tightened it up, reconnect your harness, and you're all set.
We hope this video helps you out. Brought to you by www.1AAuto.com, your source for quality replacement parts and the best service on the Internet. Please feel free to call us toll-free, 888-844-3393. We're the company that's here for you on the Internet and in person.
Tools used
Tools used
Tools used
Tools used
Pre-disconnected. We're going to come right over here to this. Can see there's a little green tab. On the other side, there's a little tab. You push that and you can draw this right off. At this point, we're going to move along to loosening this clamp. And then this one right here using an 8-millimeter or a flathead. Take a peek in here. Make sure you don't have any crud. Looks good. So now we have a clear view of the coils, you can just go down the line and start disconnecting them by squeezing this little tab and then drawing this up. Now, I'm going to use a 7-millimeter swivel. I'm going to take out the mounting bolt. It's hard to get it on there and stay. That bolt out of there. Grab your coil, lift straight up. Make sure it comes with all the boot. Now that we have that out, just take a peek at the boot. Make sure it isn't torn and missing a piece and it's down inside there. If it looks good, you can continue.
Grab that coil right on here. That fits beautifully. I'm just going to snug this up. These coils, you want them to be nice and tight so that they can't spin around. If it moves a little bit like this, that's okay. I'm just going to give it just a teeny bit more. But that's it. Last thing I want to do is break this bolt off. Go ahead and get this attached. Make sure that it's locked in. That feels good. Now, I'm going to do the same to all eight cylinders. Let's get this air intake back on. Tighten up those clamps. Nice.
So, now it's going to be time to try starting the vehicle. When we do that, we want to pay special attention to up here and make sure nothing funny happens. If you see any check engine light, which would be located right up here, we know we're going to turn it right off and check to see what's going on. It's going to run a little rough at first and then it'll smoothen out. I'm looking up here. I see nothing, an exception of just it telling me that I'm not buckled up.
Tools used
Tools used
Brought to you by 1AAuto.com your source for quality replacement parts and the best service on the Internet. In this video we're going to show you how to remove and install a new coil in this 2011 Lincoln Town Car. This has a 4.6L, the same as many of these vehicles. The tool you'll need is a 7 mm socket with a ratchet and extension.
With your 8 mm wrench disconnect your negative battery cable.
Okay, replacing your coil and spark plugs is pretty easy. I'm going to show you on this side; because, it's easier to film and get to. The other side is just as easy. You do just need to remove your intake hose which is three clamps and a couple of hose connections on the back and you remove that whole intake hose and get to your coils pretty easy. Okay, so the coils are held in place by a 7 mm bolt. Get the socket ratchet down on there. It can be a little tough to break loose. I'm just going to get my socket off of here before I get too far. Okay, this connection you just reach underneath and there's a little tab right here. Squeeze that tab and the harness pulls loose. You can just kind of pull your coil up and out like that. This happens to me a lot. I've removed a bolt but it twisted in the socket so it's now stuck. What I do I take a screwdriver or something that fits right up in there. Let's see here, and then I just drop it and basically that usually almost always gets the bolt from the socket. Just make sure you watch where it goes.
Okay original coil. New coil from 1A Auto. You can see pretty much all the same. It has the same connector and everything. Put it right down in. Press it in. Okay your 7 mm bolt. Reconnect your lead, you're all set. Just repeat that for the other seven cylinders. Then reconnect your battery and your engine should be purring like a kitten.
We hope this helps you out. Brought to you by www.1AAuto.com. Your source for quality replacement parts and the best service on the Internet. Please feel free to call us toll free 888-844-3393, we're the company that's with you on the Internet and in person.
Tools used