Replaces
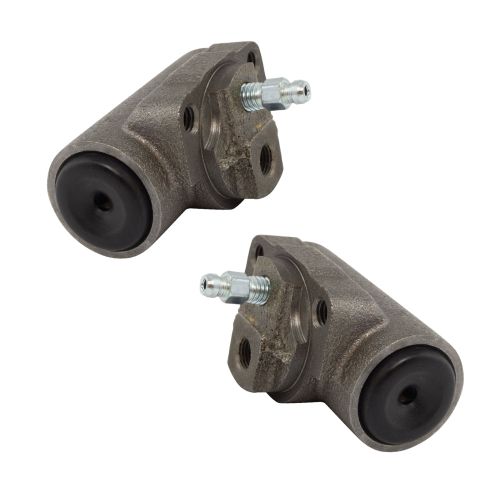
This part doesn’t fit a . Select from parts that fit.
Part Details
Item Condition:
New
Attention California Customers:
 WARNING: This product can expose you to chemicals including Chromium (Hexavalent Compounds), which is known to the State of California to cause cancer, and birth defects or other reproductive harm. For more information, go to www.P65Warnings.ca.gov
Lifetime Warranty
This item is backed by our limited lifetime warranty. In the event this item should fail due to manufacturing defects during intended use, we will replace the part free of charge. This warranty covers the cost of the part only.
FREE Shipping is standard on Orders shipped to the lower 48 States (Contiguous United States). Standard shipping charges apply to Hawaii, Alaska and US Territories. Shipping is not available to Canada.
Expedited is available on checkout to the United States, excluding Alaska, Hawaii and US Territories as well as P.O. Boxes and APO/FPO/DPO addresses. Final shipping costs are available at checkout.

Created on:
Tools used
Once you have your vehicle raised and supported, we're going to remove the center cover and the lug nuts behind it. Use your 22-millimeter socket. The next thing you're going to do is remove your drum. There's a couple of things that you may or may not have to do. One would be, of course, spray the area with some penetrant around the areas of the studs and the center area. There's also going to be an adjustment that you can relieve on the backside in case your brakes are over adjusted, and there's a lip on there. But for this one right here, it kind of just pulls right off. We'll take a peek and make sure you dispose of that brake dust properly.
We went ahead and took off the shoes, but you don't necessarily need to. Now you just want to make sure you clean down your backing plate and your wheel cylinder. Make sure you get off all that brake dust. If you look on the rear of the backing plate, you're going to see where your line goes into the wheel cylinder and, of course, your bleeder screw, go ahead and spray down that area, and let it sit. If you feel right along here, you're going to find your rubber brake hose in the rear. I'm just going to go ahead and pinch that off with some wire pliers here. Obviously, you don't want to crimp it with needle-nose pliers or anything like that or locking pliers. Now that we've let this sit for a while, let's go ahead and use our three-eighths wrench and see if I can break this free. Nice. I'm just going to remove that line completely now. Your line fitting might be a different size, by the way.
All right. We've got that out of there. Set it aside so it doesn't leak down anywhere. Now we're going to remove the bolts that hold the wheel cylinder to the backing plate using a 10-millimeter. At this point, the wheel cylinder should come free. You can give it a loving bonk or pry it away. Let's get our wheel cylinder in here, make sure that you get your little plug out of there. The bleeder screw is going to face up towards the top. Let's do that again. Let's get the wheel cylinder in there. Make sure you've got the bleeder screw facing towards the top and you've got your rubber plug out. Put it right through the backing plate, grab your two bolts, start them both in before you tighten either of them down.
All right. Let's snug it up. Just going to double-check to make sure they're nice and snug. Awesome. Let's grab our brake line. Make sure no dirt's gotten inside here and the threads look good. Let's get it into to the wheel cylinder. It's nice and snug. Perfect. Just take a little bit of lubricant, go right around your wheel cylinder. Just give the shoes a couple of bonks. This is just gonna help make sure they're situated. If it seems like it's not resting against the backing plate properly, just look right down here, there is a little edge that it could go off the side of which, of course, will make the shoes sit awkwardly, and then the drum won't go on right. This looks perfect. Now it's time to clean up the mating surface from the axle to the drum.
Now that we have this area cleaned up, let's go ahead and hit it with some copper Never-Seez. And it looks great. Grab your drum, slide it right on there. Let's open this up so we can do a gravity bleed. Just let it sit for a little bit. You're going to see fluid start trickling out. You'll probably also see some air bubbles at the same time. Wait until you don't see any more air coming out. Oh yeah, look at that. Nice. We'll just wait for a steady stream and then we'll close it off and then we'll continue with a manual bleed. So, now, it's going to be time to pump up the brakes. We're going to pump them up three times and while holding, I'm going to open up the bleeder screw.
Go ahead and pump it. You just want to pay attention to that fluid and make sure you don't see any air bubbles coming out. If you see any air bubbles, you need to make sure you go again. All right. Let's pump it again three times. As you can tell, we have a nice steady stream. This is looking great. I'm just gonna close this off here in a second. Here we are. Go ahead and clean it off. Make sure you hit it with some parts cleaner, get off all that brake fluid, and then, of course, make sure you put your little rubber cover back on there. That's going to protect the bleeder screw for a long time. That looks great.
Okay. So, when you're bleeding the brakes, it's important to make sure you go by your manufacturer specified sequence. For us personally, we're just doing one wheel cylinder for this video so I showed you how to bleed it. But if you're doing the whole vehicle, just look inside that instruction manual or the owner's manual, and it'll tell you what's the exact sequence to bleed the brakes.
All right. Let's get the wheel back on here. Start on all of our lug nuts and then we'll snug them up. Let's torque them to manufacturer specifications. Now it's time to torque these lug nuts to 120 foot-pounds. We're going to go in a crisscross pattern. Torqued. All right. Let's take our covers, get those mounted on here. Perfect. So, now, it's going to be time to check and fill your DOT-3 brake fluid. To do that, you would just grab these little tabs. You can lift right up, lift up this little rubber, look inside. If you needed to add some, top it off, get it up to where the level says right along the side here. Once you know it's full, make sure you get this rubber back on the cap. Make sure it's nice and secure, wipe down the area, and take it for a road test.
Tools used