Replaces
This part doesn’t fit a . Select from parts that fit.
Frequently bought together
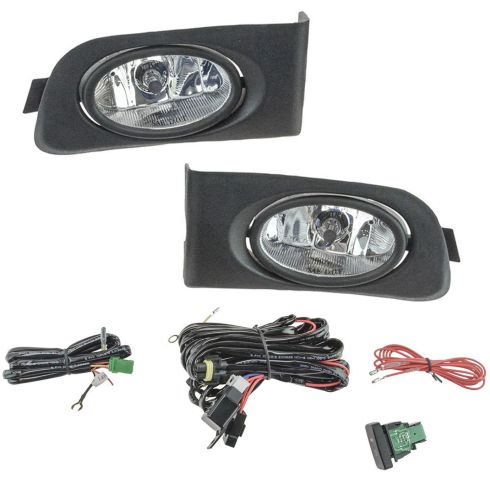
Part Details
Complete Repair in One Purchase - Stop searching for parts individually and complete your repair with a customized kit or set from DIY Solutions.
High-Quality Parts from Trusted Brands - DIY Solutions' kits and sets are selected from the best automotive brands and include hard-to-find and even obsolete parts you may need for your vehicle.
Guaranteed Fit - DIY Solutions ensures its selected parts are quality-tested to guarantee fit and function.
Assemblies may include halogen or incandescent test bulbs that should be replaced before installation.
Item Condition:
New
Attention California Customers:
 WARNING: This product can expose you to chemicals including Chromium (Hexavalent Compounds), which is known to the State of California to cause cancer, and birth defects or other reproductive harm. For more information, go to www.P65Warnings.ca.gov
Lifetime Warranty
This item is backed by our limited lifetime warranty. In the event that this item should fail due to manufacturing defects during intended use, we will replace the part free of charge. This warranty covers the cost of the part only.
FREE Shipping is standard on Orders shipped to the lower 48 States (Contiguous United States). Standard shipping charges apply to Hawaii, Alaska and US Territories. Shipping is not available to Canada.
Expedited is available on checkout to the United States, excluding Alaska, Hawaii and US Territories as well as P.O. Boxes and APO/FPO/DPO addresses. Final shipping costs are available at checkout.

Created on:
Tools used
Brought to you by 1AAuto.com. Your source for quality replacement parts and the best service on the internet.
Hi, I'm Mike from 1A Auto. I hope this How-to video helps you out. And next time you need parts for your vehicle, think of 1AAuto.com. Thanks.
In this video, we're going to show you how to install a set of our aftermarket fog lights. This is a 2003 Honda Civic. And this procedure will be the same for most 2001 to 2005. And you'll also find similarities for any car you might do this with. And you'll need a new fog light kit from 1AAuto.com, 10-millimeter socket, ratchet and extension, razor blade or reciprocating saw, drill and a 1/8th-inch drill bit, pliers, zip ties and electrical tape, and flashlight.
I'm Tony with 1A Auto. Here to show you how to install these aftermarket fog lights in your stock 2003 Honda Civic front bumper. These lights look great. They're going to help improve your vision while driving. They install very simply, fit like factory, they're DOT and SAE approved. We've already installed one for you here. We're going to show you how to install yours on the other side.
10-millimeter wrench, loosen your negative battery cable first, pull it up and off and remove it. Four clips at the top to remove. There are indents on each side of the outside so that you can just work a screwdriver underneath and pry up the center. And then, pull the clip up and out. And I'll repeat that for the other three.
Okay, at the front of the wheel well on each side, there's a 10-millimeter bolt right here you need to remove. And again, this is on each side. Also on each side, you'll want to pull the wheel wall down. This side's very broken on this vehicle, but just pull it so it's like this and it's not holding the bumper cover.
Underneath, there should be a series of these pushpins, just like the top. And there actually may be a couple of 10-millimeter bolts thrown in as well. But this vehicle has been run over a few things and then put together with wire ties. So, you just need to either remove the clips, undo the bolts. I'm not even sure how many of them I could tell you should be here, probably anywhere from six to eight of them. But we'll go ahead and do that on this car. Release each side just by pulling firmly. And then, you may have to just pull a little bit and it'll come on.
We'll have to cut out this trim in the bumper. Flip your bumper over. We're going to cut these edges with a razor blade to remove this piece. And trim along this line here, here, and here. Use a razor blade to trim out these sections. It's easiest to start with the two straight edges before moving onto the curved piece.
Now, you can flip this up, fold it back, and that score mark makes it a lot easier to trim. Don't worry too much about how this section's cutout looks because it'll all be hidden behind our new fog light. Score the edges with your razor blade a few times. A few other ways you can cut this plastic out, other than a razor blade, is with a handsaw, a pair of cutters. We're going to use a reciprocating saw. Trim up any rough edges with a razor blade.
Insert your fog light and housing into the hole you've created in the bumper. We're going to use a 1/8ths drill bit to punch through our bumper, in line with the holes pre-drilled into our fog light kit. Install the metal clips. Install the two Phillips head screws. Then drill a hole through the bottom tab and install the bolt or clip and screw. Now, you're ready to wire.
As with any custom installation, the way we're going to show you is just one way of getting the project done. You can follow these instructions verbatim or use them as a guideline to route your wiring harness, switches, et cetera, in any way you'd like. For our purposes, we're going to install the side of our harness--that includes the relay and fuse into the driver's fog light. And the side that will eventually connect to our fog light switch we'll connect to the passenger fog lights.
Before installing our bumper cover, we'll route our wiring harness around the upper radiator supports. Careful not to chafe the wires on any metal edges. Route along the top of the radiator. And send our fuse and relay harness through the radiator support on the opposite side. Again, careful not to allow any wires or casings to chafe against that edge.
Now, we can install our bumper cover back into place. Four black plastic clips on the top edge of the grille. Be sure that all three tabs are engaged into the hole. Just leave the black clips securing the bumper for now. So we can ensure all of our wiring works correctly before securing the rest of the bumper.
Route the relay side of the harness around the backside of the radiator support, being careful to stay clear of fans or any sharp edges. Zip-tie your harness onto the existing harness. Be sure to leave some slack in the harness, without leaving so much that it can move around too freely, cause issues with the length of the harness, or get in contact with something it shouldn't. Like hot exhaust or moving fans.
Now, that our relay harness is back on the same track as our switch side of the harness, we'll route everything nice and neat under the battery hold down. Grab a few more zip-ties. Tighten up the harness we've run so far. Be sure to leave plenty of slack in the ground cable, so you can still access the negative post of your battery or another bolt that you may decide to ground too.
Remove the 10-millimeter bolt under the fuse panel by the battery. Install the tab on your relay over the bolt. Now, we have easy and convenient access to both our relay and our fuse. All we have left to continue routing is this yellow lead to our switch. We've tied up our positive lead. This is just to condense everything. We'll come back through here and clean this up once everything's been plugged in and proven to work.
Our intake is a little bit in the way, so we're going to remove the lower part of our intake. Your stock airbox will probably have to come out of the way, so we can access where the engine harness comes through the firewall at the steering rack. We're going to need a little more wire to get to where we want to go. Just going to clip together these bullet connectors. They're in there pretty good, but for just a little extra assurance, we're going to go ahead wrap it in some electrical tape to make sure that the connector stays tight and free of any kind of moisture.
Now, we're going to want to route our wire over the transmission mount. And it just so happens that this brake line runs to just about where we need to be. So, we'll use that to secure our wire out of the way. We're going to make a small cut just to the left side where the harness comes through this rubber plug in the firewall. Peel the carpet back to expose the rubber plug where the harness comes through the firewall.
You'll see where your lead is passed through. Pull that wire through. You'll want to find a switched power source. Switched power means that when the vehicle is off, there will be no power to our switch. But when the vehicle the key in the On or Run position, we'll have power to our switch. This means if you forget to shut your aftermarket fog lights off, shut the car off and exit the vehicle, the lights will be shut off on their own.
A good way to check for this is with your cigarette lighter or power outlet. As you can see we have a phone charger, light's not on. Turn our vehicle to the On or the Run position and our charger turns on. Turn it off, and the light goes out. That means when we power our switch off of this source, it won't send power to our lights when our vehicle's not running.
If you don't have access to plastic trim tools, you can use the screwdriver with some tape on the end. Go ahead and pry up the trim ring around your gear selector. If you have a manual transmission, pull down on the boot. Undo the clamp around the bottom of the shift knob and pull the shift knob off. So, you can then remove this same trim piece with the leather on it. For the automatic and the manual, at this point, we'll pry up on the second layer of black trim.
So, you can see where the nine clips are that you'll have to release. Ours are broken, but there are two Phillips head screws here located just ahead of the shifter on either side. You'll have to remove those before you can pry out the side trim on the console. Ensure that your cup holder cover is down. Pull out on the front of the trim. We know that our cigarette lighter has switched power here. And we have access to a ground for our switch at the back of the console.
Take the lead from your firewall and push it up through the dash. You want to feed it over to the opening behind your cigarette lighter. You'll be able to access it right here. Fish it through and leave some slack on the floor, so we can hide this wire under the carpet. Connect the bullet connector from the harness you ran through the floor into your switch harness. Install a double-barrel connector over the power side of your cigarette lighter.
You may have to open it up a little with a flat head screwdriver. Slide your switched lead from the switch harness into the other side of the connector. Clamp it down with a pair of pliers. Nice and tight. Close the connector. Loosen up the bolt for the ground behind your console with a 10-millimeter socket and ratchet. Slide the ground from our harness.
You may have to peel back the casing a little to get a little more slack. Slide it behind the ground, tighten it back up. These two tabs here, the exact same size as our switch, pop out whichever one you like, install the connector in the back of the switch. Tuck your access wire. Re-install your center console. Everything just snaps back into place. Tuck the wire we left exposed under your carpet behind your center console.
We've decided it's a little cleaner to run our positive wire into the fuse box next to the battery. So, we'll route that along with the rest of our harness. Open up our fuse box. We have power right at the front of the box. We'll use an eight-millimeter socket to loosen up one of the leads. Install our positive lead to it. Tighten it back down. Bend the edge of our connector. Re-install the cap. We'll reconnect the ground terminal of our battery. Slide the ground for our relay, tighten it back up with a 10-millimeter socket and ratchet.
Before we do anything else with our harness, we'll take a second to make sure that our fog lights work as they're supposed to. With our key on, we'll check our switch. The lights work as they're supposed to. To make sure that we did, in fact, use switched power, we'll shut the key off with the switch on and our lights go off. Fog lights you make an excellent addition to your vehicle to really help with visibility. When every little bit helps.
At the bottom of the bumper, you can access two Phillips head screws. One on each fog light that adjusts the height of the light. Be sure that these are adjusted properly and not hazardous to other people on the road. Re-install the two, 10-millimeter screws at the bottom of your bumper on either side. Tuck the fender liner back behind the bumper. Once you've ensured that everything works properly, clean up your wiring harness by tucking any excess wiring, zip-tying it up and out of the way of anything you may see as hazardous. And snipping the ends of the zip-ties. Re-install your intake.
Thanks for tuning in. We hope this video helped you out. Next time you need parts for your car, please visit 1AAuto.com. Also, check out our other helpful How-to, as well as Diagnosis videos.


