How to Replace Window Regulator 1996-2007 Ford Taurus
Created on: 2010-11-05
In this video, 1A Auto shows you how to replace the power window regulator and motor in a 96-07 Ford Taurus.
-
step 1 :Remove the door panel
- See our other videos for more detailed instructions
-
step 2 :Remove the window regulator
- Disconnect the window regulator harness.
- Remove the window from the regulator using a drill to remove the rivets
- Tape the window up and secure out of the way.
- Drill out the window regulator rivets with a 5/16 bit
- Use a hammer and punch to remove the rest of the rivet from the door.
- Remove the two 11 mm bolts securing the bottom window regulator track in place.
- Carefully finesse the regulator out of the door.
-
step 3 :Install the new window regulator
- Place the regulator into the door
- Replace the rivets with coarse threaded bolts and lock nuts.
- Plug in the wiring harness.
- Carefully untape the window and bolt the window into the regulator.
- Test the regulator before reassembling the door panel.
- See our other videos for more detailed door panel reassembly instructions.
Tools needed
-
Hammer
Flat Blade Screwdriver
Center Punch
3/8 Inch Drill Bit
10mm Socket
Ratchet
11mm Socket
Brought to you by your source for quality replacement parts and the best service on the internet.
Hi I'm Mike. I'm one of the owners of 1A Auto. I want to help you save time and money repairing and maintaining your vehicle. I'm going to use my 20 plus years experience restoring and repairing cars and trucks like this to show you the correct way to install parts form 1A Auto.com. The right parts installed correctly, that's going to save you time and money. Thank you and enjoy the video.
In this video we're going to show you how to remove and replace the window regulator on this 2001 Ford Taurus. The same as any '96 to '07 Taurus. The tools you'll need are a drill, 6/16in drill bit, safety wear for your eyes, 10mm and 11mm sockets and ratchet, bolts, locknuts, and nuts to replace rivets (or whatever size bolts, locknuts and nuts you have for the sockets),and then a hammer and punch. I'm going to try to keep it short and I'm going to fast forward through removing the door panel. If you want to see this in regular speed just check out our door panel remove and replace, it's one of our other videos. You can probably pick up enough here, seven screws and then pull the door panel off.
You can see I have the window right at this position here. What that does for you is it puts these rivets that you have to drill out; it puts them right in the right level of these holes. You can reach in and get it with a drill get to it. Now usually when your window motor breaks or your regulator breaks, and it's not in that position where you can reach everything - I'm going to put it down like that right now, what you want to do is you want to drill out your window regulator rivet first. Then there's four right here, you drill those out and then you can lift the window up and tap it up to the right level that you can reach those rivets.
Before we drill you, have to disconnect our window regulator which is right here. This little tab right here, pull it down and off. Some of these rivets you may need to use a punch to knock out the center of the rivet. These four are my window regulator rivets and that is nice big centering hole so I don't have to worry about it too much. We can drill out and then I've got a 5/16th bit on here. The rivets are made of aluminum so they actually drill pretty easily. Make sure you wear the protection because aluminum does fly around a little bit. Drill in to them and then sometimes the edges of the rivets will just kind of come off as a ring right off into your drill bit. Then you'll want to poke them through wants you get them out.
Here I am taking a hammer and a punch. You can use and hammer and a screw driver or whatever. You just kind of punch in the left over part of the rivet, through the back end of the door. You'll want to fish them out of the door so they don't jingle around or make a bunch of noise. Now you can lift the window up into position so you can see the rivets that hold the window to the regulator. I'm using a little bit if painters tape to tape it up into position. Now on these rivets you do want to knock the center out so I'm just using a punch and give it a good hard wrap, and that just pushes the center of the rivet back out. Now I've got my drill and I'll drill both those rivets out. Now actually our regulator is separate from our window. I can remove these 2/11 mm bolts that hold this bottom track on.
You can see this is our original regulator, the new one from 1A Auto. They're basically all the same. A little different. The original regulator has the connector on the motor, so it just has a little pig-tail the same connectors are going to plug in just a little bit of a difference. Although I showed you the one from 1A Auto there's nothing wrong with this one so I'm just going to put this original one back in. Just going to get this flat piece of rivet off here. Put the regulator right into the door. Put the bolt in the crack. Now you want to lift up your regulator and you keep this little clip here and you lift up into the back. That slot hand up right there. Then you can push. I'm rotating the regulator so I can get a hold, sorry, so I can get a bolt hold wind up. I've got the full wind up right here. Push this bolt through. This looks like kind of a tight space because it's got the motor on it. Something you might want to do is, just lifting up so I can see the hole really well right here. Put this bolt in. Then rotate the regulator down. Put the bolt through. Ok this is my last bolt so what you want to do is run your regulator up a little bit. Make sure your plug to your furnace is back in. Carefully running your regulator out a little bit. Then you can reach back in. Put the flat bolt in. Now tighten them up. And again you might to run the regulator down to get to some of the bolts on the other side.
You need a 10mm wrench on the back side and a 10mm socket. Possible that your bolts might not be 10mm. Ok so I will go through what I usually do is I kind of preliminary them up. I don't tighten them up all the way the first time around. Then I go back and firm up after all four are somewhat tight. That way if the regulator shifts or whatever you can get them so you can see it I'm just going through and tightening them up for the final run. As you can see the 11mm bolts here. Now that everything is tightened up you want to run your regulator up so that you can see those holes. Right through here. You can see the track. You can move it just a little bit over. You can see the track right through there. You're going to want to use about an inch long bolt. Feed up and thru. Then we will put a lock washer on. Then another one. And you repeat the same thing over here. A 1" bolt with a washer. You're going to take the tape off a little bit so you can slide the window down some.
When you've gotten everything tightened up we can test the window. Make sure it goes up and down nice and easy. Everything looks good. Now we're going to go speed through putting the water shield and the door panel back on. If you want to see this in regular motion just check out our other videos for the Taurus door panel remove and install. You'll see me fly through this. You've probably picked up enough to put it back together anyways since you took it apart. That's about it. We hope this helps you out.
We hope this helps you out brought to you by www.1AAuto.com. Your choice for quality replacement parts and the best service on the internet. Please feel free to call us toll-free, 888-884-3393. We're the company that serves you on the internet and in person.
Shop Products
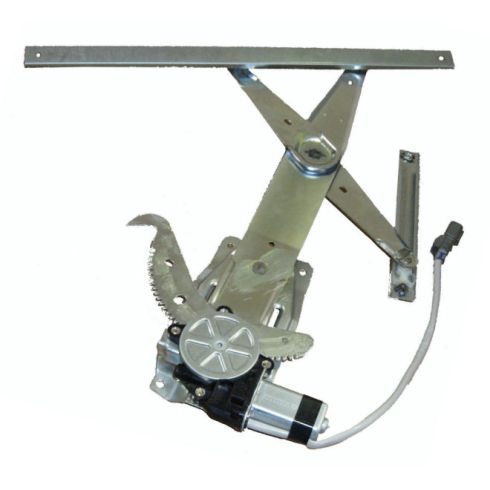
Ford Taurus Mercury Sable Front Driver Side Power Power Window Motor & Regulator Assembly TRQ WRA51369
Part Details:
- Power
- 2
- No
- No
- Galvanized Steel
- Steel
- Yes
- 7.87 in
- No
- 8
How To Replace Manual Window Regulator 1980-96 Ford F-150 F-250 F-350
Check out this video from 1A Auto to learn how you can replace the window regulator on your 80-96 Ford F-series truck.
