How to Replace Tie Rod 1981-2002 Lincoln Town Car
Created on: 2011-05-19
If the stabilizer link is rattling, vibrating, or broken, this video will show you how to properly remove, prepare, and replace it with a new one
-
step 1 :Removing the Wheel
- Pry off the center cap with a flat blade screwdriver
- Loosen the lug nuts with the vehicle on the ground
- Raise the vehicle with a floor jack
- Secure the vehicle on jack stands
- Remove the lug nuts
- Pull off the wheel
-
step 2 :Removing the Outer Tie Rod
- Turn the rotor by hand or turn the steering wheel to access the tie rod
- Remove the cotter pin from the tie rod nut with needle nose pliers
- Loosen the 19mm nut from the tie rod end
- Loosen the 1/4 inch nut and bolt from the tie rod clamp
- Apply penetrating oil to the tie rod end
- Separate the tie rod from the steering knuckle with a pickle fork and hammer
- If a pickle fork is not available, remove the 19mm nut from the tie rod end
- Then thread the nut on upside down and separate the tie rod from the steering knuckle with a hammer
- Mark the outer tie rod threads with a marker where they meet the inner tie rod
- Twist off the outer tie rod with an adjustable wrench
-
step 3 :Preparing the New Outer Tie Rod
- Measure the distance from the end of the old tie rod to the marked threads
- Mark the new tie rod in the same location
-
step 4 :Installing the New Outer Tie Rod
- Remove the shipping boot
- Twist the new outer tie rod into place
- Clean the steering knuckle
- Push the outer tie rod into the steering knuckle
- Thread the 19mm nut onto the tie rod end
- Tighten the 19mm nut to 50 foot-pounds of torque
- Line up the nut with the cotter pin hole
- Insert the cotter pin into place
- Bend the cotter pin with needle nose pliers
- Insert the 1/4 inch nut and bolt into the tie rod clamp
- Tighten the 1/4 inch bolt to between 20 - 25 foot-pounds
-
step 5 :Reattaching the Wheel
- Slide the wheel into place
- Start the lug nuts by hand
- Tighten the lug nuts preliminarily
- Lower the vehicle to the ground
- Tighten the lug nuts to 100 foot-pounds in a crossing or star pattern
- Reattach the center cap
Tools needed
-
Pickle Fork
1/2 Inch Wrench
Hammer
Torque Wrench
Tie Rod Fork
13/16 Inch Spark Plug Socket
Ratchet
Cloth Rags
Needle nose pliers
1/2 Inch Socket
Marker / Writing Utensil
Brought to you by 1AAuto.com, your source for quality replacement parts and the best service on the Internet.
Hi, I'm Mike Green. I'm one of the owners of 1A Auto. I want to help you save time and money repairing or maintaining your vehicle. I'm going to use my 20-plus years experience restoring and repairing cars and trucks like this to show you the correct way to install parts from 1AAuto.com. The right parts installed correctly: that's going to save you time and money. Thank you and enjoy the video.
In this video, we're going to show you how to replace the outer steering tie rod end on this 2000 Lincoln Town Car. It's actually the same as any '81 to 2002 Town Car. Tools you'll need are 13/16 inch and 19 millimeter sockets with a ratchet, a torque wrench, pliers, tie-rod separator fork, hammer, ruler, and a marker or a grease pencil.
We're going to start out. Remove your center cap. If you're using hand tools you'll want to loosen your lug nuts while the wheel's on the ground first, then raise the car with the jack stand, and then remove your lug nuts. I have the benefit of air tools. These are 13/16 inch lug nuts. We'll just speed it up here as we remove those lug nuts and then remove the wheel entire.
Pull or turn your steering wheel so you can have easy access to the tie rod. Apologies here, I didn't get a very good shot of it, but all I'm doing is using a pair of needle nose pliers to break off the ends of the cotter pin, and then pull it out of the tie rod stud. This bolt's 19 millimeters. We'll speed it up here a little bit as we just remove that bolt the rest of the way. Now, right here, on the steering linkage there's a bolt with a nut on the back side that holds a clamp. It's a half inch, which I'm surprised about. It can seem to bounce back and forth between metric and standard, but we want to loosen up this bolt.
Now, we're going to hit the end of the tie rod end with a lot of penetrating oil. Now we want to separate the tie rod end from the steering knuckle. There are two ways you can go about this. The best way is using the correct tool which is a tie rod and ball joint separator, sometimes called a pickle fork. The other way is you could take your bolt, thread it back on, actually, upside down onto your tie rod end, and then use a hammer to try to force it out. That bolt keeps the tie rod stud from mushrooming and then not being able to go through here, so you'd want to make sure you get the bolt down level with the stud, and then beat on it. This is not always successful. It can cause stress to your steering knuckle, so it's not a hundred percent recommended. Also, if you do it this way, you probably will have problems getting this bolt back off because it will get stuck onto the stud. The right way is with a pickle fork. I do make a minor mistake here. You see I took that nut off. You actually want to loosen that nut and leave it on. You'll see later so that when you do break the tie rod loose the pickle fork doesn't fall and the tie rod or the steering linkage doesn't fall. It's not a big deal, but just a little safer way to do it is to leave that bolt threaded on there so it doesn't come apart too violently. You can see there's an ear on this side which means they want you to go at it just like this. This is one of those times when it's fun not to be nice. I don't have a lot of room here.
So, now what I'm going to do is use a red permanent marker, you can use anything. I mean grease pencil or something would be best. I'm going to really put a bunch of red ink there. That's going to tell me how far in the tie rod was. Now, I'm going to take a large adjustable wrench, and, on these tie rods, clockwise actually is moving them out, so you want to basically just start turning, and this one actually started turning pretty easy.
We'll measure from the end here. I would say it's about eight and three quarters centimeters. For this one, down here, do the same and mark. This'll just give you a rough alignment. After this repair, you should have your car aligned.
Remember on this side it's counterclockwise you can install it. Then up to my mark and one more. Remove the nut. That plastic is a shipping boot, so we want to remove that. If you have paper towels, clean off. Clean out the steering knuckle. I'm just going to push the new tie rod. It's going to be stiff. Push it a little bit. Work it up in there. Get the nut on. Now, we need to torque our nut on here. I've got the torque wrench set to 50 foot-pounds. Then at a brief look, it looks like you pull it just a little tighter to get the cotter pin into it. I'll need a cotter pin. Put it in from the side here. It just needs a little convincing. It's got to get up and over. It doesn't go anywhere. Briefly tighten this bolt here. When I get this tight, it probably should be about 20 to 25 foot pounds. I'm just going to get it pretty tight with my ratchet here.
Now we're going to fast forward through putting the tire back on, thread the lug nuts on by hand. I use my impact wrench just to tighten them preliminarily, and then lower it down to the ground. Torque them to 100 foot-pounds using a star pattern, and then put my center cap back on.
We hope this video helps you out. Brought to you by www.1AAuto.com, your source for quality replacement parts and the best service on the Internet. Please feel free to call us toll-free, 888-844-3393. We're the company that's here for you on the Internet and in person.
Shop Products


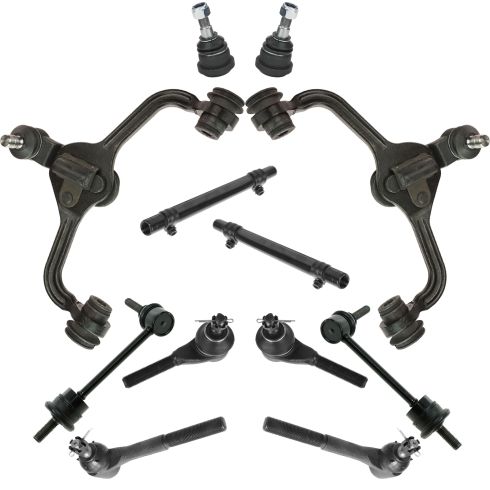
1998-02 Ford Lincoln Mercury Front 12 Piece Steering & Suspension Kit TRQ PSA70019
Part Details:
- (2) Front Sway Bar Links
- (2) Front Lower Ball Joints
- (2) Front Upper Control Arms with Ball Joints
- 12 Piece
- (2) Front Tie Rod Adjusting Sleeves
- (2) Front Outer Tie Rods
- (2) Front Inner Tie Rods
How to Replace Inner Tie Rods 2007-17 Ford Expedition
This video shows you how to replace the inner tie rods on your 2007-2017 Ford Expedition.
