How to Replace Inner Tie Rods 2007-17 Ford Expedition
Created on: 2020-11-16
This video shows you how to replace the inner tie rods on your 2007-2017 Ford Expedition.
Tools needed
-
Torque Wrench
Hammer
Socket Extensions
Channel-Lock Pliers
Pry Bar
Jack Stands
Liquid Thread Locker
21mm Socket
Inner Tie Rod Removal Tool
Socket Driver
Paper Towels
Large Locking Pliers
Copper Anti-Seize
Wheel Chocks
Straight Cutters
Hose Clamp Pliers
Wire Ties
Ratchet
Floor Jack
Needle nose pliers
1/2 Inch Impact Gun
Go ahead and remove your center cover here. Now it's gonna expose your lug nuts, remove all 6 of your 21-millimeter lug nuts. Remove your wheel. Now the next thing we're gonna do is break free our jam nut right here. There we are. Remove your outer tie rod end nut. Now let's go ahead and use our hammer, and we're gonna give our knuckle a couple loving bonks to break this free. Now let's use some locking pliers, come right up on this inner tie rod end stud here, and then we'll remove our outer tie rod end. You wanna make sure you count this on the way out. What I mean by that is here we go around one, two, three, and then so on. All right. So, I got 23, results may vary. Let's go ahead and fully remove that jam nut. Now we need to go ahead and get our power steering bellows boot off of here. Typically, you do that by removing the clamp here, and then on the inside, there's gonna be another clamp. Stick a nice pry bar or screwdriver or whatever you've got. Come right up against that clamp edge, give it a couple loving bonks until it breaks free. Recycle that. Grab your boot, give it a nice little twist to break it free from the power steering rack, and then, of course, from here, we wanna pull this down as well. Inspect your boot, make sure it's still in good condition. If it needs to be replaced, well, now's the time to do it.
Now it's gonna be time to remove your inner tie rod end from the rack. You wanna do that by grabbing onto this area right here. If you've got some nice long pliers, this comes in handy. There it is friends. Now, we're just gonna take a nice rag and we're gonna clean out this internal area. We don't want that out of portion. Try to get inside this area, get out any gunk or debris that might be in there for whatever reason. All right friends. Now it's time to install our brand new inner tie rod end. One thing I'd like to mention is it's always a good idea to use a little bit of thread locker. Go ahead and start this on there, we're gonna bottom it out, and then we'll, of course, snug it down. Okay. Just a little tweak after it's bottomed out, should be all it needs. Now the inner tie rod came with some nice grease. You wanna make sure that you use the majority of it right inside the ball area of the joint. So, go ahead and just put a whole bunch in there, kind of smooth it around a little bit and this is gonna help keep moisture out of there and, of course, keep it lubricated. Let's take a little bit of that grease and we're just gonna come right up along this line right there. You can go on both sides of it and I'll show you why in a minute.
So, now we're gonna go ahead and put our bellows boot back on. I like to use a nice wire tie as a clamp because it works just as well as anything else in all honesty. I'm just gonna go ahead and slide this on here, and then as I get to this point on the inner tie rod end, that's going to be approximately where I have that lubricant. So, it's gonna get into that groove, and that's going to help keep moisture out of there, and it's also gonna help the alignment professional down the line. We'll go ahead and slide the boot onto the rack. Once it's completely on, give it a nice spin, and then tighten up your wire tie. Now let's go ahead and put our outer clamp back on there. Typically, people like to use copper never- seize but if you've got a little bit of your grease still leftover, go ahead and put it right on the threads here and that's gonna help keep the moisture out of there. And then, of course, start on your jam nut. We're gonna get that about halfway, and then we'll get to our outer tie rod end.
Okay, friends. Now it's time to install our brand new outer tie rod end. You wanna make sure you put this in the same amount of turns that you removed the old one. Let's go ahead and put this back into the knuckle. Start our nut on there. Let's snag up the jam nut. Let's go ahead and snag the tie rod nut. And now we'll torque it to 44 foot-pounds. Now, we need to pay attention to our castle nut and make sure it lines up with the hole and the stud. If it doesn't, you need to continue tightening until the next hole does. That was good. Let's go ahead and put our little cotter pin in here. And then, of course, pin it over so there's no way this nut can loosen up. Let's go ahead and get our wheel back up on here. Start on the lug nuts, and then we'll torque them to manufacturer's specifications. All right. Now with the wheel just barely touching the ground, we're going to torque these lug nuts to 140 foot-pounds. The little center cover on there torqued.
Shop Products


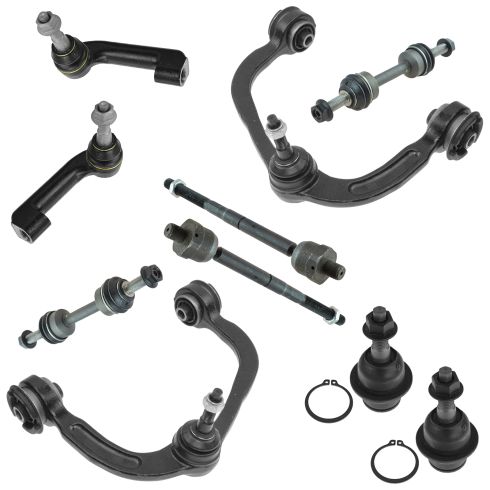
Ford Lincoln Front 10 Piece Steering & Suspension Kit TRQ PSA59573
Part Details:
- (2) Front Lower Ball Joints
- (2) Front Upper Control Arms with Ball Joints
- (2) Front Sway Bar Links
- 10 Piece
- (2) Front Outer Tie Rods
- (2) Front Inner Tie Rods
How to Replace Outer Tie Rods 2007-10 Hyundai Elantra
Check out this 1A Auto instructional video, and learn how you can replace the tie rod on your 07-10 Hyundai Elantra! Do it yourself, and save some money!
