How to Replace Tailgate Latch Rods 1988-2000 GMC Sierra K1500
Created on: 2017-02-27
How to fix or adjust a tailgate latch rod on 88, 89, 90, 91, 92, 93, 94, 95, 96, 97, 98, 99, 00 GMC Sierra K1500
-
step 1 :Removing the Tailgate Handle
- Pull the handle cover off the tailgate
- Remove the six Phillips screws from the tailgate cover
- Remove the 13mm screws from the handle
- Remove the tailgate cover
- Remove the T40 Torx bolt from the handle
- Pry off the rod latch clips
- Pull off the tailgate handle
-
step 2 :Removing the Tailgate Latch Rods
- Lift up on the tailgate slightly
- Slide the cable forward and out
- Remove the T40 Torx screw from the cable
- Remove T40 Torx bolts from the latch bracket
- Remove the latch
-
step 3 :Installing the Tailgate Latch Rods
- Pop the new set of clips into the handle
- Insert the latch rod into the latch
- Send the latch into the tailgate
- Line up the two T40 Torx bolts and the plastic space
- Tighten the bolts to the bracket
- Tighten the T40 Torx bolt to the cable
- Lift up the tailgate
- Slide the top of the cable onto the stud
-
step 4 :Reinstalling the Tailgate Handle
- Put the tailgate handle into place
- Engage the latch rods to the clips
- Fasten the T40 Torx to the handle
- Replace the cover
- Fasten the two 13mm nuts onto the latch
- Put the tailgate cover into place
- Insert the six Phillips screws into the tailgate cover
- Snap on the handle cover
- Close the tailgate
Tools needed
-
13mm Socket
Socket Extensions
Flat Blade Screwdriver
T40 Socket
Phillips Head Screwdriver
8mm Socket
Ratchet
Hi, I'm Mike from 1AAuto. We've been selling auto parts for over 30 years! We're dedicated to delivering quality auto parts, expert customer service, and fast and free shipping, all backed by our 100% satisfaction guarantee. So visit us at 1AAuto.com, your trusted source for quality auto parts.
In this video we're going to be working with our 1996 GMC Sierra K-1500. We're going to show you how to remove and replace your tailgate latch rods which if stretched, rusted, or broken can cause the tailgate to be difficult to open or have it stuck in the open position.
If you like this video, please click subscribe. We have a ton more information on this truck, as well as many other makes and models. If you need these parts for your vehicle, you can follow the link down in the description over to 1AAuto.com.
Here are the items you'll need for this repair: flat blade screwdriver, Phillips screwdriver, 8-13mm sockets, ratchet, socket extension, T40 socket
If your tailgate is stuck closed, remove the bezel by popping it off with a trim tool or a flat blade screwdriver. Ours is missing. All you have to do is these latches usually get a little stretched out, these rods, you just have to pry them over until they release. Remove the six Phillips head screws around the perimeter of the tailgate cover with a Phillips head screwdriver. Now our tailgate liner has two 8mm screws in it. I believe that these are self-tappers that somebody put in here because you can see it's kind of wrinkled up. They probably just did that to help keep it down. If you have some in there, it's not uncommon, just remove them with the appropriate sized socket and ratchet. Ours are 8mm. Remove the two 13mm bolts in the top center of the tailgate cover, do this with a 13mm socket and ratchet, and remove the cover from your tailgate.
Remove the T40 Torx bolt with a T40 Torx socket, ratchet, and extension. You may want to hold the handle in place while you do this. Pop up the plastic clips on the latch rods. You may need a small flat blade screwdriver for this, but ours are moving fairly easily. Should just be able to do them by hand. Then pull the latch rod straight back out of the clip, same thing on the other side, and remove your handle from the tailgate.
Lift up on your tailgate slightly. Lift up on the little metal safety here so you can slide the cable forward into the larger opening and pop it out. Remove the T40 Torx for the cable. Remove the remaining two T40 Torx bolts. There is a small spacer or washer back here you want to make sure you don't loose when you take this off. See, right when you loosen it, it slides out. Remove the latch. You may have to reach over and just pop up the other end of the latch rod and remove it from the tailgate.
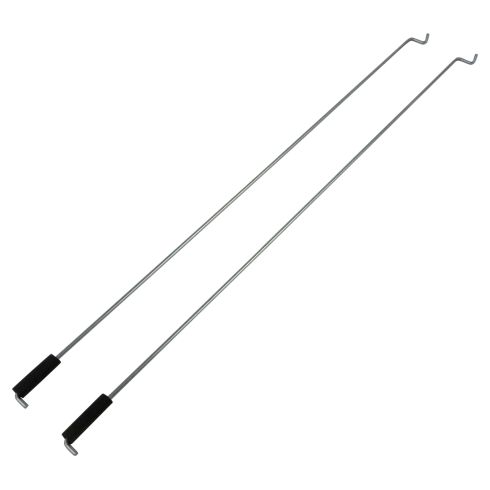
Here we have our old tailgate latch rod that we removed from our vehicle and our new part from 1AAuto.com. As you can see, these parts are nearly identical. There are some minor aesthetic differences with this little damper here. They do both have a rubberized end here, the same hook, length, and the same tab on this end. Now, these latch rods can become rusted, bent, broken or get stretched out and not allow your tailgate to release fully. A new pair of latch rods could be exactly what you need to get your tailgate functioning normally.
These are sold as a pair, however we're only showing you one here because both sides are identical. The kit even includes a new set of clips, which will pop into your old handle. You can see, it's not uncommon to break these when it comes out, so you can make sure that you can get through the whole job start to finish without needing any extra parts. If your tailgate is difficult to open or requires a lot of force, this new part from 1A Auto is going to go in direct fit, just like your original equipment and fix you up right.
Install your new latch rod into the latch. Carefully send it into the tailgate. You, again, may need to go over to the opening and just help get that hook over the end. Line up your two T40 Torx bolts. Don't forget to slide the plastic spacer back into place before tightening your bolts down with your T40 Torx socket, ratchet, and extension.
Install the T40 Torx bolt at the bottom of the cable. Make sure the hook at the top is facing the correct direction so the tab faces in toward the middle of the truck and will lock back over the stud. This bolt is shouldered, so it's going to bottom out before it's completely clamped, so this allows room to move around.
Lift up on your tailgate, slide the larger part of the cable over the tab, and then lock it into place. If your latch hold down is broken, simply take a small flat blade screwdriver, pop the old one out, pop your new one in. Now, we are installing a new handle so we didn't have to do that. The process for installing the old handle with the repaired tab and a new handle will be exactly the same.
Simply pop the top in. Slide the latch rods into their openings and engage the clips. Slide the handle back into place. Start reinstalling your hardware. Now the top two bolts on our handle went through the plastic tailgate cover. If yours don't, install them now. But since ours do, we'll install the top two bolts just a couple of threads to help keep everything aligned while we tighten down our T40 Torx bolt at the bottom. We'll take the bolts out, so now we know that everything is going to line up, and reinstall our plastic cover.
We'll reinstall our two 13mm bolts. Don't forget the washers if yours has them. We'll tighten down our two 13mm bolts with our 13mm socket and ratchet. We'll then reinstall the six Phillips head screws around the perimeter. We had our self-tapping screws that I'll reinstall as well. Open the handle. Slide the bezel up and around. Simply push all four corners to engage the clips. Close your tailgate and you're good to go.
Thanks for watching. Visit us at 1AAuto.com for quality auto parts, fast and free shipping, and the best customer service in the industry.
Shop Products


Chevrolet GMC Driver & Passenger Side Tailgate Latch Rod 2 Piece Set TRQ BDA69219
Part Details:
- 2 Piece Set
How to Replace Tailgate Handle 1995-99 Chevy Tahoe
How to repair, install, fix, change or replace a broken or snapped off tailgate handle on 95, 96, 97, 98, 99 Chevy Tahoe, or GMC Yukon
