How to Replace Radiator 2004-08 Dodge Ram
Created on: 2016-05-11
Check out this video on how to replace the radiator on your 04-08 Dodge Ram.
-
step 1 :Draining the Coolant
- Open the radiator drain
- Drain a bit of fluid out
- Close the valve
-
step 2 :Removing the Radiator Fan
- Insert a pipe wrench to the radiator fan nut
- Insert a 3/8 drive ratchet into the tensioner
- Tap the pipe wrench with a hammer to knock the nut loose
- Loosen the radiator fan nut off with an adjustable wrench
- Remove the radiator fan
-
step 3 :Removing the Coolant Reservoir
- Remove the hose from the bottom of your washer pump
- Drain the coolant fluid
- Disconnect the water pump connector
- Disconnect the coolant level sensor
- Remove the overflow hose from the fill neck on the radiator
- Remove the two 10mm bolts from the coolant bottle
- Lift the reservoir up and out
-
step 4 :Removing the Radiator Fan Shroud
- Remove the 13mm bolt under the fill neck on the radiator
- Loosen the upper radiator hose clamp at the radiator
- Twist and free the radiator hose up and off
- Remove the 13mm bolt on the fan shroud
- Lift the fan shroud up and out
-
step 5 :Removing the Radiator
- Loosen the radiator hose clamp with a flat blade screwdriver
- Twist the radiator hose to break it free
- Remove the two 10mm bolts from the upper radiator mounts
- Let the power steering cooler hang
- Remove the 10mm bolt behind the radiator below the neck filler, above the radiator hose
- Lift the radiator up and to the side
- Remove the 10mm tranny bracket bolt
- Release the transmission cooler lines from the radiator bracket
- Lift the radiator up and out
-
step 6 :Installing the Radiator
- Close the drain on the bottom of the radiator
- Insert the radiator into place
- Insert the transmission cooler tabs into place
- Snap the cooling lines into the retainer
- Tighten the 10mm tranny bracket bolt
- Place the power steering cooler into place
- Hook the radiator onto the lower brace
- Line the transmission cooler brackets up
- Hand tighten the transmission cooler nuts
- Hold the bolt with a wrench and tighten the 10mm nut
- Reinstall the two 10mm bolts to the upper radiator mounts
-
step 7 :Installing the Radiator Fan Shroud
- Insert the radiator fan shroud into place
- Insert the two 13mm bolts at the top of the fan shroud
-
step 8 :Reinstalling the Radiator Fan
- Insert the radiator fan into place
- Start the nut by hand
- Spin the nut into place
- Tighten the pipe wrench to the radiator fan nut
- Hammer the radiator fan nut into place
-
step 9 :Reinstalling the Coolant Reservoir
- Insert the coolant reservoir into place
- Tighten the two 10mm bolts to the top of the tank
- Insert the overflow tube into place
- Reconnect the water pump connector
- Reconnect the coolant level sensor
- Reconnect the upper radiator hose
- Tighten the upper radiator hose clamp into place
- Reconnect the lower radiator hose
- Tighten the lower radiator hose clamp into place
-
step 10 :Refilling the Coolant
- Refill the washer fluid
- Remove the radiator cap by pressing down counterclockwise
- Refill with 50/50 coolant
Tools needed
-
Adjustable Wrench
13mm Socket
Hammer
Socket Extensions
Flat Blade Screwdriver
Drain Pan
10mm Socket
Ratchet
3/8 Inch Drive Ratchet
Brought to you by 1AAuto.com, your source for quality replacement parts and the best service on the Internet.
Hi, I'm Mike from 1A Auto. I hope this how-to video helps you out, and next time you need parts for your vehicle, think of 1AAuto.com. Thanks!
In this video, we're going to show you a radiator replacement. This is a 2008 Dodge Ram with a Hemi V8. This radiator and this process is the same of a lot of those generation Rams. You'll need a new radiator from 1AAuto.com, drain pan, large adjustable wrench, 3/8 drive ratchet, hammer, flat blade screwdriver, and 10 to 13 millimeter sockets.
This can easily be done from the ground. We raised and supported our vehicle and put a drain bucket under our radiator. Open the drain on the bottom of the radiator. Wait for your coolant to run out.
Open the drain on the bottom of the radiator. You only have to remove the upper radiator hose, so just drain a little bit of fluid out to make sure you don't lose too much, and then re-close valve.
Your radiator fan is located at the back of your radiator, attached to your water pump. There's a few different ways to take this off, but we're going to use a pipe wrench secured to the nut, a 3/8 ratchet to add a little bit of tension to our serpentine belt and keep the water pump from spinning, and a hammer. We're just going to knock the nut loose, and use an adjustable wrench to take the nut the rest of the way off. Then move your fan out from behind the shroud and set it off to the side.
Remove the feed tube on the bottom of your washer pump, make sure you have a drain bucket to catch what comes out. Lift the red safety to the connector, release the connector from your washer pump. Release the red safety from the level sensor, disconnect from your level sensor.
Remove your overflow hose from the fill neck on the radiator, remove the two 10mm bolts. Lift the reservoir out of the car, being careful not to damage your sensors and pump, set it off to the side.
Remove the 13 millimeter bolt under the fill neck under the radiator. Loosen the hose clamp on the upper radiator hose at the radiator. To remove a radiator hose without damaging it, we're going to twist and free it up before pulling it off and setting it to the side. Remove the other 13mm bolts on the fan shroud. Lift up on the fan shroud to release it from its tabs, put it off to the side.
Place a drain bucket underneath your lower radiator hose before removing. Use a flat head screwdriver to loosen the radiator hose clamp. Move it off to the side. Twist your radiator hose to break it free and remove from the radiator. Move it out of the way.
Remove the two 10 millimeter bolts at the bottom of the radiator that hold the power steering cooler in place. The power steering cooler bolts go through the bracket, so you'll have to hold one side with a wrench. Let the power steering cooler hang so it's free of the radiator.
Remove the 10 millimeter bolt behind the radiator and below the filler neck, and above the upper radiator hose on the opposite side. Lift the radiator up and move it to the side so we can access the training cooler bracket bolt, 10 millimeter. Release the transmission cooler lines from the side of the radiator, rest the training cooler somewhere safe. Lift the radiator out of the truck.
Here's the radiator out of our vehicle, and a new one from 1A Auto. You can see they're exactly the same. Same fill hole, same points for the radiator hoses, all the same mounting points. In this case, the radiator that we took out of the vehicle is in good shape, so we're just going to put that back in. We're just doing this video to show you. If you did need a new radiator, if you have a corroded core or cracked tanks, a new radiator from 1A Auto will help you out.
Make sure you close the drain on the bottom of your radiator before beginning the install. Put the radiator back into the engine bay. Put the tabs to the transmission cooler into the proper slots. With the tabs lined up make sure the cooling lines snap into the retainer. Make sure the ridges are located to the rear of the retainers.
Reinstall the 10 millimeter bolt. Place the power steering cooler down below the bar. Set your radiator hooked onto the lower brace and into the hole on the bottom passenger side. Line the transmission cooler brackets up with the corresponding holes in the bottom of the radiator. Feed the bolts through from the front and install the nut on the back. Hold the bolt on the front of the power steering cooler and tighten the nut from the back. Repeat these steps for the other side.
Reinstall your two 10 millimeter bolts to the upper radiator mounts. Your fan shroud has 2 tabs that'll slide into this hook and the matching one on the opposite side. These tabs will slide into the hooks. Install your two 13 millimeter bolts at the top of the shroud.
Reinstall your cooling fan into the shroud. You should be able to start the nut by hand. Spin it down pretty close using the fan. Finish tightening, adjust your pipe wrench or pliers to the nut. Some water pumps are reverse thread; this one is not. We'll give it a few taps clockwise to finish putting it on.
Reinstall the two tabs on the bottom of the expansion tank and washer reservoir into the corresponding slots at the bottom of the fan shroud. Install the two 10 millimeter bolts at the top of the tank.
Reinstall your overflow tube to the back of the filler neck on the radiator. Reconnect your washer fluid line and your electrical connectors. Make sure to snap the red safety tabs back into place. Reconnect your upper radiator hose and tighten the clamp.
Reinstall the lower radiator hose under the radiator. Slide your clamp on, tighten it down with a flat head screwdriver. Refill your washer fluid. Fill your radiator with Mopar-approved 50/50 coolant. Any time you drain the coolant from your vehicle you're going to want to properly bleed the system.
To do this, fill your radiator and your expansion tank. Turn the heat on in your vehicle and let it run. With the cap off wait until you see all the air bubbles come out, constantly checking the fluid level until the fluid level remains stable without any bubbling or draining. Then you're safe to reinstall the cap, ensure that your heat's blowing hot air, you're ready to go.
Thanks for tuning in. We hope this video helped you out. Next time you need parts for your car, please visit 1AAuto.com. Also check out our other helpful how-to and diagnosis videos.
Shop Products


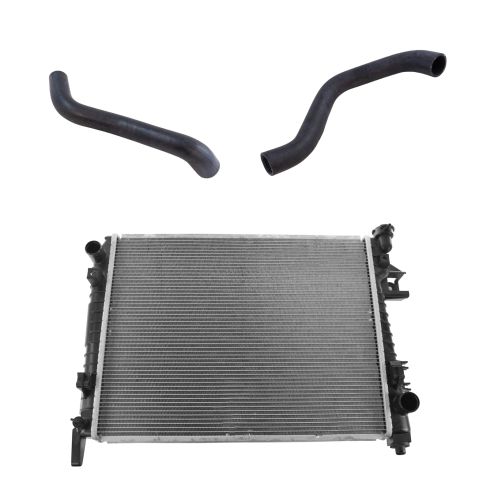
2004-08 Dodge Ram 1500 2500 3500 Radiator 3 Piece Set DIY Solutions HVA01102
Part Details:
- Upper and Lower Hoses
- 3 Piece Set
- (1) Lower Radiator Hose
- (1) Upper Radiator Hose
- (1) Radiator
How to Replace Radiator 2000-13 GMC Yukon
Watch this video to learn how to install a new TRQ radiator made to fit your 2000-06 GMC Yukon.
