How to Replace Outer Tie Rod 1983-2002 Ford Crown Victoria
Created on: 2012-03-02
Find out how to properly replace the outer tie rod yourself with help from our experts in this how-to video
-
step 1 :Removing the Wheel
- Pry off the center cap with a flat blade screwdriver
- Loosen the lug nuts with the vehicle on the ground
- Raise the vehicle with a floor jack
- Secure the vehicle on jack stands
- Remove the lug nuts
- Pull off the wheel
-
step 2 :Removing the Outer Tie Rod
- Turn the brake rotor by hand or turn the steering wheel to turn the rotor
- Remove the cotter pin from the tie rod nut using pliers
- Remove the 19mm bolt from the tie rod end
- Loosen the 1/2 inch nut and bolt from the tie rod adjusting sleeve
- Attach the tie rod press tool to the steering knuckle
- Use the tie rod press tool and a wrench to separate the tie rod end from the steering knuckle
- Apply penetrating oil to the tie rod adjusting sleeve
- Measure the distance from the end of the adjusting sleeve to the end of the tie rod
- Note this measurement
- Loosen the tie rod from the adjusting sleeve with an adjustable wrench
- Pull out the tie rod
-
step 3 :Installing the New Outer Tie Rod
- Thread the new tie rod into the adjusting sleeve
- Measure the distance from the end of the adjusting sleeve to the end of the tie rod
- This measurement should match the one noted in Step 2
- Insert the tie rod into the steering knuckle
- Start the 19mm nut onto the tie rod
- Tighten the 19mm nut to between 40 - 45 foot-pounds of torque
- Turn the nut further to line up the space for the cotter pin
- Put the cotter pin into place
- Bend the cotter pin with pliers
- Tighten the 1/2 inch nut and bolt to 20 - 21 foot-pounds
-
step 4 :Reattaching the Wheel
- Slide the wheel into place
- Start the lug nuts by hand
- Tighten the lug nuts preliminarily
- Lower the vehicle to the ground
- Tighten the lug nuts to between 100 - 110 foot-pounds in a crossing or star pattern
- Reattach the center cap
- Have the vehicle professionally aligned
Tools needed
-
Adjustable Wrench
1/2 Inch Wrench
Torque Wrench
Tie Rod Puller
Rust Penetrant
Jack Stands
19mm Socket
Ratchet
Floor Jack
Needle nose pliers
1/2 Inch Socket
Brought to you by 1AAuto.com, your source for quality replacement parts and the best service on the Internet.
Hi, I'm Mike from 1A Auto. I hope this how-to video helps you out, and next time you need parts for your vehicle, think of 1AAuto.com. Thanks.
In this video, we're going to do an outer tie rod end on this 2000 Crown Vic, very similar for any of this era of Crown Vics as well as the Town Cars. As far as alignment goes, it's recommended that you have your car aligned after you do a job like this, but if your car is still steering straight down the road, the steering wheel is still centered, then the alignment can be at your discretion. Tools you'll need are jack and jack stands, and 19mm socket and ratchet. You'll need a 1/2 inch socket and ratchet and also 1/2 inch wrench, some needle nose pliers, penetrating oil, and a torque wrench.
Raise and support the vehicle and remove the cap, and then remove the lug nuts. If you don't have the luxury of having air tools, you want to loosen the lug nuts while the vehicle is on the ground, the wheel is on the ground. Then, raise and support the vehicle. Remove the lug nuts the rest of the way, and remove the wheel and tire.
You can pull the steering over or turn the steering wheel, so it's easier to access the end of the tie rod. In this shot, the green arrow points to the tie rod and the red arrow points to the steering knuckle. In the next scene, I'm going to shake the front steering a little bit, and what you'll see is that the steering knuckle, again, with the red arrow, moves more than it should, which indicates play in the tie rod. This is how you want to look for whether or not you have a bad tie rod. That's a little difficult to see, so you might want to rewind it a couple times, but you'll see that that steering knuckle that the red arrow is pointing to moves more than the tie rod end.
Next, you want to remove the cotter pin. Hopefully, you can just kind of straighten it out, break off the ends that are bent over, and it will pull out. Mine proves to be more difficult. What I end up doing is just breaking off as much of the pin as I can, and then, I put my wrench on it, and it takes a little bit of pulling but basically the bolt just shears the cotter pin right off after you've gotten most of it broken off. It's a 19mm bolt. Here, I'm going to loosen up the nut and bolt that hold the adjustment sleeve onto the tie rod end, and those are 1/2 inch tools believe it or not. Just standard size 1/2 inch socket and wrench. Now, here I'm putting the tie rod press tool onto the steering knuckle, and tightening it down in preparation for using my impact wrench. You can also just use a regular wrench for this. Now, coat the tie rod end and adjusting sleeve with a good amount of penetrating oil to loosen it up. Let it sit for a little while. Then, you take a measurement on the bottom side from the end of the sleeve right after the end of the tie rod. You get 3-1/4 inches, right out to the end. I'm going to speed it up here. I'm just taking a big adjustable wrench and pulling on to that tie rod end, getting it to move and spin. Then, you actually, on the driver side, turn it clockwise to remove it.
Put the tie rod in. Speed it up as I thread the new tie rod end from 1A Auto in. You can see here I'm using my tape measure, measuring it. For this car, it's a 3-1/4 inches from the end of the sleeve to the end of the tie rod. That will vary by car. If you set it up the same as you took it apart, it should be okay as far as your alignment. That's kind of up to you. If you drive the car and it still goes nice and straight and the steering wheel's straight, then you'll be all right. If it's pulling at all or the steering wheel is not straight, then have it aligned. Then, you insert the tie rod into the steering knuckle. You've just got to work it around a little bit, get it up in there, and then start the bolt on. Tighten this to 40 to 45 foot-pounds. Then we will go a little bit further just to get the cotter pin through. You can see I used the wrench just to tighten it just a little bit more so that cotter pin goes through nice and easy. Then, use pair of needle nose pliers to bend the cotter pin over. Now, tighten up the bolt and nut that pinch the adjusting sleeve to 20 to 21 foot-pounds.
Now, put your wheel back on, and yes I know this is the other side. This is the footage I had, but obviously the procedure is the same for either side. You want to put your wheel back on once you're done replacing the tie rod. Put the lug nuts on by hand first. Tighten them up primarily with your wrench or impact wrench and then let the vehicle down on the ground. Tighten the lug nuts to anywhere from 100 to 110 foot-pounds and use a star pattern as you're tightening them and then put the center cap back on, and you should be all set.
We hope this video helps you out. Brought to you by www.1AAuto.com, your source for quality replacement parts and the best service on the Internet. Please feel free to call us toll-free, 888-844-3393. We're the company that's here for you on the Internet and in person.
Shop Products


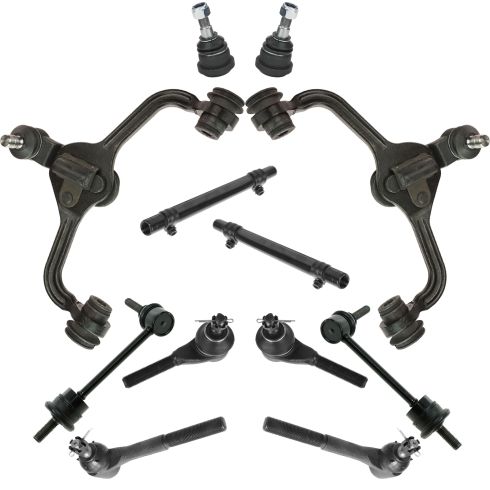
1998-02 Ford Lincoln Mercury Front 12 Piece Steering & Suspension Kit TRQ PSA70019
Part Details:
- (2) Front Sway Bar Links
- (2) Front Lower Ball Joints
- (2) Front Upper Control Arms with Ball Joints
- 12 Piece
- (2) Front Tie Rod Adjusting Sleeves
- (2) Front Outer Tie Rods
- (2) Front Inner Tie Rods
How to Replace Outer Tie Rod 1995-2008 Nissan Maxima
Learn how to replace an outer tie rod on your 95-08 Nissan Maxima with this helpful video from 1A Auto.
