How to Replace Outer Tie Rod 2007-09 Toyota FJ Cruiser
Created on: 2019-07-30
Find out how to replace the outer tie rod yourself by following the straight-forward steps in this video
-
step 1 :Removing the Wheel
- Raise the vehicle with minimal weight on the tire
- Loosen the five 21 mm lug nuts
- Raise and support the vehicle
- Remove the five lug nuts
- Remove the hubcap
- Remove the wheel
-
step 2 :Removing the Outer Tie Rod
- Loosen the jam nut from the outer tie rod end with an adjustable wrench
- Remove the tie rod ball joint cotter pin
- Remove the 19 mm tie rod castle nut
- Hammer on the knuckle to loosen the outer tie rod ball joint, or separate it with a pickle fork
- Remove the outer tie rod end
- To assist in re-installing the tie rod, count the turns it takes to remove it, or don't move the knuckle
-
step 3 :Installing the Outer Tie Rod
- Install the jam nut on the inner tie rod threads
- Thread the outer tie rod onto the inner tie rod, and tighten it to the proper length
- Insert the outer tie rod ball joint into the knuckle
- Install the 19 mm castle nut onto the tie rod end
- Torque the castle nut to 67 ft-lb
- Tighten the castle nut further to align the cotter pin hole, if necessary
- Insert the cotter pin and peen it over the nut
- Tighten the jam nut onto the outer tie rod
-
step 4 :Installing the Wheel
- Slide the wheel onto the wheel studs
- Replace the hubcap
- Replace and tighten the 21 mm lug nuts by hand
- Lower the vehicle with minimal weight on the wheel
- Torque the lug nuts to 85 ft-lb in a star pattern
- Lower the vehicle completely
Tools needed
-
21mm Socket
Torque Wrench
Jack Stands
19mm Socket
Ratchet
Floor Jack
1/2 Inch Breaker Bar
Len: Hey friends, it's Len here at 1A Auto. Today we're working on a 2007 Toyota FJ cruiser and we're going to be replacing the outer tie rod end. It's going to be very simple. I can do it. You can do it too. If you need this or any other part, you can always check us out at 1AAuto.com. Thanks.
Okay, so we've got our safety glasses on, hand protection, 21 millimeter socket. You can use a ratchet or an air gun, whatever you have access to. We're going to go ahead and loosen up these lug nuts. There we are. Continue on. Take off all the lug nuts and we'll get the wheel off. There we are. Remove the wheel, put it safely out of the way.
Okay, so one of the first things you want to do is you want to pay attention to what we are going to be taking apart. We're going to take off this outer tie rod end jam nut. It screws onto the inner tie rod end and that just locks in the outer so it can't spin. And then we're going to be removing this nut right here. So if you have access to some sort of penetrant, now's the time to use it. Spray this nut, spray these threads and off we go.
So this is already sprayed down. I'm going to grab this jam nut with my long pliers and I'm just going to give it a little crank. Okay, we'll go like this. There we are, just broke it free from the outer tie rod end. We're going to come over here, we're going to remove this cotter pin right here. This just locks in the nut so it can't come loose on you when you're driving down the road. If you have access to new cotter pins, that's always good. A lot of times when you remove them they get kind of mangled. If you don't, well I don't know, you do you boo boo, but I would replace it if you have access.
Now we're going to remove this nut right here. Okay, so we've got our 19 millimeter, safety glasses, hand protection. I'm going to use my air gun on this. So here we go. This is what our nut looks like. This is called a castle nut or slotted nut. Has all these slots up along the top. When you put this back on, you're going to line up the slot with the cotter pin hole.
What I'm going to do with the nut now, I'm just going to turn it on a few threads. Then I'm going to grab my hammer and I'm going to give the knuckle, which is this part right here, not the tie rod, a couple bonks. It's going to break it free. The reason for the nut is so it doesn't come swinging down, potentially hurt anybody. Since we're going to be replacing the tie rod, it really doesn't matter where you hit, generally. It's just kind of good habit to hit right on the knuckle. If you happen to hit up here or down there, you know it is what it is, I guess. We're replacing the tie rod so I'm not too worried about it, but if you weren't, you want to definitely make sure you only hit on the knuckle.
Pull that down. Okay, this is our new outer tie rod end. Let's just take a peek, make sure they're approximately the same length. Looks good. To remove it, just turn it counter clockwise. I'm going to go like this. Start from where I started and I'm going to count it. We don't necessarily need to count because we're not replacing the inner tie rod end and the jam nut's still exactly where we started from. If you were replacing the jam nut, you need to count, but I'll count it out anyway. One, two, three, 16, 17. 17 turns.
Okay, friends, a quick product comparison for you. Over here we have our original outer tie rod end from our 2007 Toyota FJ cruiser, and over here we have our brand new quality 1A Auto part. As you can tell, they're both the exact same. They're the same length, very important. We've got our stud, comes with a brand new castle nut. That's great because we don't want to have to reuse the old one if we don't have to. Brand new boot, you don't have to worry about the old one being torn. It's literally got everything you need. It's already pre-greased in there so you don't have to worry about greasing it. It's sealed. I don't see any reason why this wouldn't be a great part to install into the vehicle. So I'm going to go ahead and do it. If you need this or any other part, you can always check us out at 1AAuto.com. Thanks.
All right, so this is the threads that go into the outer tie rod end. If you have access to a little bit of Never-Seez, just spray it on there. Now we're just going to go ahead and put on the outer tie rod end. This is just going to go straight in until it bottoms out there. So if you want to, you can count it. Like I said, we did not turn this nut, anything on the inner tie rod end, and the outer tie rod end was the same exact length. So there's really nothing for us to have to think about as far as wanting to have to count it to make sure it's in the right depth.
So now we'll just take the outer tie rod end, we'll slide it up into the knuckle here and we'll put it on our brand new nut. It's time to get this tie rod into the knuckle. So we're going to go like that. You want to make sure that your slot or your hole is available to put the a cotter pin in. We're going to tighten this down, 21 millimeter socket. Bottom it out. Now we're going to torque it down to 67 foot pounds.
Okay. It looks like it's pretty close to being lined up. It's not exactly lined up. What I'm going to do, I'm just going to take it a little bit more. That looks pretty great. I've got my brand new cotter pin. Slide it right through here. You can either take it straight up or off to the side. Whatever you want to do. It's going to go like that. There's no way that that cotter pin's going to come out of there and this and nut's going to be able to come free.
Let's get this nice and snug. There we are. I'm just going to turn the tie rod just like this, make sure that it moves like it should. It looks pretty good. There we are. All right, let's move ahead to the next step. Okay, so now we're going to put the wheel up onto the rotor slash hub area. To do that, these wheels can be fairly heavy. I'm just going to show you something you want to make sure you have a couple lug nuts in your hand here. It's going to be helpful.
You're going to take it, roll it up against your leg, just like this. Now you're going to use your legs slash core muscles, abs, whatever, to roll it up your leg and then lift with your leg and ab muscles instead of using your back. Now we're just going to get one of these lug nuts started on here. Once we have a few good threads, we can release the wheel if we need to. I have a couple of lug nuts, so I'm just going to hold it. We know the wheel can't go anywhere. Now I can grab the rest of my lug nuts and start all those on.
So we've got all of our lug nuts started on here. Now all we're going to do is bottom them out. We're going to do a criss-cross pattern, or I guess on this it would look more like a snowflake. Okay, so here, here, here, here, here, here. We're never going to go around in a circle. You do that, you could kick your wheel off to the side, think you have it tight even, go ahead and torque it down, think it's tight. Drive it down the road, hit a bump. Next thing you know, it breaks free, okay? So make a nice little snowflake.
Okay, they're all bottomed out. We can move to the next step of torquing them. Okay, so now we're going to torque up the wheel. We're going to use our 21 millimeter socket. We're going to go on a crisscross pattern. Snowflake, call it whatever you want. 85 foot pounds. That one's a little looser than I could have had it, but it's all right. There we are. You want to go around again? Go around again. There we are. Easy peasy.
Thanks for watching. Visit 1AAuto.com for quality auto parts shipped to your door, the place for DIY auto repair. And if you enjoyed this video, please click the subscribe button.

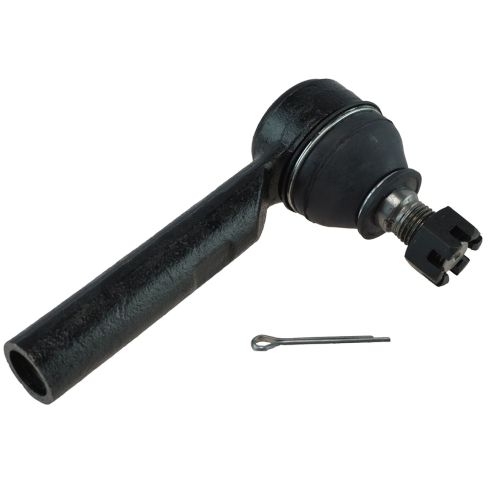
Toyota Lexus Front Tie Rod TRQ PSA68411
Part Details:
- No
- Steel
- Female
- Male
- Yes
- Yes
- Steel
- E-Coated

How to Replace Outer Tie Rods 2007-17 Ford Expedition
This video shows you how to install new TRQ outer tie rods on your 2007-2017 Ford Expedition.
