
How to Replace Outer Tie Rod 2001-05 Chrysler Sebring
Created on: 2013-11-14
Need to replace the outer tie rod? This video will show what the steps are for removing and replacing it
-
It is recommended to receive a professional alignment after completing this repair
step 1 :Removing the Wheel
- Loosen the lug nuts with the vehicle on the ground
- Raise the vehicle with a floor jack
- Secure the vehicle on jack stands
- Remove the lug nuts
- Pull off the wheel
-
step 2 :Removing the Outer Tie Rod
- Use a pair of pliers to straighten the cotter pin and remove it
- Remove the castle nut with an adjustable wrench
- Measure the distance from the inner tie rod to the outer tie rod
- Loosen the nut between the inner and outer tie rod
- Hammer the knuckle to loosen the outer tie rod
- Remove the outer tie rod and twist it off the inner tie rod
-
step 3 :Installing the Outer Tie Rod
- Twist the grease filler into the new outer tie rod
- Twist the outer tie rod to the inner tie rod
- Measure the distance and make sure it matches the recorded distance
- Tighten the nut between the inner and outer tie rod
- Insert the outer tie rod to the knuckle
- Replace and tighten the castle nut while lining up the cotter pin hole
- Insert the cotter pin and twist the ends with a pair of pliers
- Fill up the grease filler with a grease gun
-
step 4 :Reattaching the Wheel
- Slide the wheel into place
- Start the lug nuts by hand
- Tighten the lug nuts preliminarily
- Lower the vehicle to the ground
- Tighten the lug nuts to 100 foot-pounds in a crossing or star pattern
Tools needed
-
Adjustable Wrench
Measuring Tape
Hammer
Jack Stands
Floor Jack
Needle nose pliers
Grease Gun
Brought to you by 1AAuto.com, your source for quality replacement parts and the best service on the Internet.
Hi, I'm Mike from 1A Auto. I hope this how-to video helps you out, and next time you need parts for your vehicle, think of 1AAuto.com. Thanks.
In this video, we're going to show you how to replace the outer tie rod on this 2004 Chrysler Sebring. It's the same process on these Sebrings from 1995 to 2006. It's cheaper if you do this repair yourself, however, you should still go and get a professional alignment done after this repair. The only tools you're going to need include an adjustable wrench, pliers, a hammer, a tape measure, and jack and jack stands.
You want to start off by removing the wheel. You can see we're using power tools, but if you don't have air-powered tools like this, you just want to loosen the lug nuts up while the vehicle's on the ground. Raise it up, and then remove the lug nuts the rest of the way. Then pull the wheel off.
Turn your wheel so that you have better access to the tie rods, and then remove this cotter pin. Use a pair of pliers to straighten it out, and then pull it right out of there. Using your adjustable wrench, remove this capsule nut.
It's important to measure from your inner tie rod to the outer tie rod so that you can remember exactly how far up the outer tie rod is supposed to be. Loosen the nut in between the inner and outer tie rod. With a hammer, hammer the knuckle right here to loosen up your outer tie rod, and now you should be able to pull it up and out. Twist that off of the inner tie rod.
Twist the grease filler into your new outer tie rod and twist your new outer tie rod onto the inner tie rod. Using the tape measure, make sure it's back to exactly where it was. You can see ours is. Then you want to tighten that nut back into place. Now you can replace your capsule nut. When you tighten up the capsule nut, make sure that you have this hole lined up so you can put that cotter pin back into place. Use a pair of pliers and just pry out the ends of it. Using your adjustable wrench, tighten that nut up the rest of the way. Using your grease gun, fill up that grease filler on your outer tie rod.
Fast-forward as Don replaces the wheel. You want to replace the lug nuts, tighten them preliminarily, lower the vehicle, and tighten them the rest of the way. Then torque them to one hundred foot-pounds.
We hope this video helps you out. Brought to you by www.1AAuto.com, your source for quality replacement parts and the best service on the Internet. Please feel free to call us toll-free, 888-844-3393. We're the company that's here for you on the Internet and in person.
Shop Products


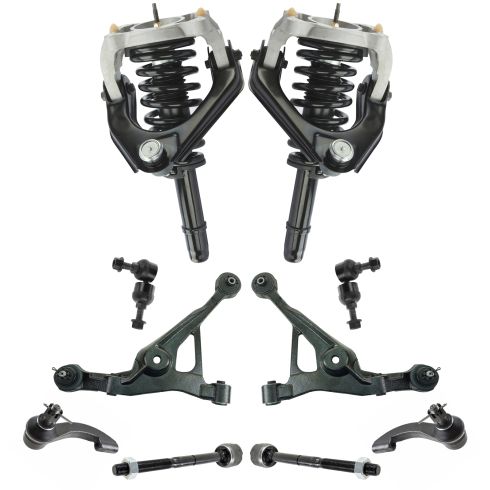
Dodge Chrysler Plymouth Front 10 Piece Steering & Suspension Kit TRQ PSA59127
- (2) Front Outer Tie Rods
- (2) Front Lower Control Arms with Ball Joints
- (2) Front Sway Bar Links
- (2) Front Inner Tie Rods
- 10 Piece
- (2) Front Strut & Spring Assemblies with Upper Control Arms & Ball Joints

How to Replace Outer Tie Rod 1995-2008 Nissan Maxima
Learn how to replace an outer tie rod on your 95-08 Nissan Maxima with this helpful video from 1A Auto.

