How to Replace License Plate Bulbs 2003-07 Cadillac CTS
Created on: 2018-07-10
How to replace a broken, damaged or burnt out license plate bulb to the 06 Cadillac CTS
-
step 1 :Removing the Trunk Liner
- Open the trunk
- Remove the trunk liner retainer with a flat blade screwdriver
- Remove the push pins from the trunk liner with a trim tool
-
step 2 :Removing the Trunk Panel
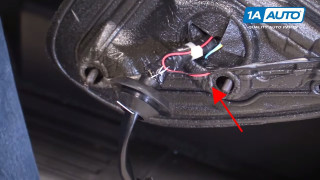
- Unclip the license plate light wiring harness from the trunk
- Unplug the license plate light electrical connector
- Push the wiring harness grommet out of the trunk panel
- Remove the eight 10mm nuts from the trunk panel studs
- Lower the trunk lid slightly
- Pull off the trunk panel
-
step 3 :Replacing the License Plate Bulb
- Twist the license plate bulb socket out of the back of the trunk panel
- Pull the bulb out of the socket
- Push a 194 bulb onto the socket
- Twist the socket into the back of the trunk panel
-
step 4 :Installing the Trunk Panel
- Remove any plastic tabs that remained in the trunk lid
- Push the license plate light wiring harness through the trunk lid
- Line up the trunk panel studs with the trunk
- Slide the trunk panel onto the trunk
- Fasten the eight 10mm nuts onto the trunk panel studs
- Plug in the license plate light electrical connector
- Clip the wiring harness to the trunk
-
step 5 :Installing the Trunk Liner
- Line up the trunk liner on the trunk
- Push the retainer into the liner
- Push the push pins into the liner
- Close the trunk
Tools needed
-
Flat Blade Screwdriver
10mm Socket
Door Panel Removal Tool
Ratchet
Trim Tool Set
Hi. I'm Mike from 1AAuto. We've been selling auto parts for over 30 years!
All right, so we're going to pop the trunk. Push that button right there. We'll lift the trunk up. We're going to have to remove this inner cover. There is a retainer right here. Just take a straight blade screwdriver and gently unscrew it. Pull that off. All around here we have some push retainers. You can use this trim tool. We sell these at 1AAuto.com. Be careful not to scratch any of the paint. Get in behind here, right there, and then squeeze like that. We can also use one of these plastic trim tools. We sell these at 1AAuto.com. Then pry out like that. There's one right here. Then there's one, two, three, four more over here. This last one is a little bit tricky to get to. Get in behind there and you can pull this off.
Disconnect the electrical connector first, then pull this off. Pry up on this a little bit. Wiggle it back and forth. Pull that out. For this rubber grommet, just push it through, because when you pull this panel off, it will come straight through.
Then we're going to take these 10mm nuts off. Three, four, five, six, seven, eight, we have eight of them. All right, so we're going to take these eight nuts off. I'm going to use a 10mm socket, an extension, and a ratchet. Take these all off, just like that. Take our last one out.
Now we're going to tip the lid down. You can grab this carefully. Pull it up and out of our way.
To replace the license plate bulb, you can grab the socket right here. Twist it to the left, and you can pull it out. Just grab the bulb and pull it out. It's a 194 bulb. As you can see, this one is actually burnt out. So we'll take the new 194 bulb. We're going to line it up in the socket. Click it down, and then there's some tabs. You're going to line those up with the hole and turn it to the right. Lock it in.
All right, so before we install this, some of these tabs broke off in the trunk from the old one, so we're going to have to remove those right here, right there, and right there. Now we're going to install this in the trunk. We're going to fish the wire through this hole. Then you're going to push this little rubber grommet so that's in there properly.
Then we're going to line all the studs up the way they go, just like that. Then we can install the 10mm nuts. We can install all these 10mm nuts. We're going to take our 10mm socket, extension, and ratchet, and we'll tighten these all down. Just snug, not too tight, because it is plastic that you are tightening down. So you want this tight, just a little bit snug.
Snug that, and then we can connect the electrical connector. Push that on, and this is going to get retained right there.
All right, we're going to reinstall this inner cover. Line this up with the holes. We'll take this big one first. Just push that right up there. That will hold it up there. Then you can take these other ones. This is one of the larger ones and it's going to go right there. Then we can push that on like that. Then some of the smaller ones will go right here, just like that. Here, and the same for the other side. Then this last one right here. Then we're all set.
Thanks for watching. Visit us at 1AAuto.com for quality auto parts, fast and free shipping, and the best customer service in the industry.
How to Feed Wire Through a Rubber Grommet the Easy Way
1A Auto reveals a useful tip on how to feed a wire through a rubber grommet.
