How to Replace Idler Arm 1997-2003 Ford F-150
Created on: 2017-08-15
Watch this video to learn how to replace the idler arm on your 97-03 Ford F150.
-
step 1 :Removing the Idler Arm
- Raise and support the vehicle
- Remove the cotter pin from the idler arm castle nut with side cutters
- Loosen the castle nut with a 21mm wrench or socket and breaker bar
- Remove the castle nut
- Attach an idler arm puller to the idler arm
- Turn the idler arm puller bolt to separate the idler arm from the steering linkage
- Remove the two 21mm bolts that hold the idler arm to the frame
- Pull the idler arm off the frame
-
step 2 :Installing the Idler Arm
- Twist the castle nut off the new idler arm
- Remove the plastic cover from the new idler arm ball joint
- Start the grease fitting into the frame side of the idler arm by hand
- Tighten the grease fitting with a 9/32" wrench
- Start the grease fitting into the ball joint side of the idler arm by hand
- Tighten the grease fitting with a 9/32" wrench
- Line up the idler arm on the frame
- Start the top 21mm bolt into the idler arm
- Start the lower 21mm bolt into the idler arm
- Tighten the two 21mm bolts preliminarily
- Connect the steering linkage to the idler arm
- Start the castle nut onto the idler arm stud
- Tighten the castle nut to 70 foot-pounds of torque
- Turn the castle nut to line up with the cotter pin hole
- Insert the cotter pin through the cotter pin hole
- Bend the cotter pin to secure it
- Torque the two 21mm bolts that hold the idler arm to the frame to 140 foot-pounds
- Add grease to each grease fitting with a grease gun until it starts to leak
- Wipe off any remaining grease
Tools needed
-
Socket Extensions
Torque Wrench
Jack Stands
Grease Gun
21mm Socket
21mm wrench
Side Cutters
Idler Arm Puller
9/32 Inch Wrench
Ratchet
Floor Jack
Cloth Rags
1/2 Inch Breaker Bar
To remove the idler arm from the steering, raise and support your vehicle. Go underneath here to the castle nut and start by removing the cotter pin with some side-cutting pliers. The goal is to not cut it, but just get a hold of them and bend it until it's kind of straight. Sometimes they break off. You can kind of grab the rounded end and try to pry against it like this. Just keep readjusting it. Just pry and there you go, pull it out.
Loosen the 21 millimeter castle nut. You can use a socket and a ratchet or a wrench. This one is pretty tight, so I've switched to a breaker bar. There it is. I will switch back to my ratchet now that it's broken free. Once this is loose, take it off by hand.
This one's actually really loose and it came right now. If this was stuck on the taper, because this is tapered and it jams into the steering control rod, you would take a idler arm puller tool, place it in here and you would turn this with your wrench and it would separate the idler arm from the steering control rod, but we got lucky on this one and it slid right off.
Remove the two 21 millimeter bolts that are holding the idler arm to the frame. Use my 21 millimeter box wrench, break these free. Now that these are broken free with my 21 millimeter box wrench, I'm going to use a 21 millimeter socket, ratchet, and extension. Just make it go a little quicker. Got one. Now we're going to hold the idler arm with one hand, take out the last bolt. And we can pull it from the frame.
Here's our old idler arm from our vehicle. Here's our new idler arm from 1AAuto.com. The dimensions between the bolt holes are the same. Their design is a little bit different but the dimensions from here to here match up.
Before you install it, you want to remove the brand new castle nut it comes with, take off the plastic cover that protects the boot during shipping. It also comes with a new cotter pin, a new grease fitting to go down here, and a new grease fitting to go down the side of this joint here. It should make the steering feel a lot tighter on your vehicle.
Install our new grease fittings, just by hand. Take a small 9/32 inch wrench on this one. A couple turns, just so it's tight, and stop. There’s one on this side. Then reinstall the idler arm to the frame. Start with my top bolt, then the lower bolt. Install that. Use my 21 millimeter ratchet and extension, finish installing it. Stop this as it gets tight, because I will come back and torque these afterwards.
Reinstall our steering linkage. Push it up there with a new castle nut. Use a 21 millimeter socket and ratchet. The torque spec on this is 56 to 84 foot-pounds, so I'm going to torque it 70. This way if you need to go more, you can, but by torquing it you should be able to seat it onto the taper. So if you turn it and the castle nut doesn't line up with the hole for the cotter pin, by giving yourself some more room on the torque number we can actually tighten this a little bit more. Just going to go maybe a quarter of a turn to get the hole to line up. Finds it nice. Grab it, bend it down and then the other one the other way. The torque for these two bolts is 126 to 169. We're going to do 140 foot-pounds. Get our torque wrench in here.
I'm going to grease these fittings. So just grease these until you start to see a bit of grease come out right here. You can actually see the boot fill up with grease. That looks nice and full, a little bit of grease coming out and then you can stop. Wipe up the excess grease, and your job is complete.
Thanks for watching. Visit us at 1AAuto.com for quality auto parts, fast and free shipping, and the best customer service in the industry.
Shop Products


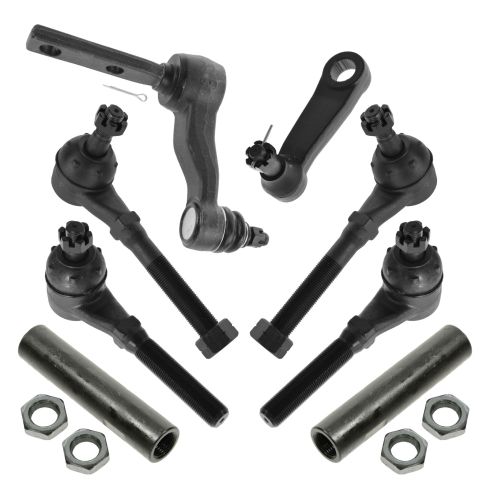
Ford Lincoln 8 Piece Steering Kit TRQ PSA37184
Part Details:
- 8 Piece
- (1) Pitman Arm
- (1) Idler Arm & Bracket Assembly
- (2) Front Tie Rod Adjusting Sleeves
- (2) Front Outer Tie Rods
- (2) Front Inner Tie Rods
How to Replace Idler Arm Bracket 1999-2007 Chevy Silverado
watch this video to learn how to install a new idler arm bracket on your 1999-2007 Chevy Silverado.
