How to Replace Fuel Tank 1965-67 Pontiac GTO
Created on: 2020-09-16
This video shows you how to replace the fuel tank on your 1964-67 Pontiac GTO.
Tools needed
-
Torque Wrench
Socket Extensions
Pry Bar
Jack Stands
10mm Wrench
Pocket Screwdriver
Pick
Rubber Mallet
Socket Driver
Wheel Chocks
Drain Pan
Brass Punch
Ratchet
Floor Jack
Okay, friends, one of the first things we need to do is safely remove our negative battery terminal from our vehicle. We'll set this aside so there's no way you can contact that battery. And now let's get underneath the vehicle. Now, we made our way underneath the vehicle, and here's the fuel tank, right in the back underneath the trunk. If you look at this wire right here that goes along the fuel hose, just kind of give it a nice little wiggle, and then it should come right off. I always like to see if there's corrosion in there, if there is you need to clean it. Aside from that, we're just gonna go ahead and set that aside. Now we're going to take off the ground wire from the body. Set this aside as well.
Next, we're gonna remove our fuel line from the fuel tank. Just be careful because there's gonna be fuel inside the line. Let's go and grab onto that fuel line, you wanna try to break it free. If it doesn't break free, you can use a nice pick, try to get up in there, just be careful not to damage your hose in any way. All right, let's go ahead and get this off of here now. Let this run out into your collection bucket.
The next thing we need to do is put something underneath the fuel tank that's going to be able to support it and, of course, let it down once we get our straps down. There we are. Next, let's go ahead and remove our mounting nuts that hold the straps to the body. Do the same to the other one. Okay, now that both straps are out of the way, the next thing we need to do is start slowly lowering the tank down. But something that I want to mention about that is you have your fuel filler neck right along here, and it's gonna come to approximately right there, which, of course, is well above this. So what we need to do is come down a little bit until the fuel neck touches, and we gonna slide towards the front of the vehicle, and then, of course, down and out until it comes down. Just be very careful.
Okay, this is looking pretty good. All right. Now that it's cleared, let's go right down. Next, we need to transfer the fuel safely. I like to use a nice jug like this with a funnel, and I'm gonna go take the gas right from this filler neck, pour it right into the funnel here. Now that we've got the fuel out of the fuel tank, we're going to remove the lock ring. I like to take a nice pry bar like this. And if you were to look along the lock ring, you're gonna see there's a little tab that fits into this slot right here. Take your pry bar or screwdriver, come right underneath, and just kind of try to pull this away a little bit. That's going to release the tab. Now I'm gonna take this, I'm gonna come right up along the top, and I'm gonna use a nice rubber mallet, and I'm gonna try to bonk this free.
Set this aside. Now we can grab this, we're gonna carefully draw on it. There's gonna be a little lever right here, the fuel lever. There we are, friends. So now looking at the bottom of this, we're gonna go ahead and take this gasket right off of there. And, of course, we're gonna replace it with a brand new one. Got a little tab here, that lines up with the flat area right there. And that looks pretty good. While this is a part, things that I like to look at is to make sure that this is functioning as it should. If it seems like it's frozen in any way, your fuel level sensors are gonna work up by the gauge. Also, this right here is the screen. So you want to make sure it's clean and free of any obstructions. This looks really good. So let's continue with our install. All right, let's carefully get our level in there and, of course, our screen. Be careful not to put a tear on that.
Now we're gonna carefully slide this in, line it up at the exact place that it came out of. Just like that. You've got your tab here and your tab there. You wanna make sure that your gasket is not hanging out anywhere, it needs to be situated perfectly. We'll take our brand new lock ring here. I'm just gonna try to line up the slots with the tabs that are on the fuel tank. Just try to get them started. Once you've got it started, we'll go ahead and put it in the rest of the way.
Okay, just a little trick that I wanted to show you real quick, if you already used a couple of super small screwdrivers or pocket screwdrivers, usually you can try to get underneath the lips where the locks are trying to catch, prime down a little bit, and then, of course, have a third hand and try to bonk along these and spin it. We're gonna keep turning this until the locks bottom out against the fuel tank. Okay, took a little while but we got it.
You wanna make sure that these tabs right here are hitting up against the tabs on the fuel tank going all the way around. You also wanna double-check to make sure you don't have any of your black rubber seal coming around any of the edges. If it did, that means it's kinda coming out. Aside from that, this looks amazing. For the ground strap, you wanna make sure you clean up that connector so it's nice and clean. Let's go to the body real quick, clean up the area on the body where this is gonna be connecting to. Let's get ready to replace these straps. Do the same to the other side. Get our straps in here now.
The next thing I like to do is take off this little rubber cover, behind that you're gonna find a plastic cover. I like to leave this one in for now. Just make sure that it comes out nice and easy. But this is going to help keep debris out of there while we put this up and into the vehicle. Let's get this fuel tank up here. It's nice and light because it's empty. Slide that right up. Perfect. Grab your strap, make sure you don't have any of your wires in the way.
The next thing we're gonna do is take our nice carriage bolt here, slide it right up in there, it's gonna hold on. I like to use some thread locker, we'll call it your prerogative. Put our strap and then I like to put a nice washer and, of course, the nut. If you have a locking nut of some sort, you don't necessarily need to use a thread locker. But if you don't, I would definitely recommend it. Okay. Let's do the same to the other side.
Now, the next thing we wanna do is tighten up our strap so it holds the tank tight. Something to remember is this strap is not gonna bottom out against the body of the vehicle. You just wanna tighten it until the strap's nice and tight and the tank can't move around. That feels great. We'll do the same to the other side. Double-check your straps to make sure they're situated inside the grooves where they need to be. This looks amazing. Let's get the support out of here.
Now, we're gonna go ahead and put our pre-cleaned ground wire onto the body where we cleaned as well. You wanna make sure you have a good grounding surface. Make sure it's nice and snug. That feels good. Make sure any wire that you have isn't anywhere near your exhaust and it's not hanging down so it can get caught on anything. All right. Let's get this wire out of the way, reconnect our fuel hose here, slide right down. That feels great. Let's go ahead and put our clamp on here. There we are. Ours had two clamps, so I'm just gonna go ahead and tighten that one up as well.
That hose's nice and tight. There's no way it can slide off. Let's go ahead and connect this wire now. There it is. Give it a nice tug, make sure it's secure. Make sure nothing's hanging down like I said before. This looks great. Let's pull down that rear license plate. Grab the plug. Replace that with our fuel cap. Perfect. Now, under the hood, the next thing we need to do is reconnect our negative battery terminal. Perfect. Okay, friends, now the next thing we need to do is go ahead and add some fuel to this, we're going to run it, and make sure we don't have any fuel leaks.

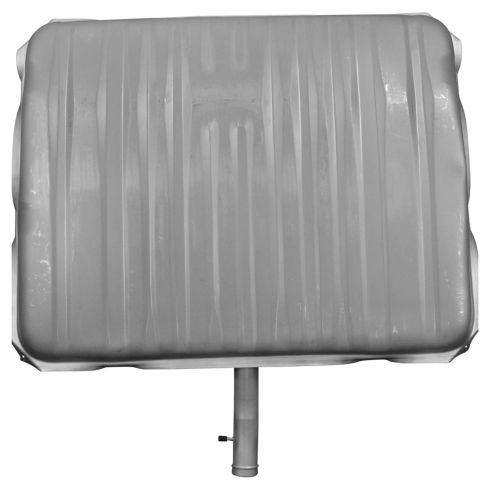
1965-67 Pontiac GTO LeMans Tempest Fuel Tank TRQ FTA07691
Part Details:
- 37.22 in
- 30.9 in
- 7.4 in
- No
- 21.7 gal
- Yes
- Liquid Painting
- Yes
- Yes
- 10.24 in
- No
- No
- No
- Zinc Coated Steel

How To Remove Fuel Tank 1991-96 Buick Regal PART1
If the gas tank is old or broken and leaking, watch this video and learn how to replace it
