How To Replace Fuel Filler Neck 1992-99 GMC K1500
Created on: 2020-05-21
A fuel tank filler neck connects the fuel tank to the spot on your vehicle where you insert the gas pump nozzle. If the filler neck has leaks or pinholes, you may lose fuel as you pump, or get EVAP system trouble codes. How to install a new TRQ fuel tank filler neck on your 2013-19 Ford Police Interceptor Utility.
Tools needed
-
Gloves
Pry Bar
Safety Glasses
Pick
Okay, friends, just a quick note, before we get started on this job, you want to make sure you have hand and eye protection and you definitely don't want to use anything electrical or anything that could make a spark. Let's get started. One of the first things we need to do is get right behind here. Carefully remove your fuel cap. Check it. Looks great. We're going to remove these bolts right here. There's three of them. Now that all three of those are up, you should be able to move this around. Now let's get underneath the vehicle. So now, if you were to either come underneath the vehicle or even come through the wheel well, you're going to be able to see where the filler neck is. You're gonna have a clamp here. One up here, and one right there.
Obviously, this clamp is nice and loose. I don't need to go much further than that. I can slide it right out of the way. I know that's not an issue. The next thing I would like to do is take a pick and try to work its way inside there. And then I'm going to spray this area down with some penetrant and hopefully, it works its way in there a little bit. Now, I'm going to take this pick and I'm going to be super careful because obviously, it's sharp. And the last thing I want to do is poke a hole through the rubber hose. Go in at an angle and try to make sure that the tip of the pick is driving straight across the metal part. Let me just see if I can get this to break free. If I can get it to break free without any lubricant, then I'm doing all right.
Oh yeah, that's going to be ready to come right off. Perfect. Let's move along to removing this clamp as well. We'll slide it down. Try to get this hose off of here. And then, of course, the next thing you would want to do is remove the connecting point for the ground wire, which would be located right over here. This one, of course, is broken. This clamp is nice and loose. Slide it out of the way. This one's obviously a little bit harder to get a pick into. So I'm just going to see if I can get my pry bar up in here. You can also use a screwdriver or even a curved pick if you needed to. But once we get this to break free, we should be able to pull it off.
Right off there. This looks great. Now let's move along to this clamp right here. If the clamp doesn't want to come off right here, maybe it's stripped around it. You could just follow this tubing and it leads to another rubber hose with, of course, another clamp. You can try to remove that clamp. Let's see if it'll work. Just gonna get the socket on there and get it to stay still. Just move that clamp. Here we are. Now we're going to stick our pick in there and we're going to get this to break free as well. All right. So that's definitely coming free now. This is looking good. Let's just grab the unit. There we are. Get the pick again. There we are. I'm gonna try to pull this tube off of there.
Obviously, you don't want to just pull on this metal without pushing on that hose because the other end of the hose obviously is connected to something as well. All right. So we get that out of there. Get our clamp off here. Pull this tube out of there. You want to visually inspect this tube, make sure it's not rotted to the point it has any holes. If it looks as though it's in poor condition, I would just replace this tube because that'll cause an emissions problem if it's bad. Use a 10-millimeter to remove this bolt that holds the ground wire on. So now I'm going to take this. I'm going to slide it right through. Now, of course, if you wanted to, you can go ahead and put this on now, and then we'll tighten up the clamp. It makes it nice and easy.
Give that a nice twist. If your clamp, for some reason, seemed like it was stripping out and it just didn't want to tighten up, you need to go ahead and replace it. You don't want to risk it. So now let's get this clamp, slide it right over the tube. It's ready and waiting for us. Now we're going to go ahead and insert this into the vehicle. I'm going to start with the farthest hose, the one that's hardest to get to and then, of course, I'll work my way to this one, and then we'll finish up at the top here. I like to push and twist at the same time. Usually, it tends to get it on there a little easier. You want to make sure you push the hose all the way down till it gets to that ending bobble.
That's right where it's supposed to stop. At that point, you would just take your clamp, slide it back over and we're going to snug it right up. That's nice and tight. It definitely didn't strip. So I'm happy with that. So now let's get the big hose on here. Slides right on easy-peasy. Get that clamp right back to where it came from and then tighten it up. This one's also nice and tight. It's definitely not loose and it did not strip. Awesome. Now we're just gonna grab this, pull it down. Slide it right into where it belongs. Perfect. Before we go up there, let's continue on to replacing our ground wire here. We want to make sure that we mount that back into the bed. That feels good. We got that there. Perfect.
Now it's going to be time to get our three mounting bolts back in there. I like to start them all in before I tighten any of them down. Now let's go ahead and snug all these up. All three of those are nice and tight. The last thing you want is this rattling around and potentially making a spark of any sort. The next thing we want to do, re-install our fuel cap. Close the latch. Down the road you go.
Shop Products


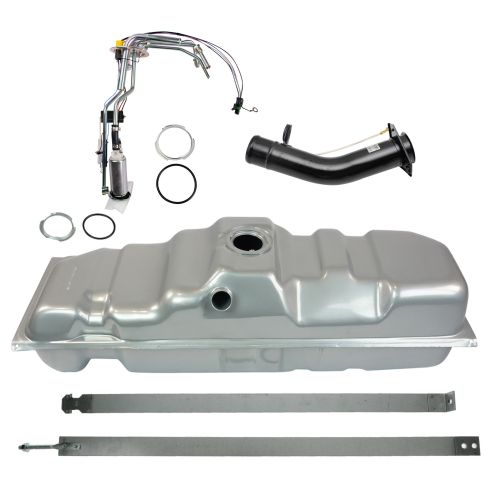
Chevrolet GMC Fuel Tank and Pump Kit TRQ FKA17645
Part Details:
- (1) Fuel Tank Filler Neck
- (1) Fuel Tank Strap
- (1) Fuel Pump Module Assembly
- (1) Fuel Tank

How to Replace Fuel Tank Filler Neck 2001-03 Ford Escape
Check out this video to learn how to replace the fuel tank filler neck on your 01-03 Ford Escape. 1A Auto shows you how so you can do it yourself!
