How To Replace Front Wheel Hub Bearing 1992-99 Buick LeSabre
Created on: 2013-07-02
Check out this video on how to replace the front wheel hub bearing on your 92-99 Buick LeSabre.
-
step 1 :Removing the Wheel
- Remove the center cap.
- Loosen the lug nuts.
- Raise the vehicle and remove the lug nuts.
- Pull the wheel off.
-
step 2 :Removing the Hub
- Use a ratchet and a piece of pipe for leverage to remove the CV 34mm nut.
- Use the 3/8� Allen tool to remove the two bolts on the back of the caliper.
- Pry the caliper up to separate it from the rotor.
- Disconnect the connector behind the hub.
- Hammer the axel in to make sure it’s free from the hub.
- Rotate the hub to locate the T55 bolts. Remove two and loosen one.
- Hit the back side of the hub until it breaks free.
- Remove the bolt and pull the hub free.
-
step 3 :Preparing the Area
- Use a wire brush to clean where the hub fits into.
- Scrape rust off with a flat blade screwdriver or a chisel so the hub will sit flush up against it.
-
step 4 :Reassembling the Hub
- Push the hub into place and replace the backing plate.
- Reinstall the T55 bolts and torque them to 55ft/lbs.
- Reconnect the connector and clip it to the backing plate.
- Reinstall the 34mm nut.
- Put the rotor back into place.
- Put the pads into place.
- Slide the caliper back on to the rotor.
- Replace and tighten the Allen bolts.
-
step 5 :Replacing the Wheel
- Replace the wheel.
- Replace the lug nuts.
- Lower the vehicle and torque the lug nuts to 100ft/lbs.
- Tighten the CV nut to 107ft/lbs.
- Replace the center cap.
- Pump the brakes until they get firm.
Tools needed
-
3/8 Inch Allen Wrench
A Piece of Pipe (for leverage)
Hammer
Torque Wrench
34mm Socket
Pry Bar
Jack Stands
19mm Socket
Ratchet
Wire Brush
T55 Torx Socket
Brought to you by 1AAuto.com, your source for quality replacement parts and the best service on the Internet.
Hi, I'm Don from 1A Auto. I hope this how-to video helps you out, and next time you need parts for your vehicle, think of 1AAuto.com. Thanks.
In this video, we're going to show how to replace a front hub. We do the right hand hub on this car. The left hand hub is basically the same procedure, and it's also the same - this is a '97 LeSabre - this hub's the same for any '93 to '98 or '99 LeSabre. It's also the same for Bonneville, Olds '88 and '98, and Buick Park Ave. You'll need a new hub from 1AAuto.com, 34mm, 19mm socket with a socket wrench, hammer, chisel, wire brush, and 3/8 Allen key tool or a socket-style tool, torques 55 socket, a pipe for some extra leverage, a pry bar or a long screwdriver, and a torque wrench.
Okay, we're going to fast forward here, remove the center cap. If you don't have the benefit of air tools, you'll want to start with the vehicle on the ground, loosen the lug nuts first, then raise and secure the vehicle, and remove the lug nuts, wheel, and tire.
We use a 34-mm socket, breaker bar and pipe extension. I've got Mike sitting in the car, holding the brakes. I'm going to fast forward as I finish removing that 34-mm nut. The caliper's held on with two bolts and a 3/8-inch Allen, and this has got quite a bit of rust on it. Knock this one in.
I'm going to speed up the video here while I remove the two Allen head bolts that hold the caliper on. I want to be able to separate the caliper off the rotor, and in order to do that, I'm just going to pry, and then pry up. Rotor all the way off. I want to make sure that the axle's going to be free from the hub before I take it off. So, I can see it moving, so it's ready to go.
The hub's held in with three T55 bolts, and when you spin this around, you're going to get access to then through the larger of the three holes. We have a lot of rust on these bolts, so I want to make sure that this T55 is really in there, because I don't want to strip out the bolt. I'm using my T55, a long ratchet, and a pipe for extra leverage, and I'm removing the three bolts. I'm going to leave one of them in just a little bit so that when I knock the hub free from the backside, it just doesn't come flying out.
Go ahead, unplug your sensor. Then, with the hammer, hit the backside of the hub until it gets free, and then go ahead and remove that last bolt that you had in there that was just going to hold the hub so it didn't go flying. When I pull the hub out, the hub separated from itself, so we got to still get this out of the way. I'm going to use the punch and a hammer from the backside to push it out. As I fast forward here, I'm just cleaning the inside of the spindle with a wire brush. You can use a flat screwdriver or chisel to get some of that rust that's on the outer surface of the spindle, so that when you put the new hub on, it sits right up against it flush.
We got the old part, and we get the new part from 1A Auto, and they're identical even down to the clip and the harness connector, so it should go in no problem. So, you can take the connector. Go ahead and feed it through your spindle and then feed your drive shaft through your bearing. And, we've got our backing plate.
With backing plate back in place, go ahead and reinstall the three T55 bolts, torquing them to 55foot-pounds, and I'm going to go ahead and fast forward as I torque those bolts. Reconnect your connector. Clip it under your backing plate. Reinstall your 34-mm nut. Here we're just tightening the nut preliminarily. As you put the brakes back together, you'll notice we're putting in new brakes. Just a good time to do it, but if you want to see a more detailed video of how to do this, check out our other videos for the Buick LeSabre front brakes. The outward pad is going to slip in like this, and the little tabs are going to fall into place, and the inward pad. These clips are going to go inside the caliper piston, and then, just slide it right back over to your rotor. We'll fast forward as we just straighten those out. Tighten up the calipers, remove that lug nut that we used to hold everything in place, and then, stick the wheel and tire back on, and lug nuts and tighten them. One hundred foot-pounds is the torque spec for the lug nuts; 107 foot-pounds is the torque spec for the CV shaft nut. Whenever you've had the brakes apart, just make sure you go in and pump the brakes a bunch of times to make sure you have a nice firm peddle before your road test the vehicle.
We hope this helps you out. Brought to you by www.1AAuto.com, your source for quality replacement parts and the best service on the Internet. Please feel free to call us toll free 888-844-3393. We're the company that's here for you on the Internet and in person.
Shop Products


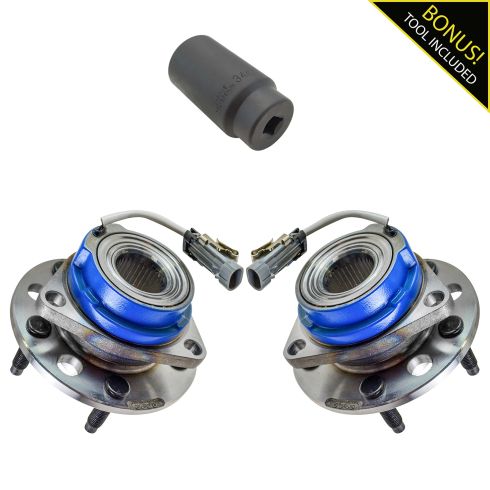
Front Driver & Passenger Side 3 Piece Wheel Bearing & Axle Socket Kit TRQ BHA84994
Part Details:
- (1) 34mm Axle Nut Socket
- (2) Front Wheel Bearing & Hub Assemblies
- Ball
- 3 Piece
How to Replace Front Hub Assembly 2002-07 Jeep Liberty
Learn how to replace the front hub assembly in a 02-07 Jeep Liberty when you watch this video.
