How to Replace Front Hub Assembly 2002-07 Jeep Liberty
Created on: 2014-01-22
Learn how to replace the front hub assembly in a 02-07 Jeep Liberty when you watch this video.
-
step 1 :Removing the Wheel
- Pry off the wheel cover with a flat blade screwdriver
- Loosen the lug nuts with the vehicle on the ground
- Raise the vehicle with a floor jack
- Secure the vehicle on jack stands
- Remove the lug nuts
- Pull off the wheel
-
step 2 :Removing the Brake Pads
- Turn the rotor by hand or turn the steering wheel to turn the rotor
- Pry the rotor back with a pry bar
- Remove the two 12mm bolts from the brake caliper
- Pull the caliper aside
- Hang the caliper with wire ties
- Pry the brake pads off with a flat blade screwdriver
-
step 3 :Removing the Brake Rotor
- Remove the two 21mm bolts from the brake caliper bracket
- Pull off the brake caliper bracket
- Pull the rotor off
-
step 4 :Removing the Wheel Hub
- Disconnect the ABS sensor wire from the wheel hub with a flat blade screwdriver
- Pry the wire out of all its clips
- Pry the wiring harness clip off of the stud inside the engine compartment
- Disconnect the ABS wiring harness in the engine compartment
- Pull the wiring out through the wheel well
- Have an assistant hold the hub in place with a pry bar
- Remove the 35mm hub nut
- Remove the three E14 external Torx bolts from the hub
- Thread the lower left E14 bolt 1/3 of the way in
- Strike the hub with a hammer to loosen it
-
step 5 :Installing the New Wheel Hub
- Clean the hub mounting area with a wire brush
- Apply brake grease to the new hub
- Put the new hub into place
- Insert the three E14 bolts into the hub
- Tighten the three E14 bolts to 50 foot-pounds of torque
- Have an assistant hold the hub in place with a pry bar
- Fasten on the 35mm hub nut
- Tighten the hub nut to 100 foot-pounds
- Feed the new ABS wiring into place
- Connect the ABS wiring harness at the wheel hub
- Clip the wiring into place
- Connect the ABS wiring harness in the engine compartment
- Clip the ABS wiring on the stud in the engine compartment
-
step 6 :Reinstalling the Brake Rotor
- Slide the rotor on
- Put the bracket back into place
- Start the 21mm bolts by hand
- Tighten the 21mm bolts to between 85 foot-pounds of torque
-
step 7 :Reinstalling the Brake Pads
- Install the new brake pads into the bracket
- Cut the brake caliper free
- Put an old pad in the caliper
- Use a large C-clamp and the old pad to push the pistons back
- Put the caliper on
- Thread the two 12mm bolts by hand
- Tighten bolts to between 20 - 25 foot-pounds
-
step 8 :Reattaching the Wheel
- Slide the wheel into place
- Start the lug nuts by hand
- Tighten the lug nuts preliminarily
- Lower the vehicle to the ground
- Tighten the lug nuts to 100 foot-pounds in a crossing or star pattern
- Reattach the wheel cover
-
step 9 :Testing the Brakes
- Pump your brakes repeatedly until they feel firm
- Test your brakes at 5 miles per hour and then 10 miles per hour
- Road test the vehicle
Tools needed
-
12mm Socket
35mm Socket
A Piece of Pipe (for leverage)
Large C-Clamp
Torque Wrench
Hammer
Pry Bar
Jack Stands
19mm Socket
21mm Socket
Bearing Grease
Flat Blade Screwdriver
E14 Socket
Wire Ties
Ratchet
Floor Jack
Assistant
1/2 Inch Breaker Bar
Wire Cutters
Brought to you by 1AAuto.com, your source for quality replacement parts and the best service on the Internet.
Hi, I'm Don from 1A Auto. I hope this how-to video helps you out, and next time you need parts for your vehicle, think of 1AAuto.com. Thanks.
In this video, we're going to show you how to replace the front hub on this 2006 Jeep Liberty. We show you on the passenger side, but the driver side is a similar procedure. The items you'll need for this are a new front hub from 1AAuto.com; flat blade screw driver; 12mm, 19mm, 21mm, and 35mm socket and ratchet; torque wrench, jack and jack stands; piece of pipe for leverage; a pry bar; a hammer; an E14 external Torx socket and an additional person would help but isn't necessary.
Pry off your wheel cover if you have one, and remove the 19mm lug nuts. If you don't have air-powered tools, you want to loosen the lug nuts up while the vehicle's on the ground. Jack the vehicle up and then remove the lug nuts. Once they're removed, the wheel pulls right off.
Turn your wheel so that you have better access to the brakes. Pry the rotor back. This will make it easier to get the caliper off. Now, you want to remove this 12mm bolt and this 12mm bolt and we'll fast forward as Don does this. Pull your caliper off and for safety purposes, you should wire tie it somewhere so it doesn't swing down and hit you while you're working on the brakes. Pry your brake pads out.
On the back of your caliper bracket, you'll see this 21mm bolt and this 21mm bolt and we'll just fast forward as Don removes those and you can see he does use a piece of pipe for some added leverage to help break them free. The bracket pulls right off and so does your rotor.
Using a flat blade screw driver, pry the harness out of this clip as well as this one. You want to just follow this harness and pry it out of each clip. Now, you want to lower your vehicle and get the rest of the harness. There is this one last clip right here. You just have to pull it up and off that stud. You also need to pull that harness up and off the clip. Now, disconnect the harness, using a flat blade screwdriver. Pry that red clip down and then push the tab on the harness and pull it apart. Now, you can pull that harness down and out.
You can have another person hold the hub with the pry bar, as we do here, or before you remove the brakes you can have somebody hold the brakes and then loosen the hub nut. That's a 35mm nut. On the back of the hub, there are three E14 bolts. There's one here, one here and then one up top right over here. We'll just fast forward as Don removes all three of those. Put the lower left one back in just a third of the way. That will keep the hub from flying while you're hammering it. You just want to hammer it until it falls like this. Now, you can remove that E14 bolt and that hub pulls right off.
On the right is the old hub. On the left is the new one from 1A Auto. They're identical and they'll mount exactly the same. Using a wire brush, clean up the area for the hub and then apply some brake grease along the outside of the hub and just feed the hub into place and replace those E14 bolts. It helps to get it started by hand. Then, tighten it up and it will help pull the hub into place. We'll just fast forward as he replaces the other two bolts and tightens them all up. You want to torque each of those bolts to 50 foot-pounds. Again, having another person here would definitely make this a lot easier. You just keep it from moving while the other person tightens up that hub nut. And you want to torque this to 100 foot-pounds.
Now, you want to put your harness back into place and re-clip it in all the same areas. If there's been a modification or one of your clips isn't the same, then just take the clip from your old hub wire and put it on to this one. Back up top, you want to reconnect your harness and push that clip back on to that stud.
Put your new rotor into place, and then, put your caliper bracket back into place and replace those two 21mm bolts. We'll just fast forward as Don does this. Torque both of these bolts to 85 foot-pounds.
Push your new brake pads into place. Take your caliper and place and old brake pad in front of the piston and using a large C-clamp, push the piston in. Put your caliper into place and replace those two 12mm bolts. Torque these bolts to 20 to 25 foot-pounds.
Replace the wheel and replace the lug nuts and you want to tighten them preliminary. Lower the vehicle and then tighten them the rest of the way and then torque each of them in a crossing pattern to 100 foot-pounds. If you have a wheel cover, replace it.
Any time you have the brakes apart, just get in the vehicle, pump the brakes a bunch of times. Make sure that the pedal is nicely firm and then do test ops from 5 and 10 miles an hour. Make sure everything is working correctly, before you road test the vehicle.
We hope this video helps you out. Brought to you by www.1AAuto.com, your source for quality replacement parts and the best service on the Internet. Please feel free to call us toll-free, 888-844-3393. We're the company that's here for you on the Internet and in person.
Shop Products


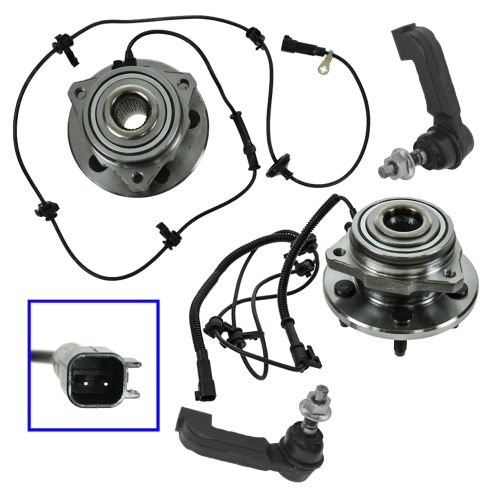
Jeep Liberty Front 4 Piece Steering & Drivetrain Kit TRQ PSA59512
Part Details:
- (2) Front Outer Tie Rods
- (2) Front Wheel Bearing & Hub Assemblies
- Ball Bearing
- 4 Piece
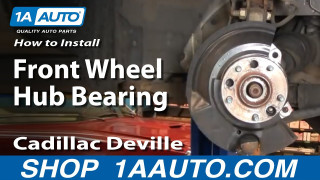
How to Replace Wheel Bearing Hub Part 1 1997-99 Cadillac Deville
Check out part one in this instructional video series showing you how to replace the front wheel bearing and hub on a 97-99 Cadillac Deville.
