How to Replace Front Upper Control Arm 2000-06 GMC Yukon
Created on: 2020-04-30
Watch this video to learn how to install a new TRQ upper control arm made to fit your 2000-06 GMC Yukon 1500.
Tools needed
-
13mm Socket
Torque Wrench
Hammer
Rust Penetrant
18mm Wrench
Pry Bar
Trim Tool Set
Pocket Screwdriver
21mm Socket
Pickle Fork
21mm wrench
Rubber Mallet
Flat Blade Screwdriver
10mm Socket
22mm Socket
Take the center cap off. Use a straight-blade screwdriver. Use a 22-millimeter socket. Take the lug nuts off. Pull the wheel off. These bolts are pretty rusty so I'm just going to use some rust penetrant and soak those before I start. Before we take this nut off, we just want to mark this cam right here. This is for the alignment. When you go to put this back together, you want to put this in the same location so at least it's close. You're still going to need to get an alignment done afterwards, but this will get it a little bit closer. I want to get this ABS wire out of the way, our wheel speed sensor wire. Disconnect the connector up here. Just push up on that tab, slide it out and use a trim tool. Just pull up on that retainer. You can do the same over here, and right here. Sometimes these ones break, just be careful. All right. So this piece is going to break so I'm just going to disconnect it right from the arm itself. And disconnect this right here. Sometimes you can use a screwdriver and just pop that out, or a needle-nose pliers also works. You just squeeze those together. I'm just going to put some rust penetrant on this bolt right here. Let that soak a little bit. We want to take that off next. Just remove this bracket. Use a 10-millimeter socket. Remove this bolt. It's probably going to break. Yup, it broke. Well, hopefully yours doesn't break. And slide that off.
All right. Now, we're going to take this nut off using an 18-millimeter wrench. Now I'm going to leave this nut on just a couple of threads, and then we're going to break this upper ball joint free from the knuckle. I'm going to use a pickle fork to break this free. Just slide it in, in between the ball joint and the knuckle and just give it a hit. There we go. Take the pickle fork out and just push down the upper control arm a little bit. You might need a pry bar. And take the nut off and you could slide it out. And just make sure that there's not too much tension on the brake line, brake hose. I'm going to take a 21-millimeter wrench, 21-millimeter socket. Now this is old and rusty so I just had to heat up that nut to break it loose. Normally you wouldn't have to do that. And loosen it up. That nut's pretty hot right now so I'm just going to let that cool down before I take that off. Take that nut off and see if you can pry this cam off. This is just the alignment cam. Just use a pry bar and a hammer. And just pry that off. All right. This cam bolt is stuck in there pretty good so I'm just going to use some more rust penetrant, soak it down for a while.
Here we go. All right. Get that out and do the same for the other side. All right. I'm just going to take this bracket out of the way. Just use a 13-millimeter socket and you can just slide it out of the way. Don't bend it too much. Here we go. And just use a pry bar and you can pry the arm out. And take the new control arm and just line it up. You can take a rubber mallet, or a dead-blow hammer to tap it in if you need to. And get the bolt started. And take this cam and the nut. Get the nut started. Now we tighten this up. Now we want to align that mark up. What you do is take your 21-millimeter wrench and just move the bolt on this side until that lines up. And you can snug that down. And we'll do the same for the other side. All right. Now, we're going to torque this nut to 140-foot-pounds. Do the same on the front one. Take this brake hose bracket and install that. Put the bolt back in and tighten that up. Get the nut off. Put that aside. Get this lined up with the upper knuckle. And I'll use a pry bar, just pry this down. Take the nut and get the nut started.
Now, I'm going to use a 19-millimeter ratchet wrench, while I'm using the pry bar to pry it down on the ball joint. Tighten this up. All right. Now, if you have the ability, just torque this with a torque wrench, you can torque this to 37-foot-pounds. Do the best you can. And if the stud starts spinning, you can use an allen key, that's a six-millimeter hex key. But if you use the pry bar and you just pry it down, you should be able to get that without having the stud spinning. Take this brake hose bracket and line that up. Put the nut on or the bolt in and snug it up. And take the wheel speed sensor wire and reconnect that. And then we have this holder or clip. Install that. Lock that in place. Reinstall this clip and connect the connector. And push the retainer. I'm just going to find the hole where it goes. There it is. And lock that in position. And take this fitting. Install that. Snug it up with a seven-millimeter wrench.
And take a grease gun and give it a couple pumps of grease. What you can do is look at the boot as you're greasing it, once you see the boot start to move, that's good enough. And put the wheel back up. Put the lug nuts on. Now I'm going to torque these lug nuts to 140-foot-pounds in any star pattern to tighten the wheel down evenly. And just go around again, double check. Install the center cap.
Shop Products


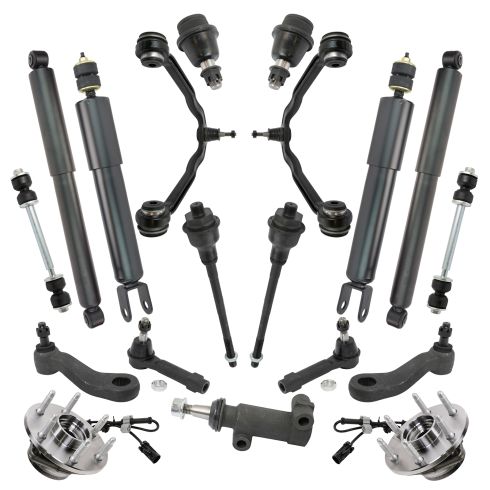
Chevrolet GMC Front & Rear 19 Piece Steering, Suspension, & Drivetrain Kit TRQ PSA30317
Part Details:
- (2) Front Sway Bar Links
- (2) Front Lower Ball Joints
- (1) Idler Arm
- 19 Piece
- (2) Rear Shock Absorbers
- (1) Pitman Arm
- (2) Front Shock Absorbers
- (2) Front Wheel Bearing & Hub Assemblies
- (1) Idler Arm Bracket
- (2) Front Outer Tie Rods
- (2) Front Inner Tie Rods
- (2) Front Upper Greaseable Control Arms with Ball Joints
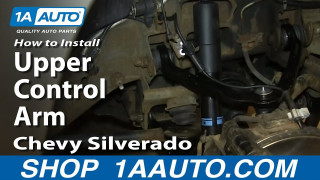
How to Replace Upper Control Arm 2000-06 Chevy Suburban 1500
Watch this video to learn how to replace a loose, rusted, or damaged upper control arm. The experts at 1A Auto will show you how to replace the lower control arm on your 00-06 Chevy Suburban or Silverado, or GMC Yukon or Sierra.
