How to Replace Front Sway Bar Links 2003-07 Cadillac CTS
Created on: 2016-08-08
How to remove, replace, and install a sway bar end link on 06 Cadillac CTS.
-
step 1 :Removing the Wheel
- Loosen the 19mm lug nuts with the vehicle on the ground
- Raise the vehicle with a floor jack
- Secure the vehicle on jack stands
- Remove the lug nuts
- Pull off the wheel
-
step 2 :Removing the Sway Bar Link
- Remove the 15mm nut from the top bar link with a deep socket
- Secure the opposite end with vise grips
- Repeat the process for the other side
- Remove the link from the sway bar
-
step 3 :Installing the Sway Bar Link
- Line up the sway bar link
- Reinstall the nut on both ends by hand
- Hold the hex with a 14mm stubby wrench
- Tighten the 15mm nut
- Repeat the process for the top side
- Torque the nuts to 37 foot-pounds
-
step 4 :Reattaching the Wheel
- Slide the wheel into place
- Start the 19mm lug nuts by hand
- Tighten the lug nuts preliminarily
- Lower the vehicle to the ground
- Tighten the lug nuts to 100 foot-pounds in a crossing or star pattern
Tools needed
-
14mm Wrench
Socket Extensions
Torque Wrench
15mm Socket
Rust Penetrant
Jack Stands
19mm Socket
Ratchet
Floor Jack
Brought to you by 1AAuto.com, your source for quality replacement parts and the best service on the Internet.
Hi, I'm Mike from 1A Auto. I hope this how-to video helps you out, and next time you need parts for your vehicle, think of 1AAuto.com. Thanks.
In this video, we're going to show you how to replace the front wheel bearing and hub assembly in this 2006 Cadillac CTS.
Here are the items you'll need for this repair: 15mm, 19mm socket, ratchet, socket extension, breaker bar, torque wrench, 14mm wrench, rust penetrant, jack and jack stands
Using your 19mm socket and breaker bar, crack the lug nuts loose. Just about a turn is fine, you just want to make sure that there's no tension on them when you jack it up, and obviously you can't remove it with the weight of the vehicle on the tire. Once your lug nuts are loose, you can jack up the vehicle and secure it with jack stands.
You'll see on the rocker panel there's a small arrow, this indicates where the jack point is on the pinch weld under the vehicle, so we'll place our jack under there, bring the vehicle up until the wheel is off the ground, and we have enough height to get a jack stand underneath the car.
Directly in front of your jack, you'll notice this boxed frame-like piece of the unibody. That's the point we're going to use for our jack stand. Slowly lower the vehicle onto the stand. Once the vehicle has been raised and supported, we finish removing the lug nuts. Remove the wheel from the hub.
We're going to use a lift to make this easier to show you guys at home, but you should be able to do this in the driveway with a jack and jack stands. After raising and supporting your vehicle and removing the wheel, locate the nut for the sway bar link. There's one on the top here, and one on the opposite side down bottom. Remove those with a 15mm deep socket extension and a ratchet. You may want to soak these in penetrating oil, and you may need a small pair of vice grips if they spin, like you can see ours are here. Get a pair of vice grips onto the backside of the sway bar link, and clamp them onto the joint to keep it from spinning while you remove the nut. Remove the link from the sway bar, and repeat these steps on the bottom.
This one's tough to get a pair of vice grips on, so we'll pop off that harness retainer, pull down, pop our link off of the ball socket, clamp the vice grips onto the newly exposed ball socket to keep it from spinning while we remove the nut and remove it from the vehicle. Here we have ours that we removed from our vehicle and our new part from 1AAuto.com. What happens with these sway bar links a lot of the time is you can see the factory one. This ball socket just sits into this little plastic bushing here. We actually had to pop ours out in order to remove it. That can develop some play and allow these to click up and down when you hit bumps. It can sound like a serious suspension issue when in reality it's a small part and an easy fix.
Here we have our new part, and you can see they're the same length, same orientation here, and it comes with a new nut. The nice thing about these is that we'll be able to grab with a normal wrench, keep that from spinning, make it a lot easier to remove and install. So if you have a clicking noise when going over bumps and you've determined that it's your sway bar links, this new part from 1AAuto.com is going to go in, direct-fit just like your original equipment and fix you up right.
Reinstall your sway bar link into the slots. Make sure you line up the bottom hole as well and reconnect the harness retainer onto the sway bar link. We'll reinstall the nut on both ends of the sway bar link, and since our new sway bar links have that nice hex we showed you there on the backside of the joint, we use a 14mm stubby wrench to hold that in place while we tighten down the new nut with a 15mm socket ratchet and extension. Repeat these steps on the top side of the sway bar link. Torque the new nuts to 37 foot-pounds.
This is the part that we always recommend you replace in pairs, so repeat these steps on the opposite side. Reinstall the wheel onto the hub. We're going to bring them down as tight as we can while the tire is still in the air, and we'll finish tightening them once the vehicle's been taken off the jack stands. Always be sure to tighten your lug nuts in a cross pattern.
We'll jack our vehicle off the stands, with the weight of the vehicle back on the tire. If you don't have a torque wrench, get them as tight as you can by hand with a breaker bar. It takes a lot of force to break one of these lug studs, so you don't need to go crazy tight, but don't be afraid to put a little bit of your weight into them to make sure they're tight. Of course, if you do have a torque wrench available to you, you'll want to torque your lug nuts to 100 foot-pounds. You can see with the breaker bar we actually got it pretty close.
Thanks for tuning in. We hope this video helped you out. Next time you need parts for your car, please visit 1AAuto.com. Also check out our other helpful how-to and diagnosis videos.
Shop Products


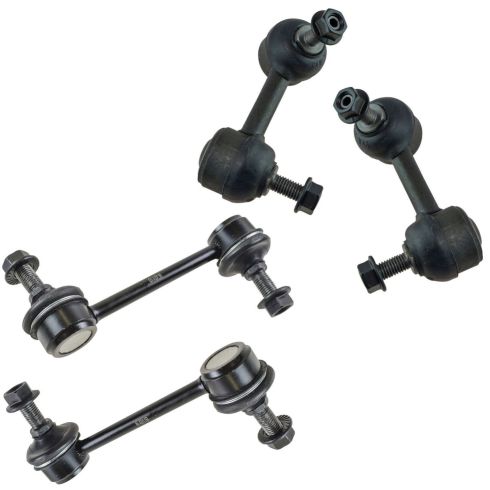
2003-07 Cadillac CTS Front & Rear 4 Piece Sway Bar Link Set TRQ PSA55951
Part Details:
- 4 Piece
- (2) Front Sway Bar Links
- (2) Rear Sway Bar Links
How to Replace Front Sway Bar Links 1980-2003 Ford F-150
How to remove, replace, and install a sway bar end link on 80, 81, 82, 83, 84, 85, 86, 87, 88, 89, 90, 91, 92, 93, 94, 95, 96, 97, 98, 99, 00, 01, 02, 03
