How to Replace Front Struts 2007-14 Toyota FJ Cruiser
Created on: 2019-07-27
In this video, 1A Auto shows you step by step how to replace the front struts in your 07-14 Toyota FJ Cruiser!
-
step 1 :Removing the Wheel
- Raise the vehicle with minimal weight on the wheel
- Loosen the six 21 mm lug nuts
- Raise and support the vehicle
- Remove the six lug nuts
- Remove the wheel
-
step 2 :Removing the Front Strut
- Remove the 10 mm ABS wire bracket bolt to remove the bracket
- Remove the upper ball joint castle nut pin
- Remove the 19 mm upper ball joint castle nut
- Hammer the knuckle around the ball joint to loosen it from the knuckle
- Tie off the knuckle so that the axle does not fall out
- Remove the 12 mm ABS wire bracket bolt from the knuckle to remove the bracket
- Remove the 19 mm nut from the 19 mm lower strut bolt
- Remove the lower strut bolt
- Remove the three 14 mm top strut mount nuts
- Remove the 17 mm sway bar link nut to remove the sway bar link from the knuckle
- Remove the sway bar link from the knuckle on the opposite side of the vehicle to freely move the sway bar for clearance
- Remove the strut
-
step 3 :Installing the Strut
- Insert the strut top mounting studs into the body, and slide the bottom mount into the bracket
- Install the three 14 mm strut top mounting nuts
- Install the 19 mm lower strut bolt
- Install the washer and 19 mm nut onto the lower strut bolt
- Torque the 14 mm top mount nuts to 47 ft-lb
- Torque the 19 mm lower strut nut to 100 ft-lb
- Install the upper ball joint into the knuckle
- Install the 19 mm upper ball joint castle nut
- Torque the upper ball joint castle nut to 81 ft-lb, then tighten further to align the pin hole, if necessary
- Install the upper ball joint pin
- Reinstall the ABS wire bracket to the upper control arm with the 10 mm nut
- Reinstall the sway bar links into the knuckles
- Reinstall the ABS wire bracket onto the knuckle with the 12 mm bolt
-
step 4 :Installing the Wheel
- Install the wheel onto the wheel studs
- Install the six lug nuts and tighten them by hand in a crossing pattern
- Lower the vehicle with minimal weight on the wheel
- Torque the 21 mm lug nuts to 85 ft-lb in a crossing pattern
- Lower the vehicle completely
Tools needed
-
14mm Wrench
12mm Socket
Torque Wrench
14mm Socket
Hammer
17mm Socket
Jack Stands
19mm Wrench
19mm Socket
Pocket Screwdriver
21mm Socket
Locking Pliers
10mm Socket
Ratchet
Floor Jack
1/2 Inch Breaker Bar
Hey friends, it's Lenny here at 1A Auto. Today I'm working on a 2007 Toyota FJ cruiser. I'm going to be replacing a front loaded shock. It's going to be a very easy job. I want to be the guy that shows you how to do it. If you need this or any other part, you can always check us out 1AAuto.com. Thanks.
Okay, so here we go. We're going to remove the wheel 21 millimeter socket, six lug nuts.
The reason why I left this on a few threads is so I can put down the rest of the lug nuts so I have empty hands. We'll remove our wheel, set this aside so it's safe. Now that we've got the wheel off, we've got a clear view of our upper control arm right here. We're going to remove this 10 millimeter head bolt. This just holds your ABS wire bracket. Once this is out of the way, we'll be clear to continue. So I'm just going to ... You didn't see that, should use a hammer. ...
Grab our bracket. This wobbles around. It's nice and free. This clip right here goes straight through the ball joint on this side, but this side right here has a little hooky-do that goes around the backside. What you want to do is grab a small screwdriver or a pick, whatever you've got, drag it out. See if I can get it, and along the bottom side of the ball joint, just like that. Grab your cutters, don't cut it, but just kinda tug it out. That's what it looks like right there. okay. You get the straight straight through, goes through the ball joint and you've got the hooky-do that grabs on.
We're going to remove this nut right here. The easiest way to do that would be, if we didn't have the sway bar link in the way right here. If you wanted to, you could take this off. Then just take out your sway bar link. It should be pretty easy. Once you do that, you'll be able to get to this very easy, Or you could just use a wrench and a ratchet. You can use a ratchet and a socket.
I've got my 19 millimeter socket fits right on there wearing my safety glasses so I don't punch myself in the eye. Give that a nice tug. I want to make sure I don't go down too far, because it'll get to the point where I won't be able to get my ratchet out of there. So just make sure you pay special attention to how much space you have. Once it's loose, you can just grab it with your hand. Take it right off of there. Easy peasy.
This is a castle nut. It's got slots. If you want to line the slots up with the holes in your ball joint, I'm gonna grab my little hammer and I'm going to go ahead and give this a bonk right on the knuckle right here. I want to be careful for the boot, and I want to be careful for those threads. Super important that I don't damage the threads. I guess it doesn't really matter because I'm replacing this anyway, come to think of it. But if you weren't, then you want to be careful.
I'm not going to worry too much about it, but basically I want a bonk right here. I wanted to mention that you want to put your nut back on a few threads just like that. This is so that when I break this free and this wants to come down, it can't come down and hurt me. Safety's the number one concern at 1A Auto. Now I'm just going to give this a couple bunks. I'm going to wait for it to break free. Separated right here. Still got plenty of slack on my ABS cable, or wire. Just pull that up. Here we are.
Okay. At this point we want to make sure that this can't go very far because we don't want to pull our axle apart. ... That'll hold it enough for me. Yeah, so I'm not putting too much pressure on anything. Still Nice and loose. I'm going to remove this right here and that's gonna take the bracket off of the knuckle here and it's going to give us more slack on this ABS wire. We definitely want to make sure we don't put any tugs on the ABS wire.
I'm removing this with a 12 millimeter socket. Oops, that's what our bolt looks like. We'll set this aside. Cool. So now this moves around. We've got plenty of slack on everything. I like it.
I'm going to use my 19 millimeter wrench. This right here is a nut obviously, and then we have the bolt that comes through from the rear to the front. The rearward side is also a 19 millimeter, so I'm gonna use my wrench for that side. Then I'm gonna blast this side with my air gun. If you don't have an air gun, you can go ahead and use a ratchet, but this is a 19 millimeter. I'm gonna grab my socket, safety glasses. Throw that on the floor. That's what our nut looks like, and the washer. We'll set this stuff aside and push this bolt through. That's what our bolt looks like. Okay, this moves around quite a bit. That's very good.
Now we're going to move up to the top. We're going to loosen these up. I'm going to use my 14 millimeter socket with a ratchet. There's three, one, two; now right on the backside there is number three. This one's going to be a little bit harder to do because of course we've got the body of the vehicle there, so I'm just going to start this one. Get it going. ... Maybe.
Got it to break free. I'm going to leave this one on here a little bit, but I'll remove the other two. The reason why I'm leaving this one on is cause it's pretty easy to get to. When it comes time to remove the last nut, you want to make sure that it's the one that's easiest to get to really. Just take it all the way off so I can show you, and then I'll put it back on a couple threads. That's what we're dealing with. 14 millimeter. Cool.
Do the same thing to the other two here. That rear one I'm probably going to use a wrench. Just get my socket on there. I'm going to switch to my 14 millimeter wrench now. I'm going to put it on the rearward nut. Try to get it in there. This one's a little harder to do because you have minimal room. I got my safety glasses on. I'm going to give my wrench a couple bonks. I'm going to try to break that nut free. I'll go ahead and do it again. Let's see, yeah a little bit more. ... Here we go. Very cool.
If you have access to a ratcheting wrench, that might be handy in this instance. I'm going to go grab mine because that's gonna make my life a lot easier. But as you can tell, the strut is loosening up at this point. We're going in the right direction. It's finally getting to the point it's ready to come off. Not down there. That's my nut, nightmare nut.
Okay, got all three of those nuts out of there. Now what we're gonna do, we're gonna remove this nut right here for the sway bar link. It's a 17 millimeter. I'm gonna grab some locking pliers to hold this side right here so it doesn't spin, and then we'll remove that nut. Okay. I'm just gonna use some locking pliers. I'm gonna hold onto the backside of this here. 17 millimeter. We'll remove the nut. ... Here we are. That's what our nut looks like. We'll set this aside.
Okay, you want to take this side apart. You also want to take the other side sway bar link off, so that way there you can go ahead and move this bar around. This is going to help you out because you can bring it up or down. Then you can bring your strut down like this. I need you to go up, there we go. Pull this up and out. There we are. Slide her right out of here. Now we've removed our right front strut assembly.
So here we are, friends, a quick product comparison for you. Over here we have a loaded shock. This is out of our 2007 Toyota FJ cruiser. Over here we have a brand new quality 1A Auto shock. As you can tell, it's a very nice part. Got a brand new bushing down here, new coil spring. You get your protective boot under here. We've got our three point mounting up here. This is where it mounts to the body of the vehicle. Everything that we need to be able to install this into the vehicle is there. With that said, I don't see any reason why this wouldn't be a quality part to install into the vehicle, so I'm going to go ahead and do it. If you need this or any other part, you can always check us out 1AAuto.com. Thanks. ...
We've got our brand new quality 1A Auto shock here. I'm just going to take off these nuts. We'll move all three of them. We'll set these aside safely, and then we're going to put this into the vehicle. We'll use our new nuts to get this in. We're going to come up and in like this, bring it down along here, just like that. ...
Okay. Got our studs up through. It's important to make sure you pay attention to which way the studs are. They have to line up. There's three of them. Then this down here at the bottom needs to be going like this. so the bolt goes from front to back. It's going to line up there. If you have it turned, this isn't going to line up down here. You're gonna have to drop it back down. Give it a little twist, and you should be good to go.
We'll get this up here, slide it in. We've got our locking nuts for up top here. Just start them on, and grab a little bit of a copper never seize. Just gonna put it on the shank end here. This comes through from the back to the front. You may need to just wobble it around a little bit. Here we are. Let's push that right through. Got our washer, set that on there. We have our nut. If you wanted to use a little bit of threadlocker, you can. For the purpose of this video, I'm not gonna worry about it.
Now we're going to tighten that up. I'm just going to bottom it out with my 19 and my 19. We'll torque those down in a minute, but we're also going to tighten those. I'll grab my socket and my wrench, and use my 19 on the backside there. That's the bolt end. I'm just going to tighten this up just until it's bottomed out, and then we'll torque it down. There we are. We'll grab the torque spec for that in a minute.
These nuts up here, we're going to tighten those up as well. Alright. Go around do all three of these. You can tighten this down to 47. There we are. If we could get it on this one, we would do the same to that. I can't, so I'm just gonna make sure it's tight. I'm using my 15 millimeter wrench here. Let's see if I can ... I guess I'm just going to have to do little turns. That's all I've got for options here. ...
Okay, beep. We'll say that's 47. Looks pretty good. We'll do this lower one. It's going to be 100 foot pounds with a 19 millimeter. There we are. We're just gonna do it one more time. Cool. Torqued, torqued, torqued, torqued. We didn't touch the center nut. Very important. Now we can move along to the next step.
We're going to take off our bungee cord or whatever you happened to use to hold your knuckle up. Bring this up, get the sway bar link in there. Bring this over, there we are. We know this is going to go like this. We'll just grab our new nut. Okay, cool. We'll bottom this out, the nut on here and move along to the next step.
Start this in here. There we are. We'll bottom the pair of these out and we'll torque them down. We're going to go ahead and tighten up this control arm right here, our upper ball joint to the knuckle. Okay, just going to take a peak.
Okay. Now we'll torque it to 81 foot pounds. ... The hole in the ball joint stud doesn't line up with the slots and the upper ball joint nut. So now what we need to do is continue turning that clockwise until the next slot lines up with the hole. Continue with our ratchet. I'm just going to bring this, like I said, so the slot matches up with the hole and we're going to take our little clip, put it through just like this and then bring it up; and it should want to grab into one of those little slots. Now it's going nowhere. It's happy there. Perfect.
We'll put in this upper bolt. I like to use just a little bit of copper never seize up there. It's your prerogative if you want to. We've got our 10 millimeter head bolt. We're gonna line up this bracket trying to get our bolt going straight. Here we are. Just get our sway bar link in there. There we are. If you wanted to, you could use a little thread locker on this. It's up to you. Going to tighten that down. 18 millimeter. There we are. Tight, tight.
Can move along to the next step right down here. That's a 12 millimeter. Grab my 12 millimeter socket. If you want to put a little copper never seize into the knuckle on this, that's up to you. Might make it so this comes out easy someday down the line. A lot of times they like to break off into the knuckle, and you'll have to drill and tap, and becomes a little bit of a pain in the butt.
Okay, bottomed out. Just give it a little bit and that's enough. We don't want to break it off. Okay, now we'll just feel around, make sure everything's secured. You definitely want to make sure that your ABS wire is nice and secured. It's not hanging off anywhere. This one looks like it's doing all right.
All right, let's move to the next step. Okay, so now we're going to put the wheel up onto the rotor slash hub area. To do that, these wheels can be fairly heavy. I'm just gonna show you something. You want to make sure you have a couple of lug nuts in your hand here. That's going to be helpful. You're going to take it, roll it up against your leg, just like this. Now you're gonna use your leg slash core muscles, abs, whatever, to roll it up your leg and then lift with your leg and ab muscles instead of using your back.
Now we're just going to get one of these lug nuts started on here. Once we have a few good threads, we can release the wheel if we need to. I have a couple lug nuts, so I'm just going to hold it. We know the wheel can't go anywhere. Now I can grab the rest of my lug nuts and start all those on.
Now all we're going to do is bottom them out. Where do you want a crisscross pattern or I guess on this it would look more like a snowflake. Okay, so here, here, here, here, here, here. We're never going to go around in a circle. You do that, you could kink your wheel off to the side. thinking you have a tight, even. Go ahead and Torque it down. Think it's tight. Drive it down the road. Hit a bump. Next thing you know it breaks free. Okay, so make a nice little last snowflake. ...
Okay, they're all bottomed out. We can move to the next step of torquing them. Okay, so now we're going to torque up the wheel. We're going to use our 21 millimeter socket. We're going to go on a criss cross pattern, snowflake; call it whatever you want. 85 foot pounds. That one's a little looser than I could have had it, but it's all right. There we are. You want to go around again? Go around again. ... There we are. Easy peasy.
Thanks for watching. Visit 1AAuto.com for quality auto parts shipped to your door, the place for DIY auto repair. If you enjoyed this video, please click the subscribe button.
Shop Products


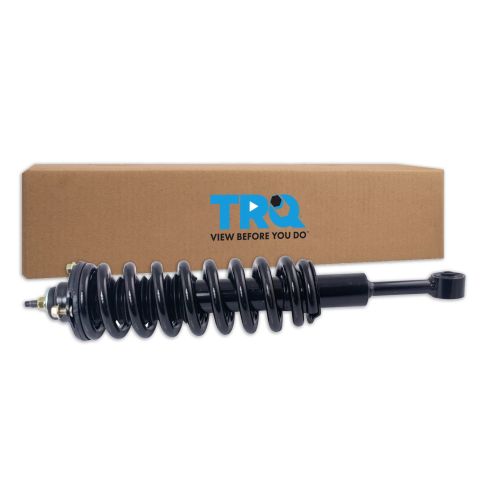
Toyota 4Runner FJ Cruiser Tacoma Front Driver Side Strut & Spring Assembly TRQ SCA70142
Part Details:
- Yes
- 17.05 in
- 22.05 in
- Loop (Eyelet) Bushing and Sleeve
- Threaded Stud
- Yes
- Yes
- 5 in
How to Replace Front Struts 1994-97 Honda Accord
Learn how to replace clunking or bouncy struts on your 94-97 Honda Accord by watching this tutorial video from 1A Auto.
