How To Replace Front Stabilizer Bar Link 1997-2002 Ford Expedition
Created on: 2011-12-16
Learn how to replace the stabilizer link with this video. Our experts will also show the proper order of the stabilizer link's grommets and bushings
-
step 1 :Removing the Stabilizer Links
- Turn the wheels for access to the stabilizer link.
- Spray the stabilizer with penetrating oil.
- 9/16� socket on the bottom and a 15mm socket on the top. Loosen the stabilizer link.
- Use a hammer and punch to push the link out.
- Use vice grips if needed.
-
step 2 :Replacing the Stabilizer Link
- Push the link up into place.
- Put the link together in this order:
- Bushing on the bottom of the control arm.
- Bushing above the control arm.
- Washer
- Shaft
- Washer
- Bushing
- Bushing
- Washer
- Nut.
- Tighten the stabilizer to 15-17ft/lbs.
Tools needed
-
Hammer
14mm Socket
Rust Penetrant
Center Punch
Ratchet
9/16 Inch Socket
Brought to you by 1AAuto.com, your source for quality replacement parts and the best service on the internet.
In this video I'm going to show you how to replace the stabilize links on this 97 expedition, same as many Ford and Lincoln trucks and SUVs. When these go bad, sometimes they break out right and just kind of fall out and then your truck is going to sway back and forth more. Also you may here a clunking when you go over bumps and that clunking actually goes away when you're going over bumps but you're turning, because it's putting some pressure on the Lincoln and not making noise.
Tools you'll need, I put jack and jack stands on here but you can actually accomplish this with the vehicle on the ground. Obviously it's a lot easier to film it with jack and jack stands but you will need 9/16 and 14mm sockets. The 19mm socket will be if you're taking the lug nuts off. Ratchet and extensions. You'll need a hummer and a punch, vise-grip or locking pliers and penetrating oil. Actually those last four things are only if yours is rusted on there like ours was.
Okay, to film it, it's a lot easier to take the wheel off. This is a repair you can do just by turning if you want to replace the right hand one you can turn your wheels all the way to the right and you can probably get in there well enough, remove the stabilizer link without jacking up the vehicle or taking the wheel off. I'm going to loosen the lug nuts here then raise and secure the vehicle and remove the tire.
Next I'm going to remove the stabilizer links. I'm going to spray the top of it with some penetrating oil and let it sit for a while. Okay this stabilizer links are sometimes difficult to get apart. You can use hand tools, they will come apart. I just chose to use a impact wrench just to make it easier. I have a 9/16 socket on the bottom and a 14mm socket on top.
Okay, use a hummer and pound down that bolt then use punch see if you can get it to go down through the sleeve, I end up actually having to use vise-grips and the wrench. Okay what I'm going to do here, I'm going to set up vise-grips on to this shaft, more tighter here. Here I'm going to install the sway bar link. I've already put a new link on the other side and just started the nut on it. The bushing always go towards the middle. We got bushing on the bottom going up to the control arm, bushing above that. My shaft goes on there and then the washer and the bushing. Okay push them down and in, and make sure that bushing is centered in there. Stabilizer bar. Now bushing and washer, and then my bolt or nut.
Okay, now you want to use the jack put pressure on the suspension and then tighten up the stabilizer to 15, to 17 foot pounds. You can put your tire back on and start each lug nut one by one make sure you don't cross-thread them. Tighten them down preliminarily. Put the lug nuts to 100 foot pounds using a star pattern.
We hope this helps you out. Brought to you by www.1AAuto.com your source for quality replacement parts and the best service on the internet. Please feel free to call us toll free 888-844-3393. We're the company that's here for you on the internet and in person.
Shop Products


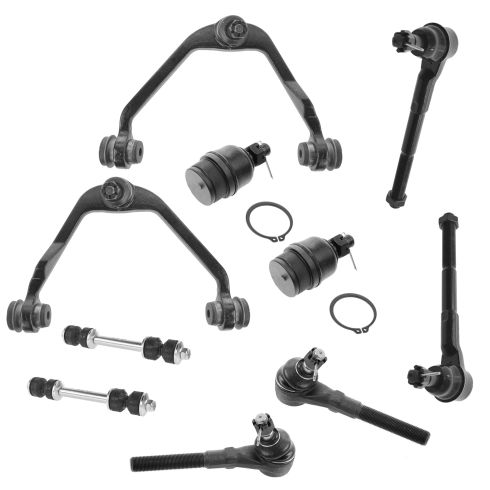
Ford Lincoln Front 10 Piece Steering & Suspension Kit TRQ PSA59271
Part Details:
- (2) Front Lower Ball Joints
- (2) Front Upper Control Arms with Ball Joints
- (2) Front Sway Bar Links
- 10 Piece
- (2) Front Outer Tie Rods
- (2) Front Inner Tie Rods
How to Replace Front Sway Bar Links 2002-07 Mazda 6
How to remove, replace, and install a sway bar end link on 07 Mazda 6.
