How to Replace Front Passenger CV Axle 2008-13 Nissan Rogue
Created on: 2018-07-16
How to repair, install, fix, change or replace broken, worn, or vibrating CV axles on 08, 09, 10, 11, 12, 13 Nissan Rogue
-
step 1 :Removing the Wheel
- Remove the hub cap
- Loosen the 21mm lug nuts with the vehicle on the ground
- Raise the vehicle with a floor jack
- Secure the vehicle on jack stands
- Remove the lug nuts
- Pull off the wheel
-
step 2 :Removing the Hub Nut
- Bend the cotter pin up straight with pliers
- Remove the cotter pin
- Pry off the hub nut cage with a flat blade screwdriver
- Tighten two lug nuts by hand
- Lower the vehicle to the ground
- Break the axle nut free with a 32mm socket and breaker bar
- Raise the vehicle
- Loosen the axle nut with a 32mm socket so it's flush with the axle
- Tap the end of the axle with a hammer to break it free
- Remove the axle nut
-
step 3 :Removing the CV Axle
- Remove the push clips from the shield in the wheel well
- Remove the shield
- Disconnect the speed sensor wire
- Loosen the ball joint nut with an 18mm socket, ratchet, and 18mm wrench
- If needed, once loose, punch the bolt out with a punch and hammer
- Remove the bolt
- Spread the ears with a chisel punch
- Separate the ball joint from the knuckle with a ball joint separator
- Hammer the ball joint loose by tapping the control arm with a hammer
- Tap the end of the CV axle with a punch and hammer
- Remove the two 13mm bolts from the bearing
- Have a drain pan ready
- Pry the axle out from the case with a pry bar
- If needed, use a puller and slide hammer
-
step 4 :Replacing the CV Axle
- Clean out the bearing bracket with sandpaper or a wire brush
- Apply copper seize to the bearing bracket
- Insert the axle into place
- Tap the axle into place with a dead blow hammer
- Check that the bearing is flush and aligned with the bearing bracket
- Insert the bearing gasket into place
- Tighten the 13mm bolts to the bearing gasket
- Insert the axle into the hub
- Tap the ball joint into place
- Tighten the 18mm ball joint nut
- Torque the nut to 21 foot-pounds
- Connect the front wheel speed sensor
- Insert the splash guard into place
- Press the push clips into place
-
step 5 :Reattaching the Wheel and Axle Nut
- Slide the wheel into place
- Start the lug nuts by hand
- Tighten the 32mm axle nut by hand
- Lower the vehicle to the ground so the wheel is barely touching the ground and won't turn
- Torque the axle nut to 138 foot-pounds
- Insert the cotter pin into place
- Bend the cotter pin down
- Tighten the lug nuts to 80 foot-pounds in a crossing or star pattern
- Replace the hub cap
-
step 6 :Adding Transmission Fluid
- Run the engine and let it warm up 10-15 min (Fluid should be 160 degrees F)
- Press the tab with a flat blade screwdriver to release the dipstick
- Remove the dipstick
- Wipe off the diptstick
- Insert the dipstick
- Remove the dipstick
- Check that the fluid is right below the upper mark
- With the engine running, insert a funnel
- Insert the transmission fluid into the engine
- Recheck the fluid level
- Lock in the dipstick
Tools needed
-
13mm Socket
Socket Extensions
Torque Wrench
Hammer
Pry Bar
Jack Stands
18mm Socket
21mm Socket
32mm Socket
Side Cutters
Flat Blade Screwdriver
Dead Blow Hammer
Center Punch
Bungee Cord
Ratchet
Floor Jack
Swivel
1/2 Inch Breaker Bar
Hi, I’m Mike from 1A Auto. We’ve been selling auto parts for over 30 years!
Okay, so we noticed grease on the ground when we were checking our parking spot. Obviously, there's a ton of grease in this area. The grease is coming from this CV boot which has ripped open, so it's all flinging out. This needs to be repaired.
At this point, you can either replace the boot or you can replace the whole axle. We're going to pull this hubcap off, just grab onto here and pull. You can also use a little pry bar and get in between pry it out. Now we're going to use a 21 millimeter socket and a breaker bar to loosen up the lug nuts before we lift the vehicle. Raise and support the vehicle, we did it on a lift. You can do this on a Jack and Jack stands. We're going to take the lug nuts off. Now take the tire off. Just give it a little hit.
We're going to take this cotter pin out when you use some side cutters. Just grab it right here and bend this back like that. Let me try to pull this out this way. You can throw that away. You don't want to re-use that, and pull this cage off. It will just hold the nut from loosening up. Then you use a screwdriver to help pry it out a little bit. It's like it's stuck in there right there. If I can pry up on that, pull it up. Now we have to take this nut off.
To get this nut off, I'm going to put the tire back on. We're going to drop it down so we can break the nut free. Throw the tire up. Now I'm only going to put two lug nuts on because we're not driving this down the road like this, but we just want the tire to be stable. So this is pretty rusty, so I am going to spray some rust penetrant on here so it's easier to take the nut off and it doesn't damage anything. I'm just lowering it down a little bit just so the tire doesn't move.
I don't have to lower the vehicle all the way down to the ground. Now I'm going to take a 32 millimeter socket and a breaker bar, and I'll loosen up this axle nut. Once it's loose, I can go back up in there. I'll take my tire off. I'll just use a ratchet to help me get this nut off. Once I get the nut flush with the axle and then stop, and I'm going to hit it with a hammer to break the axle free from the hub bearing. This will prevent any damage I do to the threads of the axle.
So that's broken free, so that's good, so now I can take that nut off. We're going to take this shield off. I'm going to take these little push clips off. Just use a straight screwdriver. This come out then this can come off. I'm going to disconnect this wheel speed sensor wire just because it's going to give me a little more slack when I moved the front suspension out of the way.
Just use the straight screwdriver. You can use your finger too, but this one's a little tricky, so just pull that out and we'll just set that aside. We're going to have to take this ball joint pinch bolt out so there's a good amount of rust right here, so I'm going to use some rust penetrant on this just like that.
I'm going to use an 18 millimeter wrench on this side and the bolt side, and I'm going to use an 18 millimeter socket and a ratchet on the nut side. And I'm going to break this free. All right, I'm going to spray some rust penetrant on this bolt, on all of this area. I'm trying to loosen up this bolt. I put the nut back on.
What I'm going to do is use an air hammer to try to push it through. While I'm doing that, I'm using an 18 millimeter socket and a breaker bar and I'm going to keep pressure on it and hopefully get it to turn a little bit as I push it through this way. We got this to break free. We're just working it back and forth, back and forth and spraying it with some rust penetrant. Just having patience going back and forth I'm able to break it free. So I'm going to tap this side with the hammer we still have the nut on so we don't damage the threads.
At this point I can pull that nut back off. I'm going to use a punch, so that I don't mess up the threads of the bolt and the hammer. I'll just tap it through the rest of the way. As you can see, this bolt is all corroded and rusted that was preventing us from taking it out and I will clean it up and put some anti seize on it before we put it back in.
Now we need to get this ball joint out of here, so to make it easier we're going to turn the wheel to the right like that and then I'm going to use a chisel punch to spread the ears, that's what's holding the ball joint in. This will make the ball joint come out easier. I'm going to try putting a pry bar in here, prying down on the ball joint, and break it free from the knuckle. Doesn't want to come off. We have this ball joint tool that's going to separate the ball joint from the knuckle. What it does is it pushes on the top part of the ball joint, the stud part, and it'll push it right out.
So I'll tighten this bolt up that's going to push the ball joint out. I'm going to try to hammer on the lower control arm. As you can see the ball joint coming out. There we go. So we're going to pop this axle out on this side and just tap it like this through the punch. Now we're going to pull it out, push on this knuckle assembly, pull the axle out, pull it to the side. Now I can drop the vehicle down a little bit. So there's a little retainer that holds the bearing in right here, there's two 13 millimeter bolts.
So I'm going to take those out, the long extension and a ratchet. We're going to pull this bolt out and then I can slide this retainer off. Alright, so before we pull this axle out, we want to make sure we have a drain bucket. I'm going to stick it right here. So if any of the fluid comes out of the transmission, we can catch it. At this point the axle should just pull right out. Because of New England rust, it is stuck in there. I'm going to use a big pry bar, get under here, I'm going to try to pry the axle out. It's not coming out because it's rusty. So I'm going to spray some rust penetrant on this barren hope to free it up a little bit.
I'm going to take another pry bar a little bit shorter and I'm going to use a hammer in the backside. I'm going to tap the axle out. We're going to use this polar on a slide hammer. We have this attachment here. Slide this in behind the axle here, and then we'll try to slide it up.
I'm going to spray some more rust penetrant on the inside here and we'll keep pulling. The axle is coming out. As you can see, our transmission fluid is dripping so make sure you put that pan under to catch the fluid. I'm going to keep on pulling. There's the axle.
As you can see, this bearing was seized in that bracket. This is a steel bearing which is, the bracket was aluminum so the two metals combined with rust, it sits in there pretty good. We tried many ways to get this out. We used pry bars in between here and the bracket, a hammer and a punch. We use some rust penetrant on this and soaked it. That seemed to help a little bit but still struggled. What we ended up using was this C-clamp type tool with this long extension on a slide hammer and this going right here was able to get a good grasp on it, and it pulled it right out. You can buy one of these tools or rent one, this is what worked for us. There may be other ways to get this out, but this is how we did it.
Here's our old axles with the ripped boot. All the grease is flinging out. Here's our new axle from 1aauto.com. Everything is set up pretty much the same. The bearings in the same location. This dust cap, the splines are the same. The boots are the same and the splines on this side of the same. This axle comes with a new nut in this cage and a cotter pin. You want to replace the cotter pin when you pull that out. You don't ever want to reuse a cotter pin, get yours at 1aauto.com and you'll be ready to rock and roll.
We're going to clean inside this bracket right here. We're going to use a wire brush and a drill. You can use emery cloth, sandpaper or a hand wire brush. I just want to clean it out, get some of the rust off over here so our axle will go in easier. You could use a file too, you just file it a little bit. Take a rag and wipe this out. Now that the axle is out, we can take some brake cleaner and some rags, and we're going to clean all this area before we put the new axle in.
I'm going to put some of this copper anti-seize lubricant on here. You can use some kind of grease if you want. It's better to have a higher temperature type grease because it gets really hot here. This anti-seize compound goes to about 1800 degrees, which is good. Just put this around, this'll help installing the axle and should help if we ever have to remove it in the future make it come out a lot easier.
Put this axle back in. You don't want to line it up over near the transmission over here, line that up good. So carefully we're going to use a dead blow hammer, I want to protect the threads so I'm just going to hammer it in. So you want to check this bearing right here make sure that is flush with that bracket and ours looks good, and then we can install the retainer that holds that down.
We'll reinstall this bracket right here and then these bolts that'll hold the bearing and actually hold in and actually hold the axle in. Use a 13 millimeter socket and a ratchet and extension. Snug these bolts down. Insert the axle back into the hub. Push this out of the way. Slide that in there. Lower control arm down a little bit. Push this whole assembly closer to the axle. Might have to turn the hub a little bit. Get the splines to line up. There we go just like that. And then I'm going to install this ball joint.
Be careful: watch your fingers. You don't want to get caught in there. Take the dead blow hammer and just tap it up. So we had a struggle getting this bolt out, but we cleaned it up with a wire brush. I'm going to use a little bit of anti-seize on this just in case we have to take it apart again. Looks good and all that. And then install the nut on the backside, so snug this down and then we'll torque it. We're going to torque this nut to 21 foot-pounds. We're using this torque wrench with an 18 millimeter socket. You can get these torque wrenches at 1aauto.com.
So in this repair we removed the ball joint. It is recommended that anytime you do any kind of suspension work, even if you're not replacing parts that you should have the alignment checked at a local garage. We're going to reconnect the front wheel speed sensor. Slide it into this bracket right here. We'll plug in the connector right there till it clicks. All right, we're going to put this cover on right here. Slide that in and take our push pins.
Before I put the axle nut on, I'm going to throw the tire up. If you have a aluminum wheel, you're going to need to take the center cap off. We had steel wheels, so we'll just leave the hubcap off. We'll put the axle nut on and then we're going to drop the vehicle down and torque the axle nut and then torque the lug nuts. All right, so I want to torque this axle nut. I'm not going to put the vehicle all the way to the ground just enough so that the wheel won't turn. I'm going to torque this to 138 foot-pounds. That's good.
I'm going to put this little cage on and line it up so that you can get the cotter pin in. You can move the cage if it's in the way so that you can line it up with the hole better. That way seems like the best. So use some side cutters to help me get it through. Just wiggle it back and forth a little bit. Once you get it down there, we can grab one side, twist it and grab this other one and twist it to the other side, and that's going to prevent the axle nut from loosening up. Now we're going to torque these lug nuts to 80 foot-pounds.
We're going to do it in a star pattern. That will torque the wheel down evenly. We're going to install the hub cap, line the hubcap up with the valve stem. This little slot right there and then bang it on. Okay, we're going to want to check the transmission fluid. To check it, the dipstick is right here. You're going to need a little tool to just push on the lock or just using a little screw driver, push on the lock that releases the dipstick and you can pull out the dipstick, wipe it off.
Here's where the level indicators are on the dipstick, you're going to want the dipstick fluid to be right about there. Now when you're checking this, you won't going to want to check it with the engine running and the transmission fluid has to be at about 160 degrees Fahrenheit, so you're going to have to warm up the car for a while and check it that way. After you wipe the dipstick off, we'll put it in. Put the lock on the other side so you don't have to unlock it every time you check it and you can pull it out like this.
We can check it again our fluid looks a little bit on the low side. If we warmed this up for about 10 or 15 minutes, we wanted a little bit higher so we we'll add a little bit of fluid to our vehicle. Make sure you're using the appropriate fluid. Check your owner's manual to see what kind of fluid. You just use a funnel and you add the fluid right there. Take the funnel out. You can recheck it. As you can see, our level is right here, so that's good. So then we can reinsert the dipstick and lock it in place.
Thanks for watching. Visit us at 1AAuto.com for quality auto parts, fast and free shipping, and the best customer service in the industry.
Shop Products


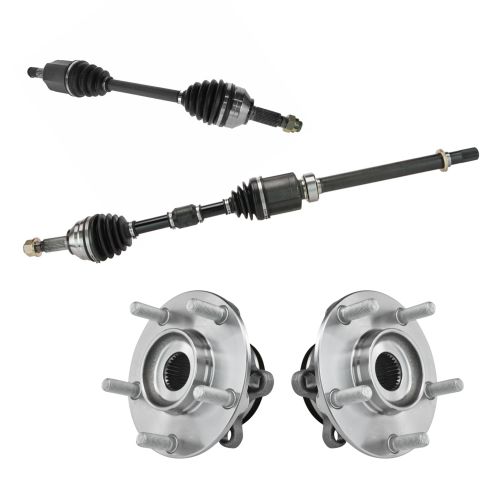
Nissan Rogue Rogue Select Sentra Front 4 Piece Drivetrain Kit TRQ CSA64124
Part Details:
- Ball Bearing
- 4 Piece
- (2) Front Wheel Bearing & Hub Assemblies
- (2) Front CV Axle Assemblies
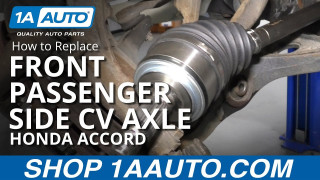
How to Replace Front Passenger Side CV Axle 2003-07 Honda Accord
Watch this video to learn how to replace the passenger side CV axle on your 03-07 Honda Accord. The driver side is covered in another video!
