How to Replace Front Passenger Side CV Axle 2003-07 Honda Accord
Created on: 2019-06-07
Watch this video to learn how to replace the passenger side CV axle on your 03-07 Honda Accord. The driver side is covered in another video!
-
step 1 :Removing the Wheel
- Partially raise the vehicle with the wheel still contacting the ground
- Loosen the 19 mm lug nuts 
- Raise and support the vehicle on jack stands
- Remove the lug nuts
- Replace one lug nut loosely
- Hammer the tire from the back side if the wheel is stuck
- Remove the last lug nut and the wheel
-
step 2 :Removing the Passenger Side CV Axle
- Remove the two 10 mm bolts securing the brake hose bracket to the knuckle
- Remove the 10 mm bolt securing the ABS wire bracket to the knuckle
- Remove the 10 mm nut securing the ABS wire bracket to the upper control arm
- Remove the 17 mm nut from the 17 mm lower strut through bolt
- Remove the 17 mm lower strut through bolt, hammering it though, if necessary
- Pry the lower strut arm forward to access the sway bar link
- Remove the 15 mm nut securing the sway bar link to the lower control arm
- Remove the sway bar link from the lower control arm
- Remove the 32 mm axle nut
- Hammer the axle to push it inward slightly, but not all the way through
- Remove the upper control arm ball joint cotter pin
- Remove the 17 mm upper control arm castle nut
- Hammer the knuckle at the upper control arm ball joint to loosen it
- Remove the upper control arm ball joint from the knuckle
- Remove the axle from the wheel hub
- Remove the axle from the transmission using the CV axle popper tool
-
step 3 :Installing the Passenger Side CV Axle
- Inspect the rubber seal on the transmission at the axle input for dryness or cracks
- Replace the seal if necessary
- For the passenger side, its best to fit the axle shaft between the lower strut arm before connecting either end
- Insert the axle into the transmission
- Hammer the axle into the transmission using a rubber mallet
- Apply copper anti-seize to the axle splines
- Insert the axle into the wheel hub
- Hold the upper knuckle in place using a brake caliper hanger
- Align the lower strut arms with the lower control arm
- Apply copper anti-seize to the lower strut through bolt
- Reinstall the lower strut through bolt
- Install the sway bar link into the lower control arm
- Tighten the 15 mm nut onto the sway bar link
- Tighten the 17 mm nut onto the 17 mm lower strut through bolt
- Torque the 17 mm nut to 47 ft-lb
- Install the upper control arm ball joint into the knuckle
- Tighten the 17 mm upper control arm ball joint castle nut
- Torque the upper control arm castle nut to 35 ft-lbs, and then tighten it further, if necessary, to align with the cotter pin hole
- Insert and peen over a new cotter pin into the upper control arm ball joint stud
- Replace the 10 mm bolt securing the ABS wire bracket to the knuckle
- Replace the 10 mm nut securing the ABS wire bracket to the upper control arm
- Replace the two 10 mm bolts securing the brake hose bracket to the knuckle
- Replace the 32 mm axle nut
- Torque the 32 mm axle nut to 135 ft-lbs
- Peen the rim of the axle nut into the notch in the axle
-
step 4 :Replacing the Wheel
- Slide the wheel onto the lug nuts
- Replace the lug nuts and tighten them in a star pattern
- Lower the vehicle with the wheel lightly touching the ground
- Torque the lug nuts in a star pattern to 80 ft-lbs
Tools needed
-
15mm Wrench
Socket Extensions
Torque Wrench
Hammer
15mm Socket
17mm Wrench
Rust Penetrant
Pry Bar
17mm Socket
32mm Socket
Side Cutters
Rubber Mallet
Phillips Head Screwdriver
Brake Caliper Hanger
3/16 Allen Wrench
CV Axle Shaft Popper Tool
Copper Anti-Seize
Center Punch
Cotter Pin
10mm Socket
Ratchet
1/2 Inch Breaker Bar
Hey friends. It's Len here at 1A Auto. Today I'm working on a 2007 Honda Accord. We're going to be doing a right front axle. Going to be a fairly easy job. I want to be the guy that shows you how to do it. If you need this part or any other part, you can always check us out at 1aauto.com. Thanks.
Okay everybody. So here we go. I've got my 19 millimeter socket, my long handle ratchet. I've got the vehicle supported off the ground, with the wheel just barely touching so that it can't spin while I try to loosen these, counterclockwise. I'm just going to give them one quick crank, just like that, just to break them free so when it's up in the air, they'll come off a lot easier. Okay? I mean if you're using an air gun, you really don't have to worry about doing this, but for the purpose of this video, I'm just going to show you that right now.
Now we'll lift it up and we'll be good to go. Now that we broke them all free. Like I said, if you didn't have an air gun, you'd want to break them free on the ground first and then you can continue ratcheting them off. Get them out of the way. You have access to an air gun, it's going to make your life easier. I'm going to start using an air gun to continue on with the video, but you can always use a ratchet to do whatever you need to do. 19 millimeter socket, I'm going to put this one on just a little bit. I'm going to set these lug nuts out of the way. I'm going to remove this one, so now I can use two hands. I'm going to hold my wheel, remove that lug nut that I started on a couple of threads, can set this aside. So here we go.
I've got my penetrant spray. I'm just going to start spraying things that I know I'm going to be taking apart. Okay. I'm going to take the upper ball joint apart. Separate that from the knuckle. At some point, we'll be taking these out. You can give him a little spritz if you want. This nut right here is going to come off. Give that a spritz over here. The bolt. Okay, this is going to come off.
We're going to let the penetrant do its job while we're focusing on what else we're going to do. Okay? This bolt right here, this comes through the lower part of the strut, goes through the lower control arm bushing, comes out this side. Then there's a nut on the backside. So I'm going to spray that. I'm going to spray the nut for the sway bar link. We'll let all that do its soaking and we'll start removing things.
Make sure I pay attention to what's going to be happening, right? So if I remove this upper ball joint nut, which we're going to need to do, so we can pull this down to get room to get the axle out. I pull this down, it's going to put a tug. It's going to tug on this. There really isn't much give there. It's going to put a tug on this. Okay? So that's why I sprayed all these things down. I'm going to remove this 10. there's a 10 mil bolt right here, 10, 10 we'll slide this out of the way. Slide this out of the way. Give us plenty of slack for when this comes down in the process of what we're doing. So I'll grab my 10 and we'll move along.
I've got my 10 millimeter. I'm using my air gun. You can use a ratchet, like I said already, I'm just going to put it on and zip these out. Look at all that slack we have now. That's going to be great. Come over here. This is a nut. Get that off of there. Do this one. Perfect. Now we got plenty of slack there too. We're doing pretty good. Let's move along.
So here we go. Now we're going to remove this cotter pin right here. It's just a flimsy piece of metal, nothing really too crazy about it. I like to use some cutters. If you don't have access to extra cotter pins, you're probably to want to try to save it. I do have access to new ones and I will be using a new one, but the purpose of the video, I'll just try showing you how to get it out, hopefully without breaking it too much. So there it is. Okay. If you need to reuse it, well you do you, booboo. I'm going to replace it.
Now we're going to use our 17 millimeter. We're going to remove this nut right here. I left it on just a little bit and give it a couple more threads. Now I'm going to take my big fabulous hammer. I'm going to whack right here on the knuckle. I'm going to be careful not to hit this boot too much. I definitely don't want to put a hole in that, obviously. I don't want to damage the upper control arm, or I also don't want to hit the stud right here and this nut, so it's all stuff to think about. You don't want to hit here, here, here, here, anywhere, but right there. Okay. I got my big fabulous hammer. I'm going to hit right here, being careful of the boot, the stud, the control arm. Okay? I'm just going to try to whack it.
It broke free. I've got a gap there. Now what am I going to do, I'm going to pull down on this. Take off this nut right here. I'll show you what it looks like. It's just a castle nut. It's got slots in it. Those slots you see is for the cotter pin to go through the hole in the upper ball joint. Not sure if you can see it, but there's a hole where the cotter pin goes through, has to line up with one of these slots. Okay? Once we torque it down, I'll tell you about that.
We're going to go ahead and we're going to loosen up this nut right here. It's a 32 millimeter, but before we go too far, I'm just going to hang this with something. Whatever you might have. I've got a little hooky tool. Just going to put it there and I don't know, right there. Cool. 32 millimeter, and then reverse that off. So here we go. 32 on my air gun, you can use a ratchet. You do you, booboo.
There it is. Okay. Next thing we're going to want to do. We're going to put a little bit of penetrate in here. We're going to let it do its magic. We're not reusing this axle, so you don't really don't have to worry about, normally if you were reusing the axle, you would put this nut back on quite a bit. Then you could hit it with the hammer. You don't have to worry about damaging any threads or you can do with the way that I'm actually going to do it anyway. I'm just going to use my air chisel and the center punch. I'm going to go right there and drive it through. Okay, so like I said, grabbed some of my penetrant. Put that on there. Got My air chisel and my air hose here. Here it is. Center Punch can go right here. I've got my safety glasses on just in case anything happens. I'm just going to drive it through.
Seems pretty good. I know it's not going anywhere. Perfect. Now we can move on to the next step. So here we go. We've got our 17 millimeter nut here and we've got the bolt that comes through on the other side of the 17 as well. So I'm going to use a wrench on the bolt side and use a 17 millimeter socket on this side. I'm going to remove it wearing my safety glasses, of course.
That's what our nut looks like. Does this spin? Spins pretty good. Sometimes you'll find that the bolt really doesn't want to spin, in which case, generally speaking, it's frozen in the bushing that runs through the control arm. If that was the case, that's a project for another day. We're pretty lucky on this vehicle. It's not. So lucky me. Lucky Len. I'm going to take our nut that we just took off. I'm going to put it back on a few good threads. Here we are. Now I'm going to take my hammer. I'm just going to give it a couple of bonks. I want to try to drive it out. Okay. The reason for putting on the nut is just so I don't damage my threads and make it impossible for myself to put the nut on later on down the line.
So here we go. Cool. Moved pretty easy. Now that I know it moves like a dead, I can gently tap it and I can use my punch. It's going to drive it through. It's going to come out the other end. It's going to hit the floor, so I just want to make sure there's nothing over there. Maybe you're on the ground and I hit your face. Here we go. Let's give a little wiggle. It doesn't want to come out by wiggling. You can always just try to unscrew it. So there's our bolt. Comes through from the front to the rear, essentially like this.
Okay, so we've got the lower part of our strut right here. It comes down as a fork like this and it goes around our control arm, which basically sits like this. I want to go like this up against my sway bar link and up against one side of my fork.
I just want to try to pull it. I want to try to get it all the way over here somehow. That way there, it'll make it so I can get my axle out. Okay, so I'm going to go like this, now it's unlatched. I can get this sway bar link net off of here. Then we're going to take down our knuckle. We're going to pull it back and we're going to drive our axle completely out. Okay? We'll have it out of the wheel bearing and everything and we can go to the transmission side after that. So right here, 15 millimeter, I'm going to blast this out. If you can't blast it out, you can try using an Allen head, stick it in there and use a wrench to take this off. That's the harder way. So best of luck if that's the way you're doing it. Here we go. Safety glasses on.
Just a 15 millimeter head. Set that aside, I'm going to take our sway bar link, see if we can get it out of the control arm. If it doesn't want to go, you can just use a pry bar. So what I'm doing at this point is essentially just getting this out of the control arm. Whatever you have to do to get that done. I'm going to grab this. I'm going to try to get my little hooky-doo out of here. It's just holding it so it doesn't come down and hit me in the face. Here we are. Now I'm going to try to force my axle through.
Let's give it a couple of little wiggles here. Pretty cool. Make sure I'm not putting any unneeded pressure on any of my hoses or my lines. I got plenty of slack. It looks like I'm doing all right still. So now I'm just going to try to force stuff around and try to get this axle out and down and out here. I'm going to go over to the transmission and we'll get it out of that side. Okay. Very careful for hoses and ABS wires. We're replacing the axle, so that's nice. We don't have to worry too much about that.
Okay, so we've got this hanging out here. Now once we pop it free from over there, it should come out pretty easily. Actually, I'm going to bring this back up over here. It looks better here. Now I've got more slack, so now when I go pop it out of the transmission, I'm going to have some area for it to go to. Right? Shoved in down there, it might not have come out so easily. Anyways, so now we got it here, we still got plenty of slack, right? If you're worried about it, you can try to tie this up. Just as long as you don't have any unneeded stress on your lines or your ABS wire, you're good to go.
So we've got our tool, we've got this right here. This is a part that can be bought right at 1A Auto. I highly recommend it because what it does is it wedges in between the transmission and the axle. Then you just drive it right up and it does all the hard work for you. Just separated that nice and easy. I'm going to stick it up in there. Cool.
All right, now we'll come back over here. We'll get our axle up and out of here and we'll move along. So now I'm just going to grab the axle. Let me see if I can work it out. So this being the longer of the two axles can make it a little bit difficult. If we were doing the driver's side, you wouldn't have to deal with the majority of all this. See, now, we're at the point where we've got the little fork here, so what we're going to have to do is just try to finagle it. And be careful of our fenders and all that, obviously. Just going to try to get it down through our fork. Here we are. Now we've removed our passenger side axle.
Here we go. Friends, a quick product comparison for you. We've got our old axle. This is the right side axle out of a 2007 Honda accord. It's a fairly easy job to do. We just pulled it out. We have our brand new quality 1A Auto part here. I just wanted to show you a quick comparison to let you know things to look for when you're comparing them. You've got your shafts over here. Okay. This is the side that's going to go through the wheel bearing. Then this is where the nuts going to obviously ride, get a brand new nut that's always nice. You want to make sure that you've got splined ends. The splined ends are the same exact length. Okay. And of course the same width. I mean, it'd be hard to kind of gauge it, but they look about the same. If you have one that's fatter or longer, you got an issue.
You come over to the other side, you're looking at the same thing. We've got our shaft over here and our shaft right there. You want to make sure that these are about the same length. If you've got one shorter or longer, shorter, whatever, you've got, thicker, it looks wrong. It's wrong. Okay? If you have a new one and it's longer than what the old one was, it's going to go too far into your transmission. That's going to cause an issue. If it's shorter, it's not going to go far enough in. That'll also cause an issue. So you want to make sure that those are the same exact length. Okay?
So moving along, what we'll notice is that the length of the axles, they're about the same length. If it seems like ones may be like a quarter inch longer or an eighth of an inch longer than the other, it's only because, well, they expand and they contract. Okay? The shafts can go in and out a little bit. That's what they're supposed to do. Okay. Your old one, same thing. So if you've got one that's contracted and one that's expanded, well of course one's going to be the different length. Okay? So as long as they're approximately approximately the same length and these shafts are all the same, you're doing all right. So with all that said, I don't see any reason why this wouldn't be a great quality part to put into your vehicle. So if you need this or any other part, you can always check us out 1aauto.com. Thanks
We're going to make sure that our axles nice and clean right along here. This is where our seal's going to ride. Okay? If you have Vaseline or some sort of silicone paste, you can just put a little bit along here. This is just going to help when you're installing the axle to slide into the seal. Once we get that all in nice and smooth, we want to make sure that there isn't any dirt. Of course. We'll set this aside and then we're going to check that axle seal, make sure it's not ripped or torn or anything like that. If it is, we'll want to replace it. Let's take a look at that. We'll set this aside and we'll move along.
So here we go. We're at the transmission. This is the seal where your axle is going to go into. It's going to drive right into there. You can see the splines. Okay. So we want to check this seal. The way to do that would just be to use your finger and your eyes, of course. Just feel around, see if you feel any splits or cracks, anything that might catch your eye. This one looks like it's in really good condition. If it wasn't, you'd want to replace this because you don't want any moisture or dirt getting inside your transmission. That'll be a costly repair right there, and or replacement. So it looks good to me.
I'd say now we're clear to grab that axle and we'll slide it in and we'll keep on rolling. So I've got my big old axle. I've got my wishbone area on the bottom of this strut assembly. I'm just going to bring it in. I'm going to get the axle resting in there. Essentially what I want to do is get the axle to go down where it's supposed to go. We'll lift this up, try to get my little hooky-doo out of here, being careful not to put any tugs on anything, right? You just got to keep being careful of that. Super important.
We'll get this down pretty close to where it's going to go. Now what I'm going to want to do is I need to get my axle in between here. So you need to do whatever your scenario is. Just be careful not to pull on this. Careful not to pull on this. Might make it easiest to just go ahead and drive in the axle first and then hopefully this will push in far enough to get it down under here and then over. If you were going to do that, just use something as simple as a rubber mallet. Okay. We're just going to whack it in. Now I'm going to see if I can get my axle up and through here.
Right. Whooee! Tell you what. Get that off of there. Set this aside. Okay. Trying to get this down lower, because I need to get this up and over here. So we do whatever we can. If it's easier, I'm just going to show you, we'll just take off this caliper right here and we'll hang it up and out of the way. That'll give us all sorts of play area to be able to do things. So I'll just show you how to remove those and we'll go from there.
Okay, so here we go. I'm going to remove this right here. This right here. I'm going to use a small pry bar. I'm just going to try to pop this caliper out of the way. There's going to be brake pads that are in there. If they come out, just remember which way they came out. That's the way you're going to put them back in. We still got plenty of slack here. Everybody can see it. Maybe you have to remove the caliper. Maybe you don't. It all just kind of depends on what's going on for you and your situation. You don't want to just let this hang down. Put a tug on your brake hose. This is a high pressure hose right here. Last thing you want is any tugs, bubbles, cracks, splits, whatevers. Here's our pads.
Do that. Not that you really have to worry about it cause the brackets on there. So you put this on. That'll just kind of hold the rotor from wobbling around too much in case there's a lot of rust. You don't want rust getting between the hub and the rotor. So if you can prevent that, that'd be good as well.
All right, so I'm just going to pop the axle back free again. Okay, so I'm going to use my little pickle fork tool here. All right. Now I'm going to come back up there. Right now is just basically about getting the axle, this axle in between here, essentially, so you're going to have to figure out for your application how to get it done. Every car might be the same car, but they all act a little different I guess in certain situations. Right? Want to be very careful to hopefully not damage my boot at all. Obviously, I don't want to damage my brand new boot. Try to work it up in there. There we are. Cool.
Okay. Now I'm going to get the axle back up into the hole. I'm going to make sure that it's getting in there and I'm going to push it back through again with my rubber mallet and we'll get going on putting all the rest of this back together. So here we go. I'm just going to get the axle getting close. I'm going to go ahead and spray this with a little bit of a Never Seize. It's going to help me out down the line or whoever the next person is that's going to take this apart. Whether it's for an axle or a wheel bearing or whatever it is they might be doing. Grab my Copper Never Seize. Just give a little spritz. There we are. Grab my knuckle. Get it kind of working into where it's going to be. There it is. Cool. So now what I'm going to do is I'm going to do this sway bar link down here. Try to lift this up enough to get my sway bar link stud through there.
It's pretty close. Might be able to hammer it in or I don't know. Yours might even just slide right in. That's probably just my sway bar link that's causing issues. There we are. Let me go ahead and tighten this up. It's a 15 millimeter. Nice and snug. Okay, so we're going to go for this now. Okay. I'm going to try to line up this hole with that hole. It's going to go through and through the other side of the little fork here. Alright.
I've got a little tool. Might make things a little bit easier for us. It's just a Phillips head screwdriver. You can use whatever you've got. You might just have something that's pointy. Essentially, I'm going to go through the hole in the fork and then through this. I'm going to use this to work it around so I can get my bolt through. Okay. Before that, I'm going to take off my nut, of course. I'm going to spray the shank area of this with some Copper Never Seize. That's just going to make it nice, easy to take back off someday down the line. A lot of times these bolts right here will freeze up in the bushings right here inside the control arm, cause issues.
So here we go. See if I can get the fork over the bushing area first. There we go. Let's see if we can get this worked in here. Okay. So we got this pretty much lined up.
I'm going to try to line up the other side of the hole real quick. Use something different on this side. I'm going to put it through from front to back. As I push this through, it might push the screwdriver through. Okay. We are cruising. Looks pretty good. Bonk. Here we are.
We've got our 17 millimeter nut. Go ahead and put this on here. Now when I zip this on, I'm pretty much just going to bottom it out because I want to make sure I torque this down. Okay. There is a torque specifications for it, so we want to use it on that. We're going to use it on the upper ball joint. We're going to especially use it on the lug nuts and the axle nut. Okay? 17 on the bolt side, 17 on the nut side. My safety glasses, of course.
Okay, bottomed it out. We'll go get the torque spec for that. We'll torque it down and we'll move along. There we go. We're going to torque this down to 47 foot pounds. We've got our inner pad. We can tell because it has a circle. That's where the piston of the caliper rides on. Right there, outer pad. Get that on there.
Star caliper. Take a peak. It's not leaking. Looks fairly decent. Just going to slide it right back over these pads. Get them lined up. We got our two bolts, just 12 millimeter heads on those, so nothing too crazy. They're not super thick bolts either, so you definitely don't want to hammer them down with like a half inch guns, but if you had something small like this, you can just blast them on real quick.
Okay. We're going to go ahead and put our upper ball joint stud down through. There's the hole that I was talking about. Here's our nut. It's got slots, right? I'm just going to get it lined up. Keep it in there. Slotted side goes down. Going to bottom it out. Now we're going to torque it to 35 foot pounds. Once we do that, we'll check to see where the slots line up with the cotter pin hole. If they don't line up perfectly, we're going to tighten it a little bit further until it gets to the closest slot. You never want to loosen it. Okay? Just tighten it to the next spot. So I'll grab my torque wrench, 35 foot pounds with my 17 millimeter socket.
Do it one more time. Looks pretty good. All right. Looks like it's just barely passed it, of course. So we're just going to bring it to the next slot, like I said. torque wrench doesn't like doing that, but whatever.
Here we are. We've got our hole going through. Got our cotter pin. Put it through the hole, this side right here, we just want to bend out of the way. Okay. Or bend down or bend wherever, but basically, just make sure it's bent. Okay. You can bend it in any direction you want. You can bend one one way, one the other if you want and make it look pretty or symmetrical or whatever you want. It just has to be bent. All that cotter pin does, does it make sure that this nut can't loosen up over time and your ball joint can separate from your knuckle, which would cause a big issue driving down the road, obviously.
Okay, so we're moving along. We've got these right here. Everything else. Let's take a look. It feels like it's tightened. We did all these, we did that bolt down there. We didn't take off the outer tie rod end. Cool. So I'm going to grab some of my Copper Never Seize. I'm going to spray the areas that those bolts go into, just so they come out nice and easy the next time. A lot of times they'll break coming out. We got very lucky on this car.
You want to make sure, oops. I'll grab that in a second. You want to make sure that if any of these mounting bolts broke, your hose is still secured and of course your ABS wire is secured. If it wasn't and it was just dangling around or could get caught on your wheel. That's going to become an issue, so you want to make sure that it's secured. You can use something like a wire tie or whatever you have access to. Just make sure that they're secured. Okay, to shorten the story. It just has a little prong here, just goes up in the hole in the control arm. Put my nut on there. I got my last bolt, put it in there, 10 millimeter.
Everything's nice and secured. Looking pretty good. All that's going to be left, just to go ahead and we're going to snug up this axle nut here. We're just basically going to bottom it out and then we're going to torque it down. Okay, so you're going to use your 32 or your hands, whatever you've got. Go like that. We'll get it down closer to the ground and I'll show you how to torque it down. We're going to go ahead and we're going to tighten this up to 134 foot pounds, using our 32 millimeter axle nut socket. We are just going to hit it one more time. Cool. Now there's a little slot in our axle right there. We're going to take a punch and we're going to try to drive this part of our nut into that slot and that's just going to lock it in. Okay? So I'm going to grab a punch and a hammer and we'll get that done.
So I've got a punch. I'm going to try to drive this into that slot right there. Best I can, at least. All I want to do is make sure that this not can't spin on its own, over time. It's going nowhere. Perfect. We'll get this lug nut off of here. I'm going to grab the wheel. I'm going to lift with my leg and my abs. Get it up on here. We've got my one lug nut with my 19 millimeter socket. Just going to get us started on there. Now I can release the wheel, I'll get my other four started, we'll bottom them out, and then we're going to go ahead and torque them down to 80 foot pounds. I just bottomed them out in a star pattern real quick. Now when I torque them, I'm going to do the same thing. It's important to go in a star pattern and not just around in a circle so you don't have your wheel off kilter. Time to torque these puppies. Star pattern, like I said, 19 millimeter socket. Here we go.
I'm just going to go around again. All right. Now we've completed our service.
Thanks for watching. Visit one 1aauto.com for quality auto parts shipped to your door, the place for DIY auto repair. If you enjoyed this video, please click the subscribe button.
Shop Products


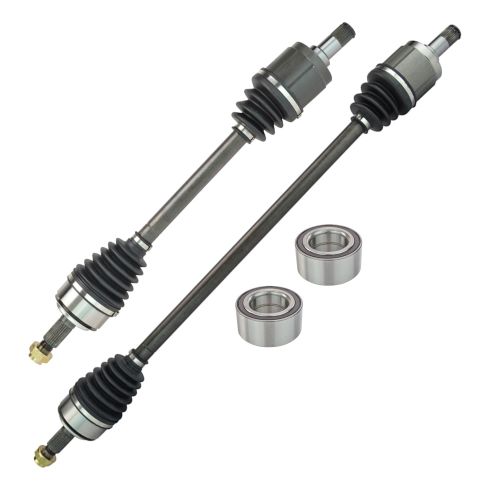
2003-07 Honda Accord L4 2.4L Automatic Transmission Front 4 Piece Drivetrain Kit TRQ PSA84885
Part Details:
- 4 Piece
- (2) Front CV Axle Assemblies
- (2) Front Wheel Bearings
How to Replace Front Driver Side CV Axle 2005-16 Toyota RAV4
How to replace a bent, broken, rusted, or worn front driver side CV axle on your 05-16 Toyota Rav4.
