How to Replace Engine Mounts 2007-14 Cadillac Escalade
Created on: 2020-06-12
This video shows you how to install new TRQ engine mounts on your 2007-2014 Cadillac Escalade.
Tools needed
-
Torque Wrench
Socket Extensions
Socket Driver
Pry Bar
Jack Stands
8mm Socket
Wheel Chocks
10mm Wrench
Ratchet
Floor Jack
22mm Socket
15mm Socket
Trim Tool Set
10mm Socket
Swivel
Bungee Cord
11mm Socket
All right, so we're gonna be doing both motor mounts on this vehicle. If for some reason you're only doing one, then just follow the instructions for that corresponding side. Now to start doing this job, one of the first things that you need to do is disconnect your negative battery terminal. The reason for that is because we wanna make sure that nothing goes on electrical when we're dealing with these motor mounts.
Use your 10-millimeter, come right under here. We're just gonna loosen up this nut, and we'll lift the terminal up and off of there, and set it aside so there's no way it can touch up against that battery. The next thing we're gonna do is grab onto this, lift it straight up, and then draw it towards you, and set it aside. Use an 8-millimeter or a flathead screwdriver to loosen up your clamps. You'll have one here and one there.
If you were to grab onto this right here, it should just pull right out. Now if you come right down along here, you're gonna have a little push clip that's holding your radiator hoses up. Just kinda grab onto it, give it a little push. Now I'm gonna grab this, draw it towards me and up at the same time, get it off of here, set it aside. Take a small pry bar, and we're gonna take off this center cap. If you were to spin it, you're gonna see a little notch in the cap. Just carefully slide this off of here. That exposes our 22-millimeter lug nuts. Remove all six. Remove your wheel. Okay. Let's take off the other wheel.
Now with the wheel off, you have a clear view of what's going on here. If you wanted to, you can remove your plastic fender liner here, and that will give you a little bit more room. But, theoretically, if you just move it around, it should get right out of the way. The next thing we're gonna do is remove our bolt that holds our level sensors, okay? Use your 13-millimeter, and just set this aside so it's out of the way. Look at that nice big hole we have now. Do the same to the other side of the vehicle. There we are, set that aside.
All right, so here's what our motor mount is gonna look like. If you were to look down, you see the steering shaft. You'll see the manifold, and below that, you're gonna see the shield for the motor mount. You're gonna see a bolt here, one over there towards the front and then one over towards the rear, that's holding the motor mount down to the frame. We're gonna remove all 3 of those using a 15-millimeter. If you were to use a 15-millimeter swivel and a nice long extension, get right down in here like this, put it right on there. Do the same to all three. Now, if you're doing both motor mounts, you do the same to the other side of the vehicle. Now if you wanted to, you can come through the wheel well to get this one out.
The next thing that we're gonna do is remove the heat shield for our manifold. Some of these bolts may break, but just be careful about it, and use a 10-millimeter to remove all 5 on the driver's side. And then if you're doing the passenger side as well, you would remove the six bolts on that side. This one should come out of the way fairly easily. The passenger side might not come out of the way like that.
The next thing we're gonna have to do is coming from underneath the vehicle, you're gonna remove your starter. Assuming you've disconnected your battery, as I stated as the first step. We're gonna go ahead and remove this bolt and that one right there. Then we'll slide the starter out of the transmission bellhousing, and then just bring it down so it's out of the way. Let's go ahead and remove this anchor bolt. That's gonna make it so this cable can move around. Slide this right down here. Now it's nice and out of the way. Awesome.
One of the next things we're gonna need to do is to try to jack up the engine a little bit so we'll be able to get to those engine mounts. The way that we're gonna want to do it is by coming right under here. I'm gonna use a nice piece of wood and a jack, and lift it up slowly and carefully. I want to try to do it right near the edge here or the corner, that way there I'm not gonna cause any damage to anything. Just gonna carefully get that wood right on the edge of that oil pan. You definitely don't wanna do it with anything metal. Now we're gonna jack up, and this should start lifting up the engine. Now, as you jack up, you wanna keep paying attention to this area right along here to make sure that your engine does not press up against this part of your cowl, because, of course, you could cause damage. Feels good right about there.
Now, if you look down through the wheel well, you're gonna be able to see all four of the bolts, going through the mount and into the engine. Got one over here, one up in this corner, down over there, and another one over there. If you have a hard time getting to 'em, just go ahead and grab this plate, lift it up a little bit. And that should give you a little bit more access, and then, of course, you can flex it as needed to get the rest of the bolts. There we are, hit the ground. It's good sign. And we can move this around. The next thing we wanna do is find the oil dipstick, which is this one right here. Follow that tube down and find the mounting bolt. We're gonna remove that 15-millimeter mounting bolt. Wiggle the dipstick tube around. There we are. Let's get this to this point here. Now, I'm just gonna try to spin it. Now we're gonna remove the bolts or the nuts I should say that hold this top bracket with the shield to the bottom area. Use your 15-millimeter from this side. Now, with that off of there, should be able to separate these pieces. This is the part that was hanging this up. The shield right here, which is super important by the way.
There we are, friends.
So now it's gonna be time to install our new mount. If you were to look right here, this was the main issue where we were struggling so much to get it out of the frame. Because, as we tried to lift up, we're hitting against the manifold, and it just wouldn't let this come out and around through the frame. So what we're gonna have to do, I like to mark it, so I know exactly how things are gonna line back up. And then we're gonna remove these nuts, just like we did on the original one, and we're gonna put it back together while it's inside the vehicle. It's gonna be much easier than trying to fit this whole big old thing in there. Let's get ready for our install here. [inaudible 00:08:00] got it out. Right. I'm gonna turn this so it's facing in the exact direction as when I took the original one apart. Because, obviously, it's gonna be easiest to get it back into its original position from that point.
Now, we'll start piecing the rest of it together. This job would be a lot easier if it didn't have this shield, but it's ultra important to have it on there, so don't skip putting it back on. Try to line up those studs with the holes in the shield. Okay. Just like this, slide that on there like that. Take our two locking nuts, start them both on there. Make sure you tighten them up. Get these snug. I'm just gonna double-check them here. Just gonna have to wedge the mount in to make sure it can't move too much on you. That one's definitely tight. Oh, yeah, definitely tight. Let's go ahead and spin this up into the position that it needs to be in to mount it to the vehicle.
Next, we're just gonna have a second person, carefully pry up against the engine, against the manifold and the frame, and just try to move it over. There we go, slid right in. All right, so let's pause here and go do the same to the other side. Now if you want to make it so you have more room to be able to get inside here, can remove this plastic fender liner, use the 7-millimeter to remove all of the bolts that go around. And you're also gonna notice that there's push clips. To get those out, you can use one of these forky tools, or whatever you've got that you think will work.
Now, with this flopping around, we're gonna continue with our forky tool, and just get all these little press clips out of here. I'm just gonna carefully use some cutters, see if I can grab onto here. Just try to work it out of there. There we are. Cool. Okay, so I got my socket in there. Here's our first bolt, do the same to all the rest. Now you might need a setup that looks a lot like this. There's bolt number two. Getting the concoction on here is the hardest part. Bolt number three. Nice. Come on. Moved quite a bit, and I can get to the backside. There it is. Okay. It should be ready to separate now. Clear. Whoa, look at this, a problem right there.
The next thing you're gonna wanna do is make sure that your steering wheel is in the locked position. You wanna make sure it cannot spin. All right. If it can, you need to make sure you secure it. You can do that with something as simple as a bungee cord. Next, we're gonna use our 11-millimeter, and we're gonna take out the lower bolt that holds the steering shaft to the power steering rack. If you move up the rack, the next bolt we're gonna remove is this one up here. That's the one that leads from the center shaft to the upper shaft. That has this little dongle on there.
The next thing we need to do is come from underneath. And you can either use a pry bar or an air chisel, whatever you have. But, we need to get the steering shaft to come up off of the power steering rack. So I'm just gonna kind of lightly tap on it. If you want to use some penetrant, it's probably going to be helpful. So now, with the steering shaft completely in the downward telescoped position, we're just gonna try to bonk down on this a little bit to try to separate the intermediate shaft from the upper shaft. Okay, it's coming right off. This out of here. So now that I test fitted how this is gonna get back into the vehicle, I'm just gonna go ahead and make sure that I tighten this back up. Let's go ahead and try to get this down in here. If you happen to bonk anything loose, just make sure you have it re-secured.
All right, so now with the engine mount nice and loose, we're just gonna go ahead and start in the bolts that go from the mount to the engine. All right, that started in as well. Before we tighten anything down, let's go ahead over and do the other side. There we are. All right, all four started on this side as well. Let's go ahead and snug them up. Nice. Now, we're gonna do the same to this side. Nice. Tight. Nice and tight, awesome. Now it's time to get these lower bolts in from the mount to the frame. We're gonna do the same to the other side, then we'll lower the engine, and then we'll snug them up. All lower mount bolts are started in. At this point, we're gonna lower the engine all the way down.
Now we're gonna lower that engine back down. Nice and easy.
Just double-check them with a ratchet, make sure they're all tight. Now, we're on the other side. Let's snug them up. Let's check them all with a ratchet. Tight. Now, we're just gonna torque down the bolts that hold the mount to the engine to 37 foot-pounds. Do the same to all. Now, that we torqued down those bolts, we're gonna torque down the bolts that hold the mount to the frame. Torque those to 48 foot-pounds. Do the same to all. All alright, now that we finished the driver side, let's go ahead and torque the passenger side.
Now, it's gonna be time to get this exhaust shield back on here. There we are. Go ahead and start them all in before you tighten any of them down. Now that we have them all started, let's go ahead and snug them up. Grab that last back one with a wrench. That's tight. Let's go do the same to the other shield.
Now, it's gonna be time to get the oil dipstick back in here. It's much easier without the dipstick inserted in the tube. We're gonna take it, and we're gonna go right through the second channel in the manifold there. Right along that spark plug wire. Bring this down. We're just gonna let it hang like this, and then we're gonna work our way into the wheel well. Just line it up. We're gonna carefully slide it down. Pay attention to your wire, make sure you don't give it a tug. Just kind of wiggle it. If you want to use a little bit of penetrant, I would use a very minimal amount, but you shouldn't need any. As you can see, the bolt holes lined up, this is perfect. Let's go ahead and put that in. Let's go ahead and get our bolt right on to the socket here, bring it through, and then we'll slide it right into the hole. I always put it in as many threads as possible by hand here. Now we're just gonna snug it up. That feels good. Let's go ahead and put that oil dipstick back in there. Just get this starter line back up in here. There we are. Grab your two bolts. All right, that one's definitely started in, do the same to the other one. Let's bottom them out. Now, torque these to 37 foot-pounds.
Now, we're gonna make sure we secure our starter cable here. Add our little bolt through the hole in the frame. Go ahead and snug that up. Now, we're gonna make sure we get our level sensor back secured as well. Now, it's gonna be time to get our steering shaft back up on here. Before I do that, you can try to sand it down a little bit if you felt the need to. But definitely use some sort of lubricant or even Never-Seez. That's gonna help it slide back up on there.
Got our steering shaft here. Down there. Just gonna work this back up on. Let's take our bolt, just go right through here. If you want to use a little bit of thread locker, we'll call it you're prerogative. I'm gonna grab. Start that bolt onto there. Okay, that's snug. Now let's do the bottom. So now we're just gonna telescope the steering shaft up so that it lines up with the steering rack here. Right over that shaft on the steering rack, then just kind of wiggle it around till it slides down and on. There we are. Just work that right down on there. Now, we're gonna put our lower bolt in. Okay. Now we're gonna make sure we torque these. The top bolt is 37 foot-pounds. Torque this lower bolt to 35 foot-pounds. Let's get our level sensor back on this side. Now, it's gonna be time to get the driver side panel in here. Just pay special attention to your clip. That's going to go around here. And then, of course, all these have to be resecured back into the plastic. Do that clip first. There we go. Put that through. And then the same down the line. There we are. Let's go ahead get our plastic clips up in here.
So, now we're gonna grab our wheel well. Just bring it up to approximately where it's gonna go. We need to make sure we resecure our wiring. So if you were to look, you're gonna see a hole right here. Then you should be able to see a little bit of an outline where the next one's gonna go. Go ahead and start those in, push them right on through, if I can find it. There is one, two. Line this up.
Now, it's time to get the wheel up on here. Go ahead and start on those lug nuts. And then we'll bottom them out and torque them to a 140 foot-pounds. Do the same to the other side of the vehicle. Now, it's gonna be time to torque the wheels. Torque these lug nuts to 140 foot-pounds. Torqued. Now, it's gonna be time to put on your vehicle's center cover. If you look at the back, you're gonna see something that looks a lot like a valve stem. Line it up with the one on the wheel, give it a light bonk, and now go ahead and do the same to the other side of the vehicle.
Now it's time to get the air intake system back on here. You've got your little piton, make sure it goes into the dongle there. Just gonna line it up, slide it in. Couple light bonks. You can see that it's in. Make sure that this is fully up against the intake right there. This comes over here. Okay, go ahead and snug up your clamps. Okay, let's make sure we get this plug back in. And then right under here, make sure that you resecure your hoses so they're not hanging down.
Let's get our engine cover back on there. Slide it in. Okay. Let's take a peek at everything. If you notice you have any loose hoses or anything that might have came out of it securing point, just make sure you put it back in. Make sure your dipstick's in. Any hoses, wires, anything that might have gotten dislodged or moved around, just make sure that it's fully secured and it's not anywhere near anything that might get hot, such as your exhaust.
Let's go ahead and get our battery terminal back on here. Make sure it's pushed down as far as it can go. Give it a nice wiggle, make sure it is not loose in any way. Just check that positive just because. Perfect.
Shop Products


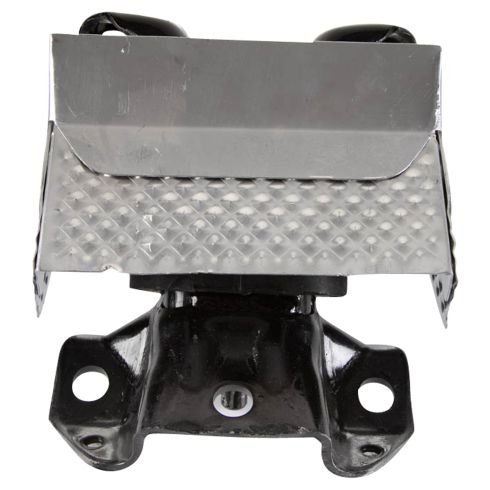
Chevrolet GMC Cadillac Front Engine Mount TRQ MTA35103
Part Details:
- Steel
- Yes
- Rubber
- 7
- No
- No
- Hydraulic
How To Remove Replace Motor Mount 2003-06 Mazda 6
How to remove, install, change or replace a broken, worn out motor mount on 03, 04, 05, 06 Mazda 6
