How to Replace Driver Side Inner Tie Rod 1994-2002 Dodge Ram 1500
Created on: 2019-09-23
Check out this video to learn how to replace the left inner tie rod on your 94-02 Dodge Ram.
Tools needed
-
21mm Socket
Measuring Tape
Side Cutters
15mm Wrench
Hammer
Flat Blade Screwdriver
Torque Wrench
17mm Wrench
Rust Penetrant
Slip-Joint Pliers
Oh hey friends, it's Len here at 1A Auto. Today I'm going to be working on our 1996 Dodge Ram 1,500 and I'm going to be replacing the left front inner tie rod end. Going to be super easy. I can do it and you can do it too. As always, if you need this or any other part, you can check us out at 1aauto.com. Thanks.
Okay, friends, so we're underneath the vehicle here. We have our left front outer tie rod end, which is this unit right here. It's approximately this long. Okay. You have your sleeve unit and then you have this right here that comes all the way across. Over to here. This would be your left front inner tie rod end. Okay. A lot of times what happens is, is exactly what this one looks like. You get a lot of rust and corrosion inside here. This should be where the sleeve is and all these threads right here on your tie rods should be inside here. This whole sleeve is a completely threaded unit and it threads onto this part and right here. When they get rotted and they look like this, the odds that the threads on the tie rods and the threads on the inside of this sleeve being good is just so minimal because all they're doing is sitting there collecting rust and rot.
And when you're dealing with steering and suspension, you want to make sure that you're being as safe as possible and you have as strong material as possible because last thing you want is bad threads on either of these two pieces and this pulling right out. Okay because you're driving down the road, your wheels are going nice and straight. Next thing you know there's no threads holding this in except for just the tightness of this and just slides right out, and I don't want to think of any worst case scenarios but I'm sure you can. And to avoid that, what I would recommend in this case, is you replace this whole unit. Okay. Left front, outer tie rod end, sleeve and the inner tie rod end, all the way down to here. All right. If you're not going to do that, and for some reason you want to risk it, and you do you Boo-boo. What you would do, loosen this nut right here all the way to the end, or even take it all the way off. Same thing with this one. These will rattle around. Digger, digger, digger, right?
You're going to take some nice big channel lock pliers, whatever you've got and you're going to turn this and you're going to turn it and turn it. Keep twisting it until these right here separate all the way out. Okay. At that point you would take your new tie rod end. You start it into the sleeve a little bit. Start the sleeve on this just a teeny bit. Put your tie rod end up inside the knuckle. Just kind of nut it for a couple of minutes. Then you're going to take this and you're going to turn it, turn it, turn it until it comes all the way in, until it's approximately where this is now. A good idea before you start taking anything apart is to measure from one end all the way down to the other end. And that way there you have an idea of how long you want this to be. Of course you're going to bring it down to an alignment shop after you've done this because all you have to be off is just one little half a turn and that's going to have your wheels going God knows where.
All right, so with that said, we don't know what kind of condition these threads are in, in here. I'm going to go with probably very bad where I can't even get the rot off of them. So we're just going to replace this whole unit. Okay? You know how to replace this if you wanted to. Like I said, loosen it, loosen it, take this off, put on your new tie rod, snug it all up, get it to about the same length and take your risks the way that you're going to do it. For me personally, boom, boom, boom. One unit. Measure it up. Put your new one together right on the floor. Have it about the same length. You put a nut there, you put a nut here, you tighten these puppies up and you're good to go down the road to your alignment shop.
All right, so I'm just going to put a little bit of penetrant in here and what I'm going to do is I'm just going to take this apart just so I can show you what I was talking about because that way there you'll have a visual, and usually when people see things they can understand them a little better. So we get this sprayed. We're going to let it sit. We're going to take this out right here and this out right here. So we're going to loosen this and loosen this. 15 millimeter. There we are. That's nice and loose.
Generally speaking, when you're replacing a tie rod, whether it's the inner or the outer or both, you always replace the sleeve. So if you get an outer tie rod, get yourself a sleeve. You get an inner tie rod, get yourself a sleeve. Get an inner and an outer tie rod, sleeve. Okay, these are loose. Let's grab a measuring tape. We'll get a rough estimate of how long this is. So when we put our new parts together, we'll know exactly the length that we need it.
Okay, so it looks like we're at approximately 52 and a quarter inches from right here to the same thing on the inner tie rod end. Same exact spot right there. Hold this up here. Yeah. 52 and a quarter. Write that down or remember it or carve it into a rock. Whatever you want to do. I'm going to write it down real quick. So we're just going to grab this with our pliers here. You're going to need as much leverage as you can possibly get. We're just going to see. Yeah, right. This is why I said you've got to replace these things. Let's try though. Give it the old college try. Oh yeah, the threads in there really aren't looking very good. So you can see the threads right in there where they're all rusted up. Holy cow.
Okay. So it's pretty obvious that this isn't going to be coming off. We can see the threads on the inside of the tie rod ends, where they go into the sleeves, they're in very poor condition and there just really isn't any purpose of taking this apart. So what we're going to do is I'm going to take it apart from the vehicle, I'll bring it over to the bench and I'll put together a new assembly and I'll show you how to take apart each piece as it goes with new parts. It'll just be much better for the video. So we'll just get our cotter pin out of here. That's out of here. These are very rotted, so I'm not even going to try to pop them out of there. Cool.
Grab our socket, should be here. Let's see if this will go on. It might be a little bit bigger. I got 21. Grab my air hose. Safety glasses on of course. See if we can get this on here. There we are. There's our nut in there. Just going to take it and go just like this. Get my socket off of there. I'm going to leave this on here for now because we're going to grab our hammer. We're going to give this a loving bonk and the tie rod end should come down and the nut's going to keep it from falling down and potentially hurting us.
So here we are. I'm going to grab a little bit of penetrant spray. Let that do its job. Now we're going to bonk right here. I'm going to be careful not to hit my rotor, and if I was keeping this outer tie rod end, which I'm not, I would be careful for hitting the boot. There we are. You can see the stud. The nut did its job. Saved this from coming down, potentially hurting us. Let's move along.
Just going to get this cotter pin out of here. I'm just going to go ahead and cut this off. Just got to get out the rest of this cotter pin real quick. What's left to it. We'll dispose of that. Now we're going to take off this nut right here. Just going to grab my socket. 21. Safety glasses on. There's our nut. Just going to put this back on here, a few threads. Come on. See if I can get it on there. It's perfect. We have a couple options at this point. If you're going to be reusing this inner tie rod end right here, you don't want to bonk right here. If you're going to be replacing it and you really don't care what condition it's in, go ahead and give it a couple of loving bonks and try to drive it through. There we are, that can move around quite a bit. The nut did its job. We'll take that back off of there and we can get this out of here. Okay. Slide that. Get this whole unit right out of here. There we are.
Okay, so now you're imagining that this is up inside the vehicle, right? This is our old piece. Obviously I can't get it apart so I'm just going to show you with the new. Here's your outer tie rod end. This is where it connects to the knuckle. You've got your nut and everything like that, right? This is our sleeve. The adjustment sleeve. This is that inner tie rod end, where it goes down and connects into the rest of the steering. All right. What you would normally do with it in the vehicle, if you were just replacing one piece at a time. Okay. If you're replacing both then you just tear them right out. Just like we kind of did the two nuts. Take the whole thing out, measure it, put your new piece together, throw it in.
One piece at a time, this is what you'd do. Loosen up these nuts like what we did here. Then you turn this sleeve, whether you have to use your nice long pliers like we tried doing here to get it apart. Or if you can do it by hand because it's brand new, like this one. I guess you go that way. But anyway, to get to the point, just take your sleeve and you just turn it, turn it, turn it. So when you take this apart, you're going to want to be careful because this arm right here or inner tie rod end, will come swinging down.
All right. This one right here might try a little bit, but it really can't go far. It's not super long. There we are. So right now, if this was in the vehicle, this inner tie rod end would have just swung down. Okay, and this one was pretty close, ready to come off. At this point, there's your outer tie rod end. You'd replace this with a brand new one or replace this with a brand new one. Of course, no matter what you do, you're going to replace this. This is your sleeve and it's threaded all the way through.
So here we are friends, a quick product comparison for you. Over here we have our left front inner tie rod end out of our 1996 Dodge Ram 1,500. Over here you have your brand new quality 1A Auto part. Both these parts are created equal. If you were to bring them up next to each other and you could see through this sleeve somehow, you would see that the end matches up at the end there. All right, it's got a same little bend right here, which is very important because this one right here has a little bend. Same length, same bend. You got the same end over here, even comes with a brand new castle nut and of course a grease boot. Super important, put that on there. With that said, I don't see any reason why this wouldn't be a quality piece to install into the vehicle, so I'm going to go ahead and do it. As always, if you need this or any other part, you can always check us out at 1aauto.com. Thanks.
Okay, friends, we've got our inner tie rod end. We're going to go right up like this and put it in through the hole. I'm going to take our castle nut. There we are. We're not going to tighten it yet. Bet you're wondering what this is. Just a little tool that I got, just to go like this and that's going to keep this from moving around. All right, so we're going to tighten this up. We're going to use our 21 millimeter socket. Okay. Once you know that you have it nice and snug, you're going to try to find where the slot is on the stud itself and line it up with the slots in the nut. This one right here, this lock goes this direction. So I'm going to bring this a little further. There we are. We'll grab our cotter pin and we can move along.
We're going to take our cotter pin, just go right down through here. Make sure that's all the way down inside the slot. Take your cutters, grab it, bend it over. There's no way that this nut can come loose on its own. Okay, so let's say that you're doing all these tie rods, right? You're doing the inner and the outer here or even you're just doing one. But anyway, you start putting one all the way in here. Now it looks pretty good. It's nice and deep. Now you're going to take this one and we're going to try and get this one on here, right? We're going to spin it in and spin it in. The problem with doing it this way is your tie rods are going to be out of time. Let's see what I can show you. Get that up on there. Try to get the teeth where you can see them. Almost there.
Okay, so if one of your tie rods, like this one right here, this one comes up to there, you can see where the threads are just barely starting to come up to where this bolt is. And this one, the threads are all the way up here. That means that your tie rods are out of time. The person that's going to be doing your alignment after this. They're going to have to loosen these back up, try to adjust this right and this tire rod is going to be adjusted in way further than the inner tire rod. And this could be a vice versa situation where you might have this one screwed in further. That's called timing your tie rods. You need to time your tie rods and that's done with this adjustment sleeve. So that's what I'm going to show you.
What we're going to do is we're just going to take this all completely back apart and start right from ground zero and yeah, you could do this with this up inside the vehicle, all connected in. It's a little bit harder that way. And for purpose of this video, I can demonstrate what I'm talking about without actually having it in the vehicle or connected in, so I'm just going to do it that way. And it'll be easier for you to see. See these things are all coming apart just randomly. When you do this and you turn this so it comes all the way off, theoretically, not theoretically. But what should happen is when this is loose, it should be ready to come off of this side at the same time. That would mean that it's screwed into both tie rods, the same exact amount. Okay. It's All apart. You got your outer, you got your sleeve, you got your inner.
Something that's always good to do, is you're going to use a little bit of copper never-seize right there, right there. Okay. That's just going to help this be able to move around for a long, long time. It's going to be great for the alignment person when they go to help you out and do your alignment. So now we're just going to take the sleeve and start it on just a teeniest bit. just one turn and that's it. Outer tie rod end. We're going to do the same thing. Just try to turn it on. Just one turn. The hardest part's just getting them lined up. Okay, that's one turn. Now to continue, you're just going to hold your tie rod so it can't spin. You can even put it back into the vehicle, whatever you want to do. And as I turn this, it's actually drawing both these tie rods in at the same exact time. That means that they're are going to be timed well.
Let's keep turning this until the length of this to here is 52 and a quarter inches. That's what the original bar was measured at, so that's what I'm going to go with with this one. The alignment shop can do the rest. Looks like we're getting pretty close. Let's keep bringing it in here. It should be quite a bit. Perfect. 52 and a quarter. Okay, so now what you do, put this up in here and tighten up these.
You can tell we're pretty close because it lined right up, I didn't have to move the knuckle around or anything. Perfect. We'll tighten that up in a minute. Let's take a look at this stuff. These right here, the sleeve actually has grooves. Grab that in a second, right here where the bolt goes through. So you can't spin this and expect it to just kind of like line up because it doesn't, it needs to be perfectly lined up with that screw. And the important reason why they did that was just so when you're tightening, it's going to put the squeeze right here. All right. If you could spin this, some people might try to put it all the way up here and then how's it going to squeeze solid metal to try to tighten? It can't, it's impossible. Okay, let's put this back in here. We'll grab our nut and we'll continue.
Okay, so we're just going to tighten this up to 65 foot-pounds. Just going to hit it one more time. There we are. Just going to take a peak. We need the slots on the nut to line up with the hole for the cotter pin that goes through the stud. This looks like it's a quite a bit past it. It's about lined up with this part of the castle. So what you need to do now is you need to continue tightening. You do not loosen it to get to the next hole. You tighten to the next hole. Grab my ratchet here, grab our cotter pin that came with it. Take that, put it right through there.
You can do whatever you want with this cotter pan. You can put it off to one side, both sides, up top, you do you Boo-boo. As long as it's bent over and there's no way that it can come off and not come off on its own, you're doing all right. Let's continue. So we're going to hold the backside or the bolt side with our 17 millimeter wrench. We're going to tighten up the the nut side with our 18 millimeter socket. This does have a torque spec, so get it so it feels like it's pretty snug. I like to put these so they're facing straight out, but of course that'll change once the alignment's done because if they need to go out a little bit, this'll need to get turned, in which case, the nuts will be in their corresponding spots. So to start, this is where I go. Okay, that's pretty bottomed out. Let's grab our torque wrench. We've got that set to 40 foot-pounds. There we are. We do this one. Perfect. So both of those are nice and tight. 40 foot-pounds. Let's continue.
Thanks for watching. Visit 1aauto.com, your place for DIY auto repairs, for great parts, great service, and more content.
Shop Products


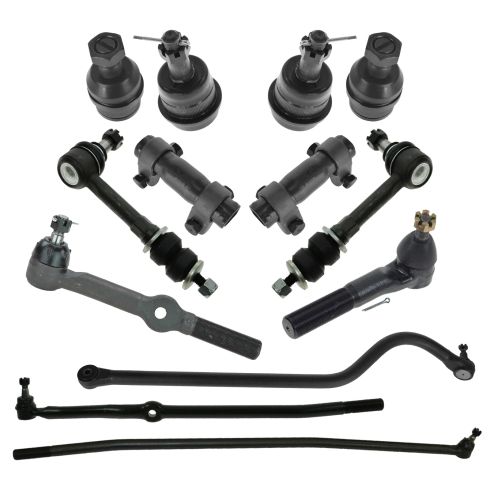
Dodge Ram 1500 2500 Front 13 Piece Steering & Suspension Kit TRQ PSA34381
Part Details:
- (2) Front Sway Bar Links
- (1) Front Track Bar
- (2) Front Tie Rod Adjusting Sleeves
- 13 Piece
- (2) Front Lower Ball Joints
- (1) Front Inner Tie Rod
- (1) Front Inner Drag Link
- (1) Front Outer Tie Rod
- (2) Front Upper Ball Joints
- (1) Front Outer Drag Link
How to Replace Inner Tie Rods 2007-17 Ford Expedition
This video shows you how to replace the inner tie rods on your 2007-2017 Ford Expedition.
