How to Replace Distributor Cap Rotor 1996-99 GMC K1500 V8 5-7l
Created on: 2017-02-15
Find out how to remove the distributor cap and rotor by following along this how-to video
-
step 1 :Removing the Upper Air Intake
- Remove the thumbscrew on the top of the intake track at the throttle body
- Disconnect the PCV breather from the intake
- Loosen the intake hose clamp
- Remove the upper intake
-
step 2 :Removing the Distributer Cap
- Mark the position of each wire
- Pull from the boot and disconnect the wires
- Remove the two T20 Torx bolts
- Remove the cap
-
step 3 :Removing the Rotor
- Make note of the position of the rotor and it's contact position
- Remove the two T15 Torx screws
- Lift up and remove the rotor
-
step 4 :Installing the Rotor
- Install the rotor to its original position
- Tighten the two T15 Torx screws
-
step 5 :Installing the Distributer Cap
- Tighten the T20 screws to the distributer cap
- Connect the wires to their original position
-
step 6 :Installing the Upper Air Intake
- Insert the upper intake into place
- Tighten the hose clamp
- Connect the PCV breather hose
- Tighten the thumbscrew to the top of the intake
Tools needed
-
Flat Blade Screwdriver
T15 Torx Driver
T20 Driver
Hi, I'm Mike from 1AAuto. We've been selling auto parts for over 30 years! We're dedicated to delivering quality auto parts, expert customer service, and fast and free shipping, all backed by our 100% satisfaction guarantee. So visit us at 1AAuto.com, your trusted source for quality auto parts.
In this video, we're going to be working with our 1996 GMC Sierra K1500. We're going to show you how to replace your distributor cap and rotor. This is an important part of the tune-up process. If your plugs and wires are bad, it's worth going in there and taking a look at this because ours was loaded with corrosion and probably a good part of the reason that a vehicle doesn't run right.
This video is on a 5.7L V8, but will be very similar to a variety of other GM engines. If you like this video, please click Subscribe. We have a ton more information on this and many other vehicles. If you want these parts for your truck, you can follow the link down in the description over to 1AAuto.com.
Here are the items you'll need for this repair: flat blade screwdriver, T15 Torx driver, T20 Torx driver
Remove the thumb screw on the top of the intake track at the throttle body. This can be done by hand, or if yours is stuck you can lightly grab it with a pair of pliers and rotate it that way. Disconnect the rubber elbow on your PVC breather and loosen this hose clamp with a flat-blade screwdriver. Now, you could disconnect the electrical connectors, undo the air box and remove this all as one piece if you want, depending on what you're trying to get room for. However, this is all that's necessary for what we're trying to do.
Undo the boot, lift up and forward, and remove the upper intake.
The distributor cap is located at the back of the engine behind the upper intake manifold. It's secured with two T20 Torx bolts, which you can remove with a screwdriver, like we're going to, or a Torx socket and ratchet. Now, it's very important that your plug wires go on in the same way they came off. They are numbered, so you could look it up, but that's a little more difficult.
What we're going to do is if you look, the wire looms have these locked in the right position, so we're just going to unplug them and let them hang knowing that we can plug then back in in the same order and not have an issue. These do tend to get stuck on there, especially if they've been on there a while, so you may have to work them a bit to get them off. Just make sure you pull from the boot and not the wire because tearing or breaking it could cause misfire. On the passenger side, you'll notice this lone wire over here that's not in a wire loom, marked C. This is for your ignition coil. It'll be the only wire not out of a loom. If you follow it, it comes out of your ignition coil, which is located right over here, so that's an easy one to keep track of. Once all your plug wires are off, you can remove your two T20 Torx screws. You can now remove your distributor cap.
Now, normally when doing a distributor you'll do your rotor as well. It's very important to know which way the contact on the rotor is facing. Ours is at about the 7 o'clock position. It's facing the number two cylinder, which is going to be the front passenger cylinder, so we know where that's going to go. We'll now remove these two T15 Torx screws. We’re going to use a Torx screwdriver for this. You can use a Torx socket and ratchet if you prefer. Now, these are very tiny screws, and I don't want to lose them. Once they're loosened up, I'm just going to leave them sitting in their holes in the rotor, so I can lift it all out as one piece and take the screws out then. It looks like they're loosen out to me. Now, we'll lift up and remove our rotor from the distributor.
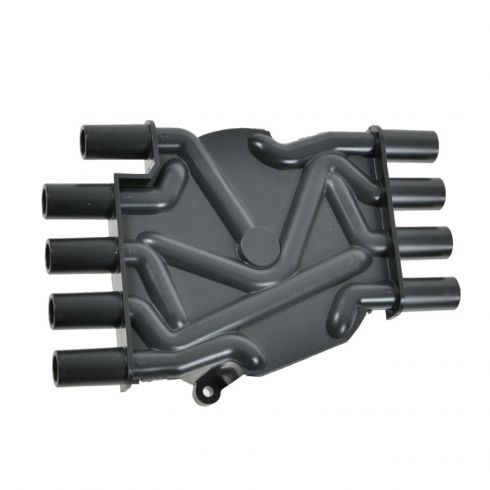
Here we have our old distributor cap and rotor that we removed from our vehicle and our new parts from 1AAuto.com. Now, you can see these parts are exactly the same. Our new parts even come numbered with which plug wire is going to go where, which is going to make this a lot easier to install.
We also have a new rotor with the same two-bolt mounting location which has the same alignment tabs on the bottom. Now, you can see our olds one's got some pretty nasty corrosion building up here. It's got that greenish tarnish color on the contact here. There's also a bunch of debris on the inside and some rust at the end here. That's kind of bent down where you can see this is pointing up and nice and springy on the new one, nice clean metal. Same two-bolt mount location on your distributor cap. If you flip it over, the difference is clear. Nice clean contacts here. No debris. No buildup.
On this one, you knock the corrosion off with your fingers. It's just really contaminated and dirty. It's not going to give us a good spark, and it's not going to let our engine run to its full efficiency. This means we're going to get less power. We're not going to get as good of a burn, which makes our vehicle less efficient as well, and it could also cause misfires and more serious issues with our engine. If your vehicle's misfiring and plugs and wires weren't quite enough to get it back up and running the way you would expect, these new parts from 1A Auto are going in direct fit just like your original equipment, get you a good strong spark and fix you up right.
Reinstall the rotor onto your distributor in the same way you removed it. There are little alignment tab's there as well but you could put it 180 out. We already know that ours was facing the 7 o'clock position the way we're looking at it now. We'll reinstall our screws with a T15 Torx driver, whether you're using a socket and ratchet or a screwdriver, either way. Reinstall your distributor cap, lock into place once it goes on. It only fits one way. Then, we'll reinstall our two T20 Torx screws. Remember, your single wire goes on the coil, and the rest you'll just want to check the alignment, the loom it comes through. Make sure they're all in the right order.
Reinstall the intake boot onto the MAP sensor. Tighten down the hose clamp with your flat-blade screwdriver. Line up your fitting onto the throttle body. Remember, this has to slide on at the front first and then be pushed down. Reinstall your PVC breather. Reinstall your thumb screw. Just get that down as tight as you can by hand, and you're good to go.
Thanks for watching. Visit us at 1AAuto.com for quality auto parts, fast and free shipping, and the best customer service in the industry.
Shop Products
How to Replace Distributor Cap 1999-2006 Chevrolet Silverado 1500 43L V6
This video shows you how to install a new TRQ distributor cap on your 1999-2006 Chevrolet Silverado 1500 4.3L V6.
