How to Replace CV Axle Shaft 2000-06 Chevy Suburban
Created on: 2014-06-09
Watch this video to learn how to replace a front axle on your 00-06 Chevy Suburban, Tahoe or GMC Yukon. 1A Auto will show you the steps
-
step 1 :Removing the Wheel
- Removing the Wheel
- Loosen the lug nut covers with a 22mm socket
- Pry off the center cap with a flat blade screwdriver
- Loosen the 35mm nut but don't remove it
- Loosen the lug nuts with the vehicle on the ground
- Raise the vehicle with a floor jack
- Secure the vehicle on jack stands
- Remove the lug nuts
- Pull off the wheel
-
step 2 :Removing the Stabilizer Link
- Using locking pliers to clip onto the top of the stabilizer link
- Then remove 14mm bolt from bottom of the stabilizer link
- Remove the stabilizer link with a hammer or reciprocating saw
-
step 3 :Removing the Axle
- Use a pry bar to hold the hub in place
- Loosen and remove the 15mm bolts
- Hammer the axle over to the side to release it
- Pull it straight back and out of the wheel and down and out
-
step 4 :Reinstalling the Axle
- Feed the axle into the place
- Line up the back and replace the 15mm bolts
- Use a pry bar to hold the hub in place
- Torque each bolt to 65 ft/lbs
-
step 5 :Replacing the Stabilizer Link
- Put the stabilizer piece back into place
- Use four washers, four grommets, and a tube
- Use a jack stand to help push it through till it appears through the top
- Tighten the 14mm bolt on the stabilizer link
- Tighten until the bushings are the same diameter as the washers
-
step 6 :Replacing the Wheel
- Replace and tighten the 35mm nut
- Put the tire in place
- Replace and tighten each lug nut
- Torque each lug nut in a crossing pattern to 100 ft/lbs
- Torque the center hub nut to 160 ft/lbs
- Replace the hub cap and tighten the lug nut caps
Tools needed
-
35mm Socket
Reciprocating Saw
Socket Extensions
Torque Wrench
14mm Socket
15mm Socket
Pry Bar
Jack Stands
Ratchet
36mm Socket
22mm Socket
Brought to you by 1AAuto.com, your source for quality replacement parts and the best service on the Internet.
Hi, I'm Mike from 1A Auto. I hope this how-to video helps you out, and next time you need parts for your vehicle, think of 1AAuto.com. Thanks.
In this video we're going to show you to replace a front axle on this 2002 Chevy Suburban. We show you on the passenger side, but the driver side it's the same procedure. It's the same part and similar process on these Suburbans from 2000 to 2006.The items you need for this include a new front axle from 1AAuto.com, 14mm, 15mm, 22mm, 35mm, and 36mm sockets, a ratchet with an extension, a pry bar, locking pliers, a torque wrench, jack and jack stands, and a reciprocating saw depending on the condition of your vehicle.
Loosen the lug nut caps and remove the hubcap and then pry off this cap as well. Loosen this 35mm nut, but don't remove it. Now, you want to remove the lug nuts. If you don't have air-powered tools, you want to do it while the vehicle is on the ground. Loosen them preliminarily, raise the vehicle, remove the lug nuts the rest of the way, then pull the wheel off. Using locking pliers, clip onto the top of your stabilizer link and then remove this 14mm bolt. We'll fast-forward as Mike does that. If you have air-powered tools, you can remove this 35mm nut the rest of the way, and then remove the washer behind it. If you don't, you can use your socket and ratchet, but you will need someone to apply the brakes while you do this.
You also want to remove the stabilizer link now. Ours is jammed in there, we try with a hammer to knock it out, but we have to end up using a reciprocating saw to remove it the rest of the way, meaning we will need to use a new stabilizer link. Now, you want to remove these bolts around the axle. Use a pry bar on the hub to just hold that into place. Then loosen up and remove each of those 15mm bolts. Now hammer the axle over to the side a little bit to break it free, then pull it straight back and out of the wheel. Pull it down and out.
Up top is the new axle from 1AAuto, on the bottom is the original. You can see they're identical. The new axle does come with a new nut that is 36mm. Now, feed your axle back into place. Line up the back and just replace those 15mm bolts. We'll fast-forward as Mike does this. Using your pry bar to hold the wheel still again, you want to torque each of those bolts to 65 foot-pounds. Now, you want to put your stabilizer link back into place, starting with a washer and a grommet, then through the hole and then another grommet, then a washer, then the tube. Then, before going through the next hole, another washer, and then a grommet. On the top, another grommet and another washer. Put your jack underneath the bolt part of that stabilizer link and raise up the jack and that will push that bolt up in there, compress a couple of the bushings, and then you can put your washer and bolt onto the top side.
Tighten up the stabilizer link, and you basically want to tighten it up until the bushings compress and are the same diameter as the washers. Now, replace this 35mm nut and tighten it up. Put the wheel back into place, and then replace each of your lug nuts, and tighten them up. You want to tighten them preliminarily, lower the vehicle, and then tighten them the rest of the way. Torque each lug nut in a crossing pattern to 100 foot-pounds. Torque the hub nut to 160 foot-pounds, then replace the dust cap as well as the hubcap and tighten up the plastic lugs.
We hope this video helps you out. Brought to you by www.1AAuto.com, your source for quality replacement parts and the best service on the Internet. Please feel free to call us toll-free, 888-844-3393. We're the company that's here for you on the Internet and in person.
Shop Products


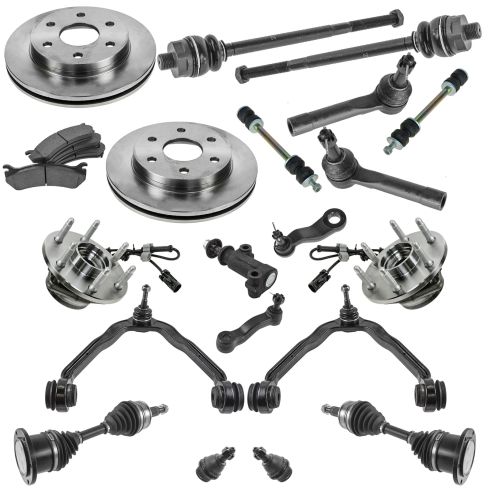
Chevrolet GMC Cadillac Front Steering, Suspension, & Brake Kit TRQ PSA64825
Part Details:
- (2) Front Sway Bar Links
- (2) Front Lower Ball Joints
- (1) Idler Arm
- (1) Pitman Arm
- (2) Front Brake Rotors
- Tapered Roller Bearing
- (2) Front CV Axle Assemblies
- (2) Front Wheel Bearing & Hub Assemblies
- (1) Front Ceramic Brake Pad Set
- (1) Idler Arm Bracket
- (2) Front Outer Tie Rods
- (2) Front Inner Tie Rods
- (2) Front Upper Greaseable Control Arms with Ball Joints
How to Replace Front Driver Side CV Axle 2011-15 Chevy Cruze
This video shows you how to install a driver side CV axle on your 2011-15 Chevy Cruze.
