Top 5 Problems Nissan Rogue SUV 1st Generation 2007-13
Created on: 2020-04-25
Watch this video to find out the top 5 problems with the 1st generation Nissan Rogue!
In this video, we're gonna be going over the top five problems on this first-generation Nissan Rogue. Now, there's nothing wrong with this car. There's nothing wrong with owning it or buying one. These are just the top five problems we've found on this vehicle.
Number one, blower motor issues. Now you may have a blower motor that doesn't work at all, or it may be squeaking, or it may even have a rumble type noise. There's all sorts of different things or even a clicking type of noise. And the blower motor itself is located on the driver side right next to the accelerator pedal. You actually have to remove the accelerator pedal to access it and that's why it's kind of a pain to get to, but it's not impossible.
Number two, the CVT transmission. The transmission's located right here on the driver side, drain plugs are right there. It's a good idea to change the fluid regularly. Check the owner's manual and change it with the appropriate fluid at the appropriate intervals.
Some of the symptoms you may have a problem with the internals of the transmission. When you go to start the vehicle, you go to drive away, nothing happens. You don't go forward. Put in reverse, same thing, nothing happens. Also while you're accelerating, you may feel some vibrations, something that doesn't feel normal. And also when accelerating, it's not accelerating very quickly. You have a lack of power. Those are some of the problems that could be internal faults in the transmission.
Number three, axles and driveshafts. The CV axles especially the front CV axles are located right here. Sometimes these boots will rip and cause the grease to go everywhere and then the joints inside there are going to start binding up and that could cause a vibration. Also on the internal joint as well, that's a tripod joint right there. So that happens on both sides. You would have the same on the driver side.
Also, something that may give you some noise and some vibration is the driveshaft. Now there's U-joints located right here. Those will go bad. They'll start binding up or there'll be some looseness there. So you can check them, see if they're loose. These ones are tight. There's a bearing right there. Support bearing. Those will go bad. And also U-joints in the back, some common problems. So you could pull this down and check and make sure the U-joints are moving properly. And the rear CV joints are located back here. And these are not as common of a problem as the front ones. They don't move as much as the fronts.
Number four, EVAP problems. Whenever you have an EVAP problem, the first thing you want to do is check the gas cap. Just open the door, just grab the gas cap itself. Don't try to twist it yet. See if it's loose and then you can try and twist it. This gas cap is pretty tight. Always check the seal. Make sure there's no cracking. It looks pretty good. And also check the filler neck, there's excessive rust built up, or if there's any cracks in that, then it's going to have to be replaced. Make sure the ratchet part of the gas cap works and you hear one click. This one's a little weak, but it's still good. If you feel the ratchet's kind of on the weak side, replace the cap.
Another common problem with the EVAP system is the EVAP vent valve and it's located on the backside near the canister. Your EVAP canister is located under the shield and the valve itself is right there. Disconnect that connector, disconnect this hose, and you should be able to gain access to that valve. Sometimes those stick open or won't move at all, and that's gonna vent out this hose and out to a vent. And if you replace that, clear the code. You should be to go.
Number five, crankshaft position sensors. This is the transmission. This is the engine. The crankshaft position is located right above here below the starter right there. It is a little difficult to get to. Now some of the symptoms you may have is the vehicle won't start or the vehicle will start and stall or you may even have some running conditions or also a code. If you end up with a code, it's always a good idea to check the wiring first and wiggle the connector. Take that connector off. There's just a 10-millimeter bolt. Take that out. It should be able to slide right out, slide the new one in, clear the code and you should be good to go.
Here's a bonus one. For this car in particular and especially the fact that we live in New England, the backing shields will actually start rubbing on the brake rotors and you can actually hear it. So what you want to do is if you can, replace the shields, but in the meantime, what you can do is get a pick. Just get behind here, try to bend the shields out a little bit. You can try to do this with a screwdriver as well. Get some that rust out of there. I can see it right there. There we go. That one's quiet now. Let's do the other side. There we go, nice and quiet. So get some new shields or just bend them out of the way.
So those are the top problems that we have found for this vehicle. Now we sell most of those parts at 1aauto.com and have repair videos on how to fix them. If you enjoyed this video, make sure you subscribe to our channel, ring that bell, turn on all notifications so you don't miss any of our videos.
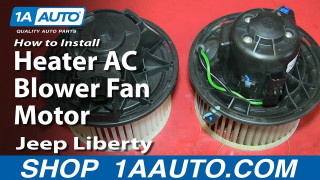
How to Replace Heater Blower Motor 2002-07 Jeep Liberty
Watch this video to learn how to replace the blower motor on your 02-07 Jeep Liberty.
