How to Replace Wiper Transmission 2000-07 Toyota Highlander
Created on: 2018-02-02
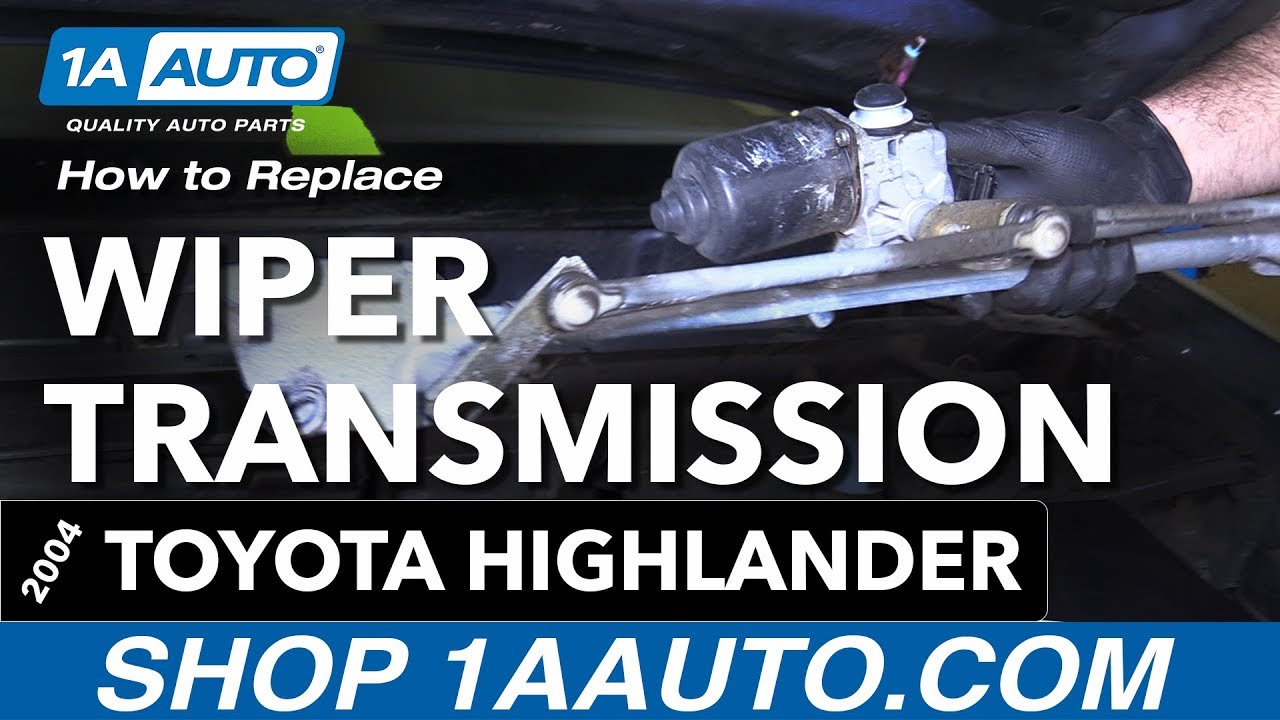
New Windshield Wiper Transmission from 1AAuto.com How to replace worn, rotted, or loose windshield wiper linkage bushings on 04 Toyota Highlander
-
step 1 :Removing the Wiper Arms
- Mark the position of the wiper blades with painter's tape
- Pry off the wiper arm caps with a flat blade screwdriver
- Remove the 14mm nut from each wiper arm stud
- Pull the wiper arms off the studs
-
step 2 :Removing the Hood Cowl
- Open the hood
- Release the push clip from each side of the cowl with a flat blade screwdriver
- Push in the tabs underneath the hood cowl with a flat blade screwdriver, while lifting the cowl
- Unclip the cowl from the windshield
-
step 3 :Removing the Wiper Transmission
- Disconnect the wiper motor
- Remove the two 10mm bolts from the wiper transmission
- Slide the wiper motor assembly off of the pin
- Remove the wiper transmission
-
step 4 :Removing the Wiper Transmission Motor
- Break the 12mm nut free from the wiper motor with a 12mm wrench
- Remove the two T30 Torx bolts from the wiper motor
- Tap the nut on the wiper motor free with a ball peel hammer
- Remove the old transmission
-
step 5 :Installing the Wiper Transmission Motor
- Connect the motor to the transmission
- Tighten the T30 Torx bolts to the motor
- Place the transmission on the wiper motor
- Tighten the bolt and lock washer
- Tighten the 12mm bolt to the wiper motor
-
step 6 :Installing the Wiper Transmission
- Insert the wiper transmission into place
- Tighten the two 10mm bolts to the wiper transmission
- Connect the wiper motor
- Let the wiper motor run to reset the transmission into the park position
-
step 7 :Installing the Hood Cowl
- Slide the cowl into place
- Hook the cowl underneath the windshield
- Push in the cowl tabs
- Push the push pin into each side of the cowl
- Close the hood
-
step 8 :Installing the Wiper Arms
- Line up the wiper arm marked P with the passenger side stud and painter's tape
- Make sure the wiper arm is positioned correctly
- Fasten the 14mm nut onto the wiper arm stud
- Line up the wiper arm marked D with the driver side stud and painter's tape
- Make sure the wiper arm is positioned correctly
- Fasten the 14mm nut onto the wiper arm stud
- Pop the cap onto each wiper arm
- Remove the painter's tape from the windshield
Tools needed
-
12mm Socket
Hammer
Socket Extensions
Flat Blade Screwdriver
14mm Socket
T30 Driver
Ratchet
Hi, I’m Mike from 1A Auto. We’ve been selling auto parts for over 30 years!
This is why you should always clear snow before you work your wipers on your vehicle. Turn them on here. Because now I only have one working wiper. The wiper transmission is broken and will need to be replaced. This wiper is lose, but before I remove it... just kind of eyeball it. It should be there. That's lined up with the other wiper. I'll take some masking tape and just put it right there, just so I know it needs to be at the bottom of the tape when I reinstall it. Did the same for the other side.
Use a small, flat bladed screwdriver, and just pop this little plastic cap off. So I can get to the bolt that's holding the wiper blade on. It's a 14 millimeter nut. This wiper blade's real loose. Whoops, use the other one. Using a ratcheting wrench just to get it loose. Spring tension may start to push it up, you just push it back down, help you get the nut off. Fold it up, and you might have to wiggle it a bit, it should come right off. Going to put that aside because we're going to reuse it. Do the same to this one.
Open the hood. There's a push clip on both sides. You remove it in the same manner. Push in on the center to unlock it. Use a small, flat bladed screwdriver to pry it up. And then pull it out, just repeat that for the other side. Don't need to pull the weatherstripping off, you kind of need to follow underneath and there's these push clips that need to be pushed in.
Take a small, flat bladed screwdriver, push them in, and then at the same time, lift the cowl trim up. If you have to, go in from the side. Lift it up, go on, and find them all. You kind of unclip it from under the windshield. It has some hooks that ride under there. Just sort of pop loose. So these hooks go underneath the windshield. Put this aside.
This is the wiper transmission. The wiper motor sits in the middle. Moves these two arms. Kind of rotate around and move the wipers back and forth. This arm here, because of having too much snow on it. It's popped off of the mount so it won't turn anymore. You really can't pop these back on. Once they pop loose, they're kind of junk. Sometimes you might get lucky. It's like a little ball. It's a little plastic cup with a ball joint, and you can kind of wind it back up. And if it's still in good shape you might be able to snap it back together. I'll just pull it up. Well that one snapped back on, so that should work for a while. If it's totally broken, you'll have to take this out and replace it. Going to unplug the wiper motor. There's a lock on the bottom of the connector. Push in. Sometimes you go in and pull it out.
Wiper transmission is held in with two 10 millimeter bolts, one on this side and one on this side. Use a 10 millimeter, socket, ratchet, and extension. Start by removing this one and take the bolt out. Reach over and get this side. Pull that bolt out. It comes with a little metal part, that's okay. Wiper motor assembly is then sitting on the pin here, is go toward the passenger side, slide out and lift the whole thing out of the car.
Here's our original wiper transmission and wiper motor out of our vehicle, here's our new wiper transmission from 1AAuto.com. It's an exact match for the part, it's just painted black. All we have to do is just swap over this motor. It'll be a nice fit and it'll work great in our vehicle. We'll use a 12 millimeter box wrench to break this nut free. Take the washer off and use a T30 Torx bit to remove these two bolts on the top.
Take this out and work on getting this off. I've got the nut on here and a small ball peen hammer, and I'm just going to try to tap this free. Just like that, I'll take the nut back off and slide the motor out of there. Put our old one aside.
Take our new one and get lined up here. What I'm going to do first is get these two alignment tabs are going to go in these openings here. Torx bolts back in, so just tighten those down. Bring our wiper transmission over. And when it's basically lined up like that, put the lock washer back on underneath and get the nut started. Use the ratcheting wrench and I'm just going to tighten it down.
To keep the transmission from spinning, I'm going to pry or wedge a screwdriver in here, a flat bladed one. Because it need to tighten this so it seats down on the splines. That should do the trick. What you're doing when you're tightening that is your pushing this metal piece down on to those splines so it doesn't slip, but the lock washer is crushed, so that nut is on there pretty tight. That should be good.
Take our wiper transmission, place it in the cowl area, and slide it right there. Should line up. Reinstall the bolts on this side, and reinstall the bolt on this side. Also have that sleeve on there. Put it in the oblong opening. Tighten these back up, and once you feel the rubber bushing is all squished down, it should get tight, and that's good. We do the same for both. Plug it back in before I put the cowl back on.
And before I re-hook up the wiper blade arms, I'm going to let the wiper motor run and it will put the wiper transmission back in the park position so that when I line up the wiper blades where I want them to be and when I go to use them, they won't be way off and land like down here or up at the top of the windshield. And with this open you can see how it works. The wiper transmission is now in the park position, so when I put the wiper blades back on, they'll be at the bottom of the windshield where I want them to be. Take off the nuts, that are going to hold our wiper arms off.
Reinstall our cowl, so these clips are going to go under underneath the windshield and this rubber's going to go above the windshield. So start by sliding it in first. Have to underneath that trim. And then once you get them lined up—still didn't get this one caught—you have to angle it up and then under. And push them in, go down. There we go.
Reinstall the clips on both sides, so push this back out like that and then push it in to lock it. Close the hood. Wiper arm is marked P for passenger side, so put this one over here. Get it onto the splines, but I want to move it and line it up. I don't quite like where that went, so you can always pick it up, put it back down. That's where I want it. Put the nut back on, now tighten this back up. Should be good there. This one is marked D for driver's side. Down the splines, get this one lined up, start the bolt, and start the nut. Using the ratcheting wrench on this side, clearance of the hood is tight. Nice and tight. Just reinstall the caps and take the tape off. Here we go.
Thanks for watching. Visit us at 1AAuto.com for quality auto parts, fast and free shipping, and the best customer service in the industry.

How to Replace Windshield Wiper Transmission 1995-2000 Chevy Tahoe
How to repair, install, fix, change or replace a broken, bent, damaged, failing or squeaking windshield wiper transmission on 95, 96, 97, 98, 99
