How to Replace Windshield Wiper Transmission Linkage 2005-13 Volkswagen Jetta
Created on: 2015-03-06
Check out this video on how to replace the windshield wiper transmission on your 05-13 Volkswagen Jetta.
-
step 1 :Removing the Wiper Arms
- Open the hood
- Pry the wiper arm caps off with a pick
- Remove the 13mm nut from each wiper arm
- Apply rust penetrant to the wiper arm studs
- Pry off the wiper arms by hand
- If the wiper arms will not come off by hand, use the wiper arm removal tool
-
step 2 :Removing the Wiper Transmission
- Peel off the cowl weatherstripping
- Lift off the hood cowl
- Remove the two T30 Torx bolts from the wiper transmission
- Disconnect the wiper motor wiring harness
- Remove the two 10mm bolts from the wiper transmission bracket
- Maneuver the transmission out
-
step 3 :Removing the Wiper Motor
- Set the wiper transmission to the stop position
- Remove the 13mm nut from the wiper motor
- Pull the wiper arm off the wiper motor
- Remove the three T30 bolts from the wiper motor
- Pull off the wiper motor plate
- Separate the wiper motor from the transmission
-
step 4 :Installing the Wiper Motor
- Position the wiper transmission on the wiper motor
- Put on the wiper motor plate
- Fasten the three T30 bolts into the wiper plate
- Push the arm onto the wiper motor
- Set the wiper transmission to the stop position
- Fasten the 13mm nut onto the wiper motor
-
step 5 :Installing the Wiper Transmission
- Put the transmission into place
- Put the transmission bracket into place
- Install the two 10mm bolts into the wiper transmission
- Position the wiper transmission using the wiper motor peg
- Insert the two T30 bolts into the wiper transmission
- Connect the wiper motor wiring harness
- Run the wiper motor to set it in the stop position
- Put the cowl panel into place
- Push on the cowl weatherstrip
-
step 6 :Installing the Wiper Arms
- Put the wiper arms onto the studs
- Position the wiper blades about 1" above the cowl panel
- Fasten the two 10mm nuts onto the wiper arms
- Push on the wiper arm caps
Tools needed
-
13mm Socket
Flat Blade Screwdriver
Torque Wrench
T30 Bit
Rust Penetrant
Windshield Wiper Puller
10mm Socket
Ratchet
13mm Wrench
Pick
Brought to you by 1AAuto.com, your source for quality replacement parts and the best service on the Internet.
Hi, I'm Mike from 1A Auto. I hope this how-to video helps you out, and next time you need parts for your vehicle, think of 1AAuto.com. Thanks.
In this video, we're going to replace the wiper transmission on this 2005 Jetta. Pretty much the same for any 2005 to 2010 Jetta, Golf and GTI and often these parts seize up and cause problems. Items you'll need are a new wiper transmission from 1AAuto.com, 13mm socket and ratchet or a wrench, penetrating oil and a wiper arm removal tool if your arms are little bit stubborn, a pick or a small flat blade screwdriver, a T30 Torx driver and a 10mm socket as well.
Release your hood on the driver side, right underneath. Just pull. Then there's a lever up underneath, pull it up and then pull your hood up. At the base of your wiper, near the pivot point there's just a little black cap. Use a pick or a small flat blade screwdriver and pry the cap up and there's a 13mm nut underneath and do the same thing on passenger side wiper. With a thirteen millimeter socket and ratchet, you might want to hold onto the wiper arm and loosen up the nuts and then they'll come off pretty easily once you get them loose. To remove the wiper arms, hopefully, you can just push down on the base of the wiper and you'll see my driver side works free. I try the same thing on the passenger's side, but unfortunately I can see some corrosion and rust on that side and it does not come free. I will try a little bit of penetrating spray and then go back to it.
After attempting to just break it free by hand, I was unsuccessful, so I pull that weatherstrip back a little bit, which lets me move the cowl panel a little bit. Then that is a wiper arm removal tool. It's just a little clamp with a bolt on top, the bolt drives down onto the stud of the wiper transmission and then the clamp pulls the wiper arm up and off. There, you can hear it break loose and I'll pull it a little bit more and I'll take the tool off and pull the wiper arm up and off.
Remove the front weatherstrip if you haven't already. Then the plastic cowl panel you have to pull down from the windshield first and then, on one side or the other, you've got to release the side, pull it away and then pull it down and through. Two T30 bolts hold the transmission in. Use a T30 Torx driver and ratchet and extension to remove those. Disconnect the wiper motor. There's a little tab that you pull back on and then pull the connection off. Then you need to remove the bracket in the center. There are two 10mm bolts and remove this bracket. That makes it easier to get the wiper motor and linkage out. There's a pin on the backside of the motor, so you have to pull the motor and transmission towards you and then you rotate the top of the motor down into the well. It's a little hard to see. You actually rotate the motor down into the well and bring the transmission up and out and then it pulls out.
Take the wiper transmission and move it so that arm hits the stop, and then take a 13mm socket and ratchet, and remove the nut that holds the arm to the motor. You can see there that that arm is right up against the stop. That's important because you want to make sure you put it together the same way and then pull the arm up and off. Three T30 bolts or screws hold the transmission to the motor, we'll remove those. As soon as that last one comes out, then that plate comes off and the transmission separates from the motor.
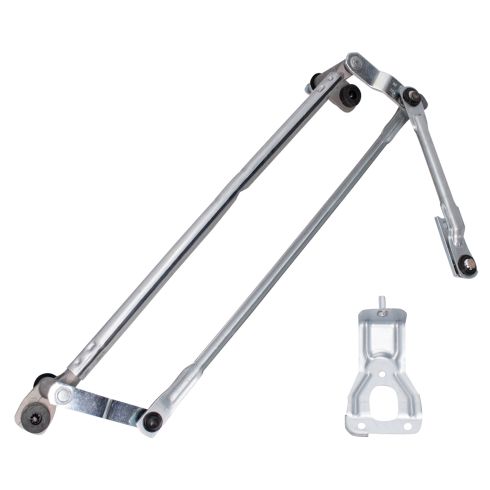
Here you can see the original's on top. The new one from 1A Auto is an exact replacement. It has all the bushings, the screws and everything. It'll bolt right on and fix the issue if you have a broken windshield transmission. To put the new transmission back on the motor, you can see it has two indents at the top and one at the bottom. You'll see that the indents line right up with the mounting holes on the motor. Get it lined up correctly and then put the plate back on and the three screws, three T30 screws, and then tighten those up. Once those are tight, we're going to reconnect the arm so your motor should still be in the same position, so take it, put the arm on to the motor shaft, and then push it against the stop, and then put that nut on and tighten it up. Once that nut starts pushing down on the arm, that will hold it in the same position on the shaft. At this point, the shaft and arm are one so I'm going to turn it toward the stop and just tighten it up a little bit more.
To reinstall the assembly, make sure you have the outer arms pointing straight up, feed the motor side down in first and then once you get to a certain point pull the arms so they're diagonal and then work it in the rest of the way. Now reinstall that bracket and tighten up those two 10mm bolts. It should install so that the ear where the transmission mounts on is close to where the transmission mount is. For final assembly, there is a peg on the back of the motor up right under the windshield, make sure that peg goes up in correctly. It's what I'm doing here. It's kind of hard to tell but once it gets in correctly then the two T30 bolts will line right up and you can tighten everything up. Those T30s are going into rubber bushings so be careful not to overtighten and ruin those bushings. Then I remove the two nuts that are on the new transmission and then plug my lead back in.
You'll want to make sure the wipers are in the park position. Close your hood, start up the vehicle, turn your wipers on and off a couple of times, make sure they're working and then make sure they're in the park position.
To put the cowl panel back on, you can see the passenger side still has that side piece on, so feed the driver's side up in first and then the passenger side. Then I work that side piece on just a little bit and then I realize that I really need to get the driver side a lot closer so I push the driver side in and get it down and onto the wipers. Then I take that piece that was apart and work it on, snap it into the edge and work it down into the puller and I do the same thing on the other side. Once you get the sides all set, make sure you push it up under the windshield. I'm going to fast forward here as we just push that rubber seal back in place and there's a lip that goes up over the plastic to hold it down.
Now you want to put the wiper arms back into place. You can use the dust marks that are on the windshield to just line it up in the same place. You basically want to have it about an inch off that cowl panel and put the passenger in place. Then it's the same thing on the driver side: you want to have it about an inch up off the cowl panel. Now put the 13mm nuts that hold them in place back in place and then tighten those up. You want to tighten them down gradually and then you want tighten them nice and firm to about 20 to 25 foot pounds. The pressure from those nuts holds the wiper arm onto the teeth of the gears of the wiper transmission, so they need to be pretty tight. Then once you have the nuts tightened up, put those plastic caps back on.
Thanks for tuning in. We hope this video helped you out. Next time you need parts for your car, please visit 1AAuto.com. Also, check out our other helpful how-to, as well as, diagnosis videos.
Shop Products

How to Replace Windshield Wiper Transmission 1995-2000 Chevy Tahoe
How to repair, install, fix, change or replace a broken, bent, damaged, failing or squeaking windshield wiper transmission on 95, 96, 97, 98, 99
