How to Replace Windshield Washer Reservoir 2007-14 Chevy suburban
Created on: 2017-07-28
New Windshield Washer Reservoir from 1AAuto.com How to repair, install, fix, change or replace a broken, damaged, split or leaking windshield washer bottle / reservoir on 07, 08, 09, 10, 11, 12, 13, 14 Chevy Suburban or GMC Yukon.
-
step 1 :Removing the Auxiliary Battery Tray
- Remove the eight 10mm bolts from the auxiliary battery tray
- Lift the battery tray up and out
- Remove the 10mm bolt from the top of the washer bottle
-
step 2 :Loosening the Fender Liner
- Remove the 7mm bolts from the fender liner
- Pry out the barbed clips in the liner with a flat blade screwdriver
- Peel back the fender liner to access the bulbs
-
step 3 :Removing the Washer Bottle
- Have a drain pan ready
- Disconnect the sensor wiring harness
- Remove the 10mm bolt from the bottom of the washer tank
- Disconnect the electrical connectors
- Remove the hoses from the washer bottle
- Let the bottle drain
-
step 4 :Removing the Washer Sensor
- Pry the sensor out and pop it off the bottle
- Remove the rubber grommet
- Remove the float from the bottle
-
step 5 :Removing the Washer Pump
- Pry the pumps back and forth out of the washer bottle
-
step 6 :Installing the Washer Pump
- Press the pumps into the washer bottle
-
step 7 :Installing the Washer Sensor
- Insert the float to the new sensor
- Insert the grommet to the hole
- Press the sensor into the washer bottle
-
step 8 :Installing the Washer Bottle
- Transfer the nutsert over from the old bottle to the new one
- Connect the hoses into the grooves on the bottle and the fittings on the pump
- Connect the motor connector
- Insert the bottle into place
- Tighten the 10mm bolt to the bottle
- Connect the sensor wiring harness
-
step 9 :Reinstalling the Fender Liner
- Press in the clips to the fender liner
- Tighten the 7mm bolts to the liner
-
step 10 :Installing the Auxiliary Battery Tray
- Tighten the 10mm bolt to the top of the water bottle
- Reinstall the battery tray
- Tighten the eight 10mm bolts to the tray
-
step 11 :Refilling the Washer Fluid
- Open the cap
- Pour the washer fluid into the neck until the fill line
Tools needed
-
Windshield Washer Fluid
Socket Extensions
Flat Blade Screwdriver
7mm Socket
10mm Socket
Ratchet
Needle nose pliers
Trim Tool Set
Hi, I'm Mike from 1A Auto. We've been selling auto parts for over 30 years. We're dedicated to delivering quality auto parts, expert customer service, fast and free shipping, all backed by our 100% satisfaction guarantee. Visit us at 1AAuto.com, your trusted source for quality auto parts.
Okay, we're going to replace the washer bottle on this vehicle. We have to start by removing the auxiliary battery tray here. There are eight 10 mm bolts that we're going to use a socket to remove. All right, with all the bolts removed, we can lift this tray out of the way.
So, one of those bolts that was holding the tray in is holding the top of the bottle, so now we have to remove this top one, and then we'll have to go underneath to remove the rest of the bolts. We're going to remove this top bolt here. Again, we're using the 10mm socket. You can see the washer bottle is already beginning to come loose. It's got a lot of fluid in it, so once we undo it, we're going to have a bucket ready to catch anything that drips.
Okay, so you're going to have to pull out this fender liner here to get to the other side of the bolts for the washer fluid reservoir, but you can do it on the ground and just turn the wheel this way. We're going to put it up on the lift and take the wheel off just so it's easier to see for the video. To remove the front of the splash shield, we don't have to take the whole thing down. We're just going to peel this part back. We'll remove these little 7mm bolts, and then we'll pop these clips off. We're going to use a trim tool to pop these clips off. You can use a flat-headed screwdriver. You're just going to carefully slide it under here and just gently pry them out. They've got little barbs to them, and they'll pop out. And these up here, take your flat-headed screwdriver or trim tool, and then work it under that part. You have to work from both sides. This releases them. Once they're up like this, they should just pull right out. It's all right if the middle comes out. Then you can just pry up and just pry the outside part out, because when you go to put it back in, you can just pop the middle right back in here. What happens when you push these in, it spreads the clips out, and that's what locks it. So the last one's out. We can just fold this back. Just sort of take it and fold like that away.
Now we can see the bottom of the washer fluid tank. So, we're going to take out the last 10mm bolt that's holding the washer tank, but first you should unclip the level sensor that's here. Just kind of pull the tab up, and pull it down and out. As soon as you undo this bolt, it's going to be loose, so you got to be ready to hold it, and then you have to pull the hoses off the motors. You're going to get some washer fluid leaking out if it's full like ours. If yours is broken, and you're replacing it, there might not be any fluid in it. So this is the 10 mm bolt, just like the others. Sometimes you just get it started, and then you can loosen it with your fingers.
Now it's loose. We're going to feed it out from underneath, and there's some electrical connectors on the front that are connected to the pumps, so you're going to want to disconnect these electrical connectors here. There should be one up here too. Okay, so you can lower it down some more. Now, we're going to work the little rubber hoses off and grab our bucket because it's going to drain out.
Okay, as we can see this is the old one here. This is our new washer bottle. It has the same mounting holes, and it has the same two holes for the pumps and the level sensor as the old one, so that's the level sensor there. Now, it doesn't come with these, so you're going to have to swap them over.
This level sensor is a bit tricky. It's got a little float inside. It's probably going to pop off when you pull it out, and then you'll have to fish it out with a pair of pliers. You might be able to get it out without it popping off. There you go. That popped off. So there's a little float that goes in there, and now we're going to have to fish it out. So I just kind of rocked the bottle around a bit to kind of get the float where I could see it by this whole. We're going to pull this little rubber seal out, grommet, so I can see it better and use some pliers, and just kind of reach in there. It's a little bit like a game of operation. Well, there it is, if I can get it. It's got a little bit of a magnet in the end, so that kind of helps, and there it is. That's the flat piece.
So we're gonna take the float piece - it just installs one way, it clips back onto here, and that's how it operates. So it floats up when you're full and closed when the level is low. There's a little magnet that connects there.
So these just pop out of the plastic and out of the grommet. You can start by just kind of lifting up here and just kind of working it back and forth. They have a pretty tight seal. That one's out. Now the next one is similar. Just kind of pry it back and forth, and work it out of the seal. There you go, that motor's out.
All right, so we're going to put these right back in the same place that we found the other ones. This white one was on the bottom. You're just going to kind of get it set in the seal, and push it in. It'll make a nice thud when it seats. And we'll take the other one, push it in. That one's in.
Now we're going to put the level sensor in, so again, you just make sure it's nice and straight. It orientates up with this flat part. Push it through the grommet in and seat it nicely. And that's it. That's installed.
Okay, so we also have to swap over this little Nutsert here, so that when you go to reinstall the bottle the top screw has something to thread into. We're gonna just take some pliers, and the things can be a little stuck sometimes so just kind of pry it off. Just like that.
Then we're going to put it on the new bottle. All right, so we're going to take our old Nutsert, and we're just going to slide it on. Perfect.
So again, you don't need to take the wheel off. We just took it off so it's easier for you to see, but you could do this on the ground by just turning the wheel this way and bending this out of the way. So you're going to slide this up into place. Get it fairly close so you can rehook the washer hose. It's got a little barb fitting to it, so we're going to push it into the rubber. It doesn't take too much. It'll go in a little bit, and that actually sits inside this little groove that's on the side of the bottle. Grab the other hose. Put that in as well. See that. Sit in that little groove. Now we're going to take the motor connector. Put that in. Don't forget to plug these in, because you'll go to use it, and it won't work. You're going to have to start turning it. May have to slide it into here just to give you a little more slack to get the wire on.
So I got that one connected. We're going to start to slide it up into place. It sits right there and connect to this level sensor. Take one of our 10 mm bolts. I'm going to put it back in the hole here, and then take our ratchet in 10 mm, snug it up. That's it. Don't go too much because you don't want to crack the plastic, but that's attached to the bottom now.
Okay, now that we're all set under here, we're going to put this plastic splash shield back in. You can use one of these little barb clips to kind of stay there so you can put that back in to hold it. You need the other barbed one that went here. Now we're going to put those other two push clips. Those bigger ones were up here. We're going to work them into the hole. Then you push the center in, and that locks them. These can be a bit tricky sometimes if you squeeze them tight like that. And then just push them in. It's locked. Now there's two screws. Those have little 7 mm heads on them. Just kind of get them started. All right, we're going to take our 7 mm socket and ratchet and tighten these up. All right so now we're reinstalling the top, so we're going to push the bottle over here. Get the top bolt caught. The 10 mm socket.
Now we're going to get ready to reinstall the auxiliary battery tray. There's one bolt here that goes through the tray that holds the bottle up, and the rest just hold the tray in. We have to slide the tray in first. It goes up and underneath this plastic here, and just kind of lays down. Now we can bolt down all these bolts here. I'm going to start with the one that held the washer bottle in. Installing the last bolt into the auxiliary battery tray. Okay, now that you've replaced the bottle, you have to refill it wash fluid so you can use it without it spilling too much.
Thanks for watching. Visit us at 1AAuto.com for quality auto parts, fast and free shipping, and the best customer service in the industry.
Shop Products
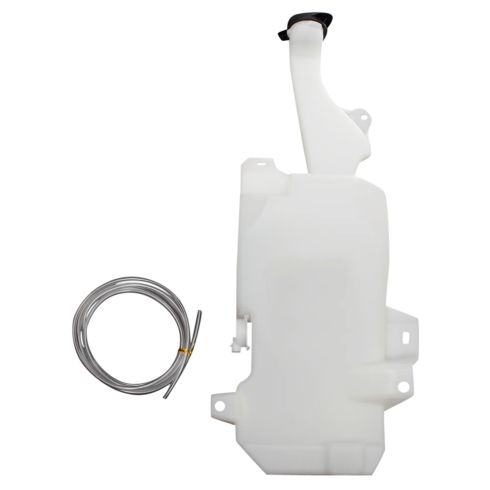
Chevrolet GMC Cadillac Windshield Washer Reservoir TRQ WWA64105
Part Details:
- Cap
- Plastic
- No
- Yes
- Yes
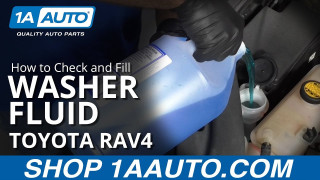
How to Check and Fill Washer Fluid 2005-16 Toyota RAV4
Check out this video to learn how to fill up the windshield washer fluid in your 05-16 Toyota RAV4!
