How to Replace Windshield Washer Fluid Reservoir 2007-11 Honda CR-V
Created on: 2018-07-16
How to repair, install, fix, change or replace a broken, damaged, split or leaking windshield washer bottle / reservoiron 07, 08, 09, 10, 11 Honda CRV
Tools needed
-
Socket Extensions
Flat Blade Screwdriver
Phillips Head Screwdriver
10mm Socket
Ratchet
Trim Tool Set
Hi, I'm Mike from 1A Auto. We've been selling auto parts for over 30 years!
We'll pop the hood over near the foot rest here, the lever, just pull that out. To release the hood, there's a little lever right here. Pull that up. Then the prop rod is right here, pull that up. Insert that right there. We have these retainers over this cover that we have to take off.
So we have seven push retainers that we need to take off up here on this cover. You can use a flat blade screwdriver and just pop the center up a little bit, and then pop these out. Pull that last clip out, and we can pull this cover off. Slide it off the release for the hood.
There's two bolts right here: there's one here, and then there's another one on the other side. We're going to take these out with a 10 millimeter socket extension and a ratchet. Okay, so the nut on the other side, it is like a J-nut. It's held in. It just keeps spinning. So what I'm going to use some rust penetrant. I'm just going to soak down the nut. Just to alleviate some of the rust and be able to loosen up that bolt. I'll let it sit for a little while. Do the same for the other side.
We can take these push clips out--there's four of them. Just use a straight screwdriver. Get in behind and pry it out. Pull this retainer up. You can also use some pliers that are made for removing clips. Just pull them out like that.
Take these bolts out just like that. Do the same to the other side. We have a Phillips-head screw here, and it's also one up here. I'm going to use a stubby Phillips head screwdriver. You could turn the wheel side to side to get more room in here. Let's take this one out. We'll take this one out as well. Do the same on the other side.
There's a push retainer right here. Use a straight blade screwdriver. Pull this retainer out. This is the same as the other side. Pull this retainer out. Grab the side of the bumper like this, just pull it out. There's clips you're going to just release, just like that. Clips in. Just like that. It's going to be the same on the other side. Grab the bumper and pull it forward.
We'll take this little retainer out here, just use a trim tool. We're going to pull this cover up, use a trim tool under here. This clip is broken right there, but we're going to release that. There's another one over here. Pull this weatherstrip out of your way. Pop that out. We can just move it out of the out of our way. Take this 10 millimeter bolt out right here. We'll use a socket, an extension and a ratchet. Pull that one out.
Keep in mind that for the headlight assembly, all these bolts are different. This is another 10 millimeter bolt right here. There's another bolt right here. There's another one right in the front, right here. There's a push retainer right here. Just use a flat blade screwdriver. Pry up the middle and then pry the rest of it out. We can pull the assembly out a little bit. We'll disconnect the connector right here. Just push in this tab here and pull the connector out. This connector, just pull straight out. There's a retainer that holds the wire on. Pull that off.
We can use our trim tool to pull this wire retainer off. Just slide it underneath here, and pry up, just like that. There's another one right here. Just get underneath it and pry up. There's one more connector right here. Just disconnect this here, push down, and pull it out.
I'm going to disconnect this electrical connector here, push down on that, pull the connector out. I'm to take these hoses off. I'm going to use a right angle pick. Get in behind the hose just like that, just go back and forth. I'm going to put a drain bucket down so that I can catch the washer fluid that comes out. Pull this hose off.
Now we'll take the other hose off, use the pick, do the same. Just go right around here. You can twist it back and forth, you can pull it off. Let that drain. Now we're going to grab this pump assembly. Pull this out, just work it back and forth. Fluid is going to come out a lot faster. There we go.
There's a 10 millimeter bolt right here. We'll use a 10 millimeter socket, and extension and a ratchet. Hold that up, there's two more bolts right here and here. Take these out. Take this one out, like that. Up here there's a clip, take this clip retainer out. We'll just take it off with a trim tool.
Take this washer hose off here. Here's the washer hose that goes over here, pull that out of the way. We can remove this top part. Just put that aside. We can pull a washer reservoir out this way. I'm just going to twist it a little bit back and forth. The hoses go through here, guide those out, just like that. There's your reservoir. All right, so we're going to fish these tubes through here. Push that there. Push this one in as well, just like that as we're pushing it up. We'll pull them through. You're going to have to twist this back and forth a little bit. Just like that. Twist it. That will line up right there.
Install this bolt right here. Get that one started. We'll install this bolt back here, and then the last one right here. Get those all started. Once they're all threaded, then you can tighten them down. We'll snug these down. Not too tight, just like that.
Then install this pump. If this rubber grommet was attached to the pump, you'd want to take this rubber grommet off, insert this into the reservoir, just like that it. Make sure it's fully in there. You can take and send this back in here. Just wiggle it back and forth, until it's fully seated. Just like that.
We can take the correct line. This one happens to go on this side, and then this one goes over here. Just like that. We're going to connect the electrical connector. Just line it up, push it down, and lock it in place. All right, so we want to reinstall this. I'll just take the cap out for now. Set that aside, and this rubber grommet, we'll take this off here.
I'm going to install it on the reservoir side first. Just like that. Make sure it goes all the way around. We can take the filler neck, and just slide it in, twist it back and forth. There's a hose right here. That's going to go on there. We'll put a push pin through here, push it on.
Now we're going to fill up our washer fluid. We're going to do this now before we put the car all back together, just to make sure we don't have any leaks. Now it's filled up, we can reinstall our cap. Slide the indicator in there, secure the cap down. As you can see, it appears there are no main leaks, so that's good.
Okay, so we're going to install this wiring harness. Connect the marker connector right there. Then the headlight connector goes right here. We'll connect this connector right here. Then we can install the retainers for the wiring harness, those go like that. I'll line bulb up. I'll line the headlight assembly up, just like that. We're going to start putting these bolts back in. Remember this three different bolts? Well, three different types of bolts that go in there up top. This screws style bolt, that's going to go in here. Get this one started, and then before we tighten that up, we're going to put the other three in. So this one over here, it's going to go on top right here. Then this other one that looks just like that bolt is going to go over here on the side Then this last one that has like a ledge on it, it's going to go right here in front, over here next to the horn when installed.
I'm going to install this push-pin right here, like that. So we're going to push this cover back on. Lock it down. We're going to put a push retainer right there. Just like this. Going to reposition the weatherstripping. Just line it up. This bumper's pretty light. You can have a helper help you do this, or you can try to do it yourself. So those are going to line up there. Push in. Line this side up, just like that. Just push it in. Same with this side. All right, that's lined up like that. We have a push retainer that goes straight up here, lock that in.
It's going to be the same on the other side. We have two Phillips head screws that we're going to screw in here, then one down here. Snug that up. That's going to be the same on the other side. We're going to install these push clips. There's four of them underneath here.
I have this 10 millimeter bolt that's going to go right here. We have the same for the other side. We'll tighten this bolt down. Just snug it. Same with this side. Put this cover on. We have all these push retainers that go in. Push those down.
Thanks for watching. Visit us 1aauto.com for quality auto parts, fast and free shipping, and the best customer service in the industry.
Shop Products

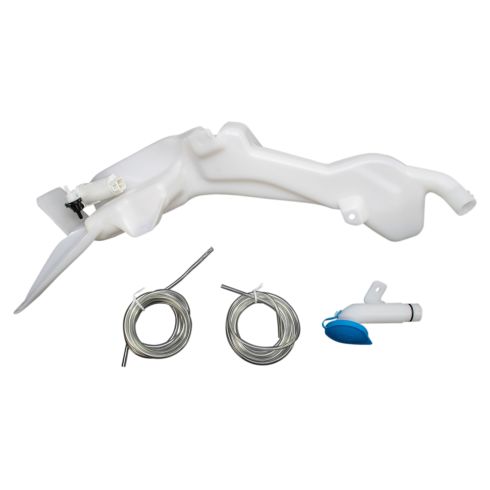
2007-11 Honda CR-V Japan Built Models (1st VIN Digit J) Windshield Washer Reservoir with Washer Pump TRQ WWA06676
Part Details:
- No
- Yes
- No
- Plastic & Metal
How to Replace Windshield Washer Fluid Sensor 2006-10 Dodge Ram
New Windshield Washer Fluid Level Sensor from 1AAuto.com How to remove, install, fix, change or replace a broken Mass Airflow Sensor / Meter on 06, 07, 08, 09, 10 Dodge Ram pickup
