How to Replace Window Regulators 2002-08 Dodge Ram 1500
Created on: 2011-04-07
Check out this video to learn how to replace the power window regulator on your 02-08 Dodge Ram. 1A Auto will guide you through the process.
-
step 1 :Removing the Door Panel
- Remove the T40 Torx screw securing the door handle
- Unscrew the Phillips screws securing the door panel
- Pry up the power window switch panel
- Unplug the wiring connectors to the power window switch
- Pull the door panel up and off
- Unbolt the bracket now exposed with your 10mm socket and ratchet
- Carefully peel back the water shield
-
step 2 :Removing the Window Regulator
- Remove the two 10mm nuts securing the window regulator
- Lower your window down some
- Remove the nuts clipping the window to the regulator
- Tape the window up with painters tape to secure it out of your way
- Disconnect the window motor lead
- Support the regulator by the motor and remove the regulator from its tracks
- Feed it out of the door and remove it
-
step 3 :Installing the New Window Regulator
- Feed the window regulator into the door
- Mount it onto the tracks
- Connect the regulator lead
- Bolt in the window regulator with your 10mm socket and ratchet
- Un-tape your window and gently lower it into the regulator
- Secure the window into the regulator by bolting it down with your socket and ratchet
- Replace the water shield
- Reinstall the door handle bracket and connect the rod
-
step 4 :Reinstalling the Door Panel
- Put the water shield into place
- Bolt the bracket on with a 10mm socket and ratchet
- Lift the door panel into place
- Push in the door panel clips
- Connect the wiring harnesses to the switch panel
- Push in the switch panel
- Insert the four Phillips screws into place
- Insert the T40 Torx screw to the door handle
- For more detailed instructions, please see the 2004 Dodge Ram 1500 door panel replacement video
Tools needed
-
Socket Extensions
Flat Blade Screwdriver
T40 Socket
Phillips Head Screwdriver
10mm Socket
Ratchet
Brought to you by 1AAuto.com, your source for quality replacement parts and the best service on the internet.
Hi, I'm Mike Green, I'm one of the owners of 1A Auto. I want to help you save time and money repairing and maintaining your vehicle. I'm going to use my 20 plus years experience restoring and repairing cars and trucks like this, to show you the correct way to install parts from 1aauto.com. The right parts, installed correctly. That's going to save you time and money. Thank you and enjoy the video.
In this video we're going to replace the front window regulator on this 2004 Dodge Ram, same for any 02' to 08' 1500, as well as the 09' 25 and 3500's. Tools you'll need are a T40 Torx driver, Phillips screwdriver, flat blade screwdriver, and 10mm socket and ratchet with an extension.
To remove your front door panel, you're going to start by removing a T40 Torx screw and hold your handle on, right there. Then you're going to remove four Phillips screws, one there, one up here, and two down on the lower part of your door panel. There's my T40 Torx driver. We're going to speed it up here, take that T30 screw out, and then your handle comes off. Then I'm going to start with the Phillips screw drivers, take those two off. Then slightly take my jacket off so you can see my 1A Auto sweatshirt, and remove the two lower Phillips screws.
Now I use a regular screwdriver to carefully pry up on your switch plate here. Then pull it up. Both of these connectors, they have a little button right here. Press the button and work the connector to the switch; same thing here. There's a button right there. Now you're just going to life the door panel up over the lock here, take it off. You're going to want to use a 10mm wrench or a socket and ratchet. There's a bolt here, there's also a bolt there but it's missing. Not sure of this door maybe has been taken apart before. Then there's a little clip right here that you either push down with your hand. Just pull it down, and then you're going to pull this rod right out.
Then you want to carefully pull your water shield down. Pull your water shield back. Your regulator is held on by four bolts here; one, two, three, and four. There's two bolts that hold a bracket here, and then there's two bolts that hold the window. I want to demonstrate to you how do you get it apart if it's stuck in the up position. You would remove these two nuts right here. Now we'll just speed it up a little bit, as I'm removing those two 10mm nuts. I'm reaching behind, right here is my lead, and I'm just reaching in there. There's a tab on top, pulling that lead that. I'm going to remove these four bolts over here. Now we'll just fast-forward through me removing those four bolts.
Now I can bring my window down. With my window down some I can see there's that 10mm nut there, and there's a 10mm nut there. Those hook the window to the window regulator. Once I loosen them you can see that I would slide it over to the right, which allows the track to go out around that nut. I'm going to tape the window right there, so id doesn't fall down. Now I've got my hand stuck down in the bottom here. I'm holding up the regulator by the motor. I'm going to flip it off the track up here. I'm going to reach up in, carefully, and pull it from the door and bring it down. I'm going to push it towards the outside of the door.
Here's my original regulator, and new regulator from 1A Auto. You can see everything is pretty much the same. It's actually just in a different position here. It has the cut outs for the window bolts right there and everything. The actual lead is the same. Ours does have this little longer lead, actually makes it a little easier to get together. On the other side, it has the balance spring. This bracket has the bolts and everything.
Before you go to install your regulator, what I like to do, is get my window all the way in the up position. I'm going to put my new regulator in. I'm going to thread this bolt three quarters of the way in, and this one three quarters of the way in. Put the regulator down in, reach in with my other hand. Grab the - Now with my right hand I have the motor. There's that bolt and my other bolt. My two bolts here are in. Let's see here, push that one up through and put a nut on there, just slightly. Then twist it a little. Push it off, I just need to push it. Push the regulator back, so I have a little clearance here. Get those on. Now I'm going to start that bolt and that bolt. I'm going to tighten these up.
Now I'm going to reach under here, feel my lead coming down. I got my connector from the door. I'm going to bring my lead our around this harness, just so I know it stays out of the way. No I can turn my key on, run my regulator up so I can see my track. Now I can see my track right through there. Then right there, except I'm going to run it up just a little more. Tape off my window. Slowly slide my window down. Got that one on, and that one is on.
Now basically you reach in there, and you might have to rotate the window a little bit; move it up and down a little bit, so you can slide the track all the way onto the studs. Just speed it up a little bit. Tighten up those bolts that hold the window. Tighten up the nuts on that track. Run the window up and down to just check it. Make sure all the other bolts are tight. Put our water shield back on. Reinstall our handle, and make sure that that rod and clip are in place. Then you can put your door panel back on.
We are going to continue the fast motion here, as we put the door panel back on. If you want to see this in regular speed, just check out our video Dodge Ram door panel installation and removal. Probably you can get enough just by watching here. Put that door panel on, put it in place, slide it down onto its clips. The four Phillips screwdrivers, I'm sorry, the four Phillips screws install them. Put your switch plate back in place and press it down into place. Then reinstall all your handle with your T3o Torx but. Then put your little lock bezel back on.
We hope this helps you out. Brought to you by www.1AAuto.com, your source for quality replacement parts and the best service on the internet. Please feel free to call us toll free, 888-844-3393. We're the company that's here for you on the internet and in person.
Shop Products


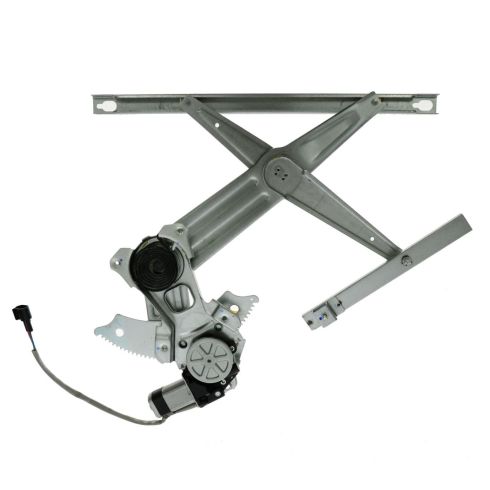
Sterling Truck Dodge Front Passenger Side Power Power Window Motor & Regulator Assembly TRQ WRA51859
Part Details:
- Power
- 2
- No
- No
- Galvanized Steel
- Steel
- Yes
- 7.87 in
- No
- 7

How to Replace Front Window Regulator 2010-15 Cadillac SRX
How to repair, install, fix, change or replace a slow, stuck, cracked or damaged window regulator on 10, 11, 12, 13, 14, 15 Cadillac SRX
