How to Replace Window Regulator with Motor 1998-2011 Lincoln Town Car PART 2
Created on: 2011-05-03
Check out part two in this video series teaching you how to replace a window regulator motor with the help of the 1A mechanics in this video.
-
step 1 :Beginning the Repair
- This is Part 2 of a two part video
- Please consult Part 1 for prior instructions
- Perform the steps outlined in Part 1
-
step 2 :Reinstalling the Regulator
- Insert one of the bolts into the window regulator
- Push the regulator into the door
- Hang the regulator by its bolt
- Insert the three T30 Torx screws into the blower motor
- Insert the four 10mm bolts loosely into the regulator
- Connect the window switch wiring harness
- Connect the window motor to the lead
- Lower the window onto the regulator
- Insert the two 10mm bolts that hold the window to the regulator
- Turn the vehicle on
- Run the motor up for 4 seconds
- Disconnect the window motor lead
- Tighten the four 10mm bolts to the regulator
-
step 3 :Reinstalling the Door Panel
- Replace the weatherstrip
- Connect the speaker wiring lead
- Insert the Phillips head screws from the bottom of the door panel
- Insert the Phillips head screws behind the door pull
- Push in the door pull
- Insert the Phillips head screws under the door pull
- Connect the power window switch wiring harnesses
- Push in the power window switch
- Screw and replace the door lock knob
Tools needed
-
Socket Extensions
Phillips Head Screwdriver
T30 Driver
10mm Socket
Ratchet
Brought to you by 1AAuto.com, your source for quality replacement parts and the best service on the Internet.
Hi, I'm Mike from 1A Auto. I hope this how-to video helps you out, and next time you need parts for your vehicle, think of 1AAuto.com. Thanks.
This is part two of a two part series installing a window regulator with a motor into a 2000 Lincoln Town Car. It's the same as any '98 to '02. For these vehicles, we sell the regulator with motor and without motor. This is for installing the regulator with a motor. The tools you'll need, we'll just a quick look at that again.
The one with the black rail is my original. The new one from 1A Auto. You can see the one from 1A Auto is going to go in exactly the same. Some things: it's been beefed up so it's a little larger in diameter on the wheel up here. That allows it to spin a little slower and has less wear. It's just going to go in there. You're going to have to bolt it in. It's going to fit the same. It has the same pigtails with plugs all the same. I'm bolting it in.
First, you've just kind of got to stuff it in there. Bring it up, and the first thing is to hang it from these bolts up here. You can look down here. The easiest way to see the place for your motor is with the plate side to the inside of the door. Hang it up from here first. There is a locating slot right here. Push your motor up and in. Push your motor up aligned with that hole there. Slide it up. You can see there's the tab right there. This is all lined up now. What I'm using are some M6. They're 12mm in length little bolts with nuts that have a serrated side to them. These little serrations, they kind of dig into the metal and hold them in place.
This tab is holding my motor in place. Reach in with the crack-it-up and put that bolt through. Start another one on the back side. I'm going to speed it up here as I put the other two nuts and bolts in, and then tighten them up. Unfortunately, with this angle, you don't see much except the great shot of the logoed sweatshirt there. Again, all I do is I put those bolts in, tighten them up, and then move on to the next step. I'm going to move through this at a little higher speed as well. Put those two nuts at the top that hold on to the studs. They're just like the original.
You want to put the nuts on there, but you don't want to tighten them up all the way. What you're going to want to do is run the window up and down. You'll see that. You put those both on, but don't tighten them up all the way. It's the same thing at the bottom. Use some M6 12mm bolts and nuts, and secure the bottom. Again, don't tighten them up until later.
Now I take our lead, put it through, and connect it. You can see I've just plugged my switch back in. We've just moved this down until we can easily see the holes. I can see the hole right here easily, and then I can see the hole through here, through this hole here. I'll take the window. Front in first. Slide it right down there and put the nose down. Make sure you've got the front in the track and the rear in the track. Slide it down to the regulator.
Now, you want 2 1/2mm bolts. It's generally easier to line up this front one that's a little higher to get to. Put the bolt in. I'm going to put my nut in my socket here, and then start it. You can see in my rear one. I'll speed this up as I use my socket and ratchet. I actually use a 10mm wrench on the inside. That's what I'm putting on there, on the other side of the window. Hold it with a 10mm wrench, and then tighten it up with my socket and ratchet. Then do the front one as well.
Now with the key on, run your window up and down a little a couple times. Probably with it right up there. Tighten up this upper one, tighten up this one, then retighten my lower ones. Now I'm going to move a little quicker. Take that switch back apart or unplug it. Put that piece of weatherstrip back on the inside. Then we'll fast-forward through putting the door panel back on. If you did want to see the door panel, if you want to see it in regular speed, just check out our other Lincoln Town Car videos, and you'll see a front-door panel installation and removal.
We hope this video helps you out. Brought to you by www.1AAuto.com, your source for quality replacement parts and the best service on the Internet. Please feel free to call us toll-free, 888-844-3393. We're the company that's here for you on the Internet and in person.
Shop Products


1998-11 Lincoln Town Car Front Passenger Side Power Power Window Motor & Regulator Assembly TRQ WRA51425
Part Details:
- Power
- 8
- Yes
- 2
- No
- 7.87 in
- Yes
- Galvanized Steel
- Nylon
- Yes

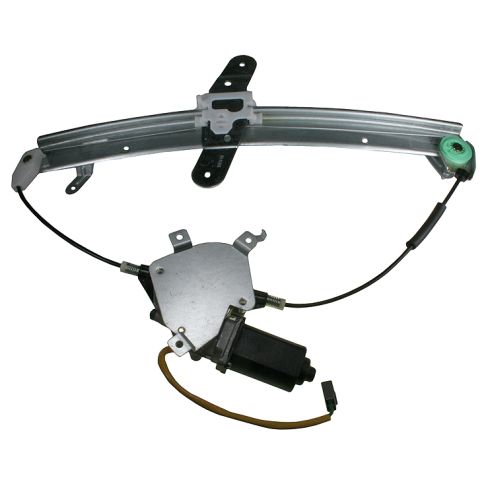
1AWRG00023 Buick Regal Century Oldsmobile Intrigue Window Regulator
Everything that you want to know about part number 1AWRG00023. It's a power window regulator for a Buick Century, Regal, and Oldsmobile Intrigue, years 97, 98, 99, 00, 01, 02, 03, 04, or 05. It fits the driver's side front door, and it includes the power window motor. New Window Regulator from 1AAuto.com.
