How to Replace Window Regulator 1999-2012 Ford F250 Super Duty Truck
Created on: 2011-11-16
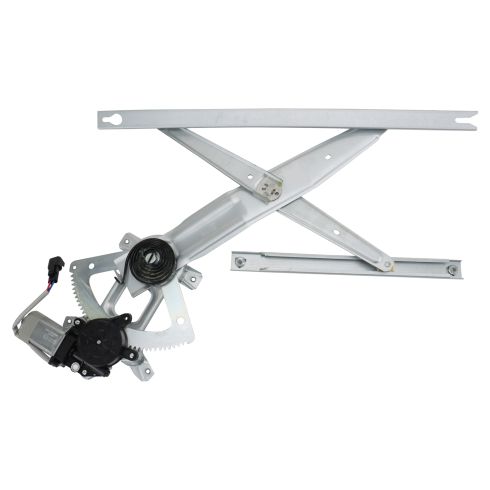
Check out this video on how to replace the power window regulator assembly on your 99-12 Ford F250 Super Duty Truck.
-
step 1 :Disconnecting the Battery
- Disconnect the negative battery cable with an 8mm wrench
-
step 2 :Removing the Door Panel
- Pry off the courtesy light with a flat blade screwdriver
- Pry off the window switch panel with a flat blade screwdriver
- Disconnect the window switch wiring harnesses
- Pull the window base trim panel off by hand
- Remove the 7mm bolt behind the courtesy light
- Remove the 7mm bolt behind the window switch
- Lift the door panel up and off
- Twist the courtesy light socket counterclockwise and pull it out
- Remove the 7/32 inch bolts from the speaker
- Disconnect the speaker wiring harness
- Peel off the water shield
-
step 3 :Removing the Window Regulator
- Disconnect the window motor lead
- Remove the four bolts from the regulator
- Remove the two nuts from the window track
- Pull the window down by hand
- Remove two nuts from the window track
- Slide the track forward and away from the window
- Pull the window up by hand
- Hold the window in place with painter’s tape
- Pull the regulator out of the door
-
step 4 :Installing the New Window Regulator
- Start all the nuts and bolts into the new regulator
- Fold the new regulator into the proper position
- Slide the new regulator into the door
- Hang the regulator by its bolts
- Tighten the regulator nuts and bolts
- Connect the window motor wiring harness, keeping the harness away from the window
- Reconnect the negative battery cable
- Connect the window wiring harness
- Turn the ignition on
- Move the regulator up with the window switch
- Turn the ignition off
- Disconnect the window switch wiring harness
- Remove the painter’s tape from the window
- Lower the window by hand
- Lower the window into the track
- Tighten the two nuts into the window track
- Turn the ignition on
- Connect the window switch wiring harness
- Test that the window works with the window switch
-
step 5 :Reinstalling the Door Panel
- Put the water shield into place
- Connect the speaker wiring harness
- Push the speaker into place
- Insert the 7/32 inch bolts into the speaker
- Put the door panel in place using the bottom clips
- Twist the courtesy light socket clockwise into place
- Pull the wiring harnesses through their cavity
- Push the door panel into place
- Push in the door panel clips
- Insert the 7mm screw behind the window switch panel
- Insert the 7mm screw behind the courtesy light
- Push the mirror base molding into place
- Connect the wiring harnesses to the window switch panel
- Push the window switch panel into place
- Push the courtesy light into place
-
step 6 :Reconnecting the Battery
- Reconnect the negative battery cable if you have not yet done so
Tools needed
-
Socket Extensions
Flat Blade Screwdriver
8mm Socket
7mm Socket
Painter's Tape
10mm Socket
Ratchet
7/32 Inch Socket
Brought to you by 1AAuto.com, your source for quality replacement parts and the best service on the Internet.
Hi, I'm Mike Green. I'm one of the owners of 1A Auto. I want to help you save time and money repairing or maintaining your vehicle. I'm going to use my 20-plus years experience restoring and repairing cars and trucks like this to show you the correct way to install parts from 1AAuto.com. The right parts installed correctly: that's going to save you time and money. Thank you and enjoy the video.
In this video, we're going to show you how to replace the power window regulator assembly in this 2003 Ford F250. We're going to do the driver's door. The passenger's door is, basically, the same procedure. This is the same for any '99 to '07 Super Duty that has power windows. Tools you'll need are 7 millimeter, 8 millimeter, 10 millimeter, and a 7/32's inch socket with a ratchet and extension; flat blade screwdriver; and some painters tape.
To prevent your battery from running down while you have your door open, disconnect the negative cable. An alternative is you could just pull out your interior light bulbs. That way you can keep the battery connected and still be able to run the window up and down when you need to.
Using a small flat blade screwdriver, take this lens, pop it off. Mine is actually broken. It should pry out here, pop it off. Here, you're going to do the same thing. You just pull up with your hand or use your screwdriver a little bit right in the front. You pull that up, pull it forward, and then you disconnect all the harnesses. There's little push tabs on them. Push on the tab with your thumb, pull the harness here, push on the tab right here. The tab here, push on it a little bit. Do the same thing here. You just pull down this trim panel. It's got two clips that hold it on. Now, there are two 7 millimeter bolts: one right there and then one right there. Use a 7 millimeter socket with a ratchet and extension. A wrench would work as well. Fast forward as I just remove those two bolts. Once those two bolts are out, just lift up on your panel, bring it out. Then, in behind is your courtesy light. Just turn it counter clockwise and pull your socket out. Your door panel comes off. You'll want to remove your speaker too, and it's a 7/32 inch socket. Take the speaker out, and then there's a little tab here, disconnect it. Remove your shield the rest of the way.
I've got my switch plugged in and key on. Actually, you can see that my motor and regulator are working just fine. What we'll do is, we'll do the worst case scenario, which is if your motor or regulator breaks in the up position. Now, disconnect your lead. It's right back here through the speaker hole. Just press, and pull. Now remove these four bolts that hold the regulator and these two nuts that hold this track. I'm just going to fast forward as I remove the two nuts from the track. Then, also I remove three of the bolts that hold the regulator bracket, and I'll slow back down here as I start removing the last one. You just saw my window actually slid down some, so that's actually the regulator turning. It's okay. I'm holding the window with one hand. Pull this back out, and the whole thing comes down. Now you want to loosen two nuts: one there, and then when the window's low enough, you can see that one through there. Once you loosen those, then the track just slides forward and comes off. Now, with those loose, the track slides forward. Be careful. Now my regulator is basically free from the window. Now I can pull my window back up. With my window up, you can see I've got some painters tape up here. Put that on. It holds it in place for right now. Back down here, this comes out, come together. There's your regulator out.
Here's our new regulator from 1A Auto. All the same, only sight difference is it has a little bit of a pig tail, but it's going to plug in correctly. The only thing I've done is I started all my bolts in, and I started my two nuts on this track here. What we're going to do is put those together like that, feed it in, and push through. You just have to get these bolts right through. Put our mechanism in place up here, so these four bolts are now in their slots. Put this here, pull it in. Now I can tighten all of those up. Just hit the fast forward button here, as I tighten those four bolts that hold the regulator and the two nuts that hold the track back up. Now to connect the motor, since this has a harness on it, what you probably want to do is take your door harness, feed it down and around your harness down here a couple times. Then connect this harness to it. I'll show that to you. What we did is we just wrapped our harness around here a couple times and then plugged it in right down here. That just keeps the harness away from the window. Just make sure that there's plenty of room for the speaker as well. I can see one of my window mounting points here. The other one is just a little bit low here, so I'm going to turn my key on, plug my window back in, and just run that up a little bit. Do a little test to make sure it works well. Now you can see my window mounting point there, and then that one right there. Slowly let my window down. Now grab my window here through here, lift it up a little bit, pull the regulator down, and let the window come down slowly. Now, I'll slide my track on the back first. It's on the front. Slide it back. That nut's there properly, and that one in there is where it's supposed to be. Tighten that one up. Tighten that one up. Turn the key on, plug in the harness. Everything is working nicely.
I'll speed up as I put the water shield back on. What I like to do is find one point, like where a screw goes through, and you line up that point and then go out from there. Then reinstall your speaker, make sure that you plug it in first, and then reinstall the four 7/32 inch bolts that hold it in place. To reinstall your door panel, what you want to do is take your bottom clips, and they're actually designed to just go on here and rest in place. You can reach down and put in your courtesy light and turn it clockwise to lock it in. Then, make sure all these harnesses come up through. Force it against, lift it up a little bit. Make sure your door lock comes through, and clip it against. You lift it just up a little bit, push it in, and bring it down on to make sure you're nice and tight against the door, nice and tight against the door over here. We'll speed it up again as I take those two 7 millimeter screws, put them in, and then tighten them up nice and firm. Now I'm going to clip the molding on up top to cover the mirror mounting holes, and then take my switch panel, and reconnect all my harnesses. Then I slide the tab back into the back first, and I make sure the wires are getting pinched in there, and then I clip it down in place. That's all set. If you disconnected your battery, then reconnect it and tighten up the 8 millimeter bolt.
We hope this video helps you out. Brought to you by www.1AAuto.com, your source for quality replacement parts and the best service on the Internet. Please feel free to call us toll-free, 888-844-3393. We're the company that's here for you on the Internet and in person.
Shop Products


Ford Front Passenger Side Power Power Window Motor & Regulator Assembly TRQ WRA51768
Part Details:
- Power
- No
- 8
- 2
- No
- 7.87 in
- No
- Galvanized Steel
- Yes
- Steel

How to Replace Window Motor Regulator 1996-2000 Nissan Pathfinder
New Window Regulator from 1AAuto.com How to repair, install, fix, change or replace a weak, noisy, damaged or defective power window motor on 00 Nissan Pathfinder
