How to Replace Window Regulator 1998-2002 Toyota Corolla
Created on: 2011-09-24
Learn how to replace the window regulator on your 98-02 Toyota Corolla in this 1A Auto video. Do it yourself and save some money!
-
step 1 :Remove the door panel
- Remove the Phillips screw in the door latch
- Pry up the door latch and unclip the latch rod.
- Use a flat blade screwdriver to pry up the top of the door pull and the switch panel.
- Unplug the switch panel from the wiring harness.
- Remove all the now-exposed Phillips screws.
- Pry off the door panel and pull it up and over the lock.
- Carefully peel back the water shield.
-
step 2 :Remove the power window regulator
- Remove the stamp plate secured by two screws.
- Disconnect the window motor lead.
- Unbolt the seven 10 mm bolts secure the window regulator and motor.
- Carefully lower the window and regulator, making sure you don’t cut your fingers.
- Unbolt the window from the regulator by maneuvering the bolts securing the window to the regulator in front of the access ports in the door.
- Pull the window up and out, tilting it inwards towards the body of the vehicle to remove it.
- Pull the window regulator out.
-
step 3 :Install the new regulator.
- Slide the regulator into the door and start threading in the nuts and bolts.
- Tighten the 10 mm bolts with your socket and ratchet.
- Plug in the switch panel to the wiring harness to move the window regulator up and down so you can access the window anchor points.
- Lower the window down into the regulator and bolt it in.
- Test that the window goes up and down ok.
- Unplug the switch plate.
- Screw the stamp plate back in and replace the water shield
-
step 4 :Install the door panel
- Hang the door panel up, make sure your lock button comes through the top.
- Once you get it hang up, you can look in behind and line up the clips.
- Feel the pin and then hole, push it in.
- Make sure that you have your lock rod and your harness coming through, and then install the two Phillip screws that hold near the armrest base.
- Now you can reinstall the armrest, just push it down, lock it into place.
- Reconnect your power window switch, slide the back end first then push the front down into place.
- Reinstall your door handle, push it in, push it back, then walk it into place and then put the screw back in.
- The trim panel, it goes up top near the mirror and then the little clip in the back to hold it.
Tools needed
-
Socket Extensions
Flat Blade Screwdriver
10mm Socket
Ratchet
Flashlight
Brought to you by 1AAuto.com, your source for quality replacement parts and the best service on the internet. Hi, I'm Mike Green. I'm one of the owners of 1A Auto. I want to help you save time and money repairing and maintaining your vehicle. I'm going to use my 20 plus years experience restoring and repairing cars and trucks like this to show you the correct way to install parts from 1AAuto.com. The right parts installed correctly, that's going to save you time and money. Thank you and enjoy the video.
In this video we're going to show you how to replace a window regulator on this 1998 Toyota Corolla. Same as any 98 to 02. Tools you'll need are pretty basic. Phillips screwdriver, flat blade screwdriver, a 10 millimeter socket with a ratchet and an extension as well as a flashlight may help you out in seeing things inside there. Start by removing the front inside door handle. There's a little Phillips screw right there to remove. The handle slides forward and pulls out. Behind, you could see there's a clip right there on a rod. Get your screwdriver and then take the handle and push it up and off the rod and off. Now you're going to pry up your switch panel here, pull it forward and disconnect your lead. You're going to use a screwdriver right under your armrest pad here. Pry that up. You can also pull off this trim panel here. There are two screws holding the armrest right there and then a little clip right here. For the clip, just use a Phillips head and turn it, put your fingernail under and pry out. Once it's out like that, it's all set. Remove these two screws.
Speed up as we do that, and this is probably the most physically challenging part, those screws in there, a little difficult to get out but as long as you have a good Phillips screwdriver you'll be all set. Just pull, use your fingernails, use your fingers, work them in underneath. The door panel is just held in by series of clips. A little surprise as that clip came flying out. The proper way to do it. Pulling this one hand over that, it's going to come out. Just let the door panel right up off. Pull your water shield down, pop the rod around. Remove two Phillip screws. Remove those screws and then that plate comes off. Right here is your lead for car window motor. What you want to do is reach around the back pushing the tab in. Now, disconnecting that lead. Now you're going to want to remove series of bolts. We'll fast forward here. There are seven bolts to hold the regulator, three near the back of the door and then four in a rectangular pattern up closer to the front near where you disconnected the lead. We'll slow down in a minute. I am doing this as if my window had stuck in the up position. As I remove that one I see my window shift a little bit. We'll do this last knot and you can remove your regulator out and start pulling it down. As you're moving your regulator down like this or anytime you're moving your regulator, be very careful, it can cut your hands and fingers very easily.
As it comes down more, slowly let it down. There are two bolts you want to take off. There's one bolt that holds the regulator to the window there. I speed up here as I loosen that rear bolt. What I'm doing here, you could see with my left hand or both hands actually, I lift the window up and I'm looking through. There's a round hole and a smaller square hole. You look through those holes and you can see the front bolt that holds the regulator to the window. You could see I put my extension and ratchet in there and start removing that front bolt. I just took the ratchet off, removing the rest of the bolt, the rest by hand. Bring it out and then lift up the window and just finish removing that rear bolt. Again, be careful with your hands so that you don't pinch or cut yourself at all. Finish taking out that rear bolt and then you pull the regulator away from the window. You can pull the window up and out, you tilt it in towards the center of the car. Pull the window up and out and put that aside carefully. Now you can take the window regulator, collapse it down and pull it out through that larger bottom hole where you removed the plate. You want to put your regulator back in now, hang that stud right up there, start a knot going to hold that.
The regulator has a stud on it and you get that stud in and start the first knot and then I'm just fast forwarding through, I'm putting all the rest of the bolts in just starting them by hand and then I'll go to tightening them up. You want to tighten this one up right in the same spot it was before. Make sure that your wire comes through and I'm going to plug it in. Now I'm just fast forwarding as I tighten those bolts up. You want to make sure they're tighten firm but do not over tighten them. Now with the working window, plug your switch back in, turn your key on and run your regulator down. You could see where the bolts go here. Now you want to put your window in carefully, you want to go down. It needs a tip forward so you could put the front into the channel here and work the back into the channel on the back as well. Now slide the window down slowly until it meets up with the regulator. Here's a close up of the clips, you bring the window clips in front of the regulator. Sorry, the auto focus is getting a little confused I think. It clears up here, you can see in front and then the front one, you see me lift up the window a little bit and get that clip on to the regulator so the bolt can go right in. Speed up as I put those bolts in and tighten them up. Again, firm but don't over tighten them. To go for a test drive. That's all set. After the test then put the two screws back into the plate.
Tighten that up and put your water shield back in place. Speed through putting them back together. Hang the door panel up, make sure your lock button comes through the top. Once you get it hung up, you can look in behind and line up the clips. Feel the pin and then hole, push it in. Make sure that you have your lock rod and your harness coming through then install the two Phillips screws that hold near the armrest base. Now you can reinstall the armrest, just push it down, lock it into place. Reconnect your power window switch, slide the back end first then push the front down into place. Reinstall your door handle, push it in, push it back, then walk it into place and then put the screw back in. The trim panel, it goes up top near the mirror and then the little clip in the back to hold it.
We hope this helps you out. Brought to you by www.1AAuto.com, your source for quality replacement parts and the best service on the internet. Please feel free to call us toll free, 888-844-3393. We're the company that's here for you on the internet and in person.
Shop Products


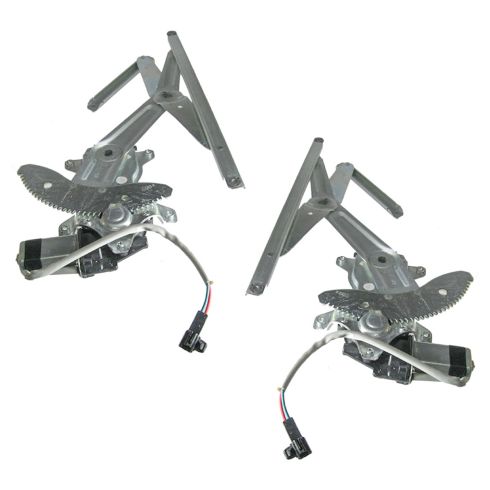
1998-02 Chevrolet Prizm Toyota Corolla Front Driver & Passenger Side Power 2 Piece Power Window Motor & Regulator Assembly Set TRQ WRA50521
Part Details:
- Power
- 2 Piece
- (1) Front Driver Side Power Window Motor & Regulator Assembly
- (1) Front Passenger Side Power Window Motor & Regulator Assembly
How to Replace Front Window Regulator 1999-2007 Chevy Silverado
This video shows you how to install a new window regulator on your 1999-07 Chevy Silverado.
