How to Replace Window Regulator 2006-11 Chevy HHR
Created on: 2011-10-06
How to repair, install, fix, change or replace a broken, cracked, damaged, slow-moving, or stuck power window regulator and motor on Chevy HHR, years 06, 07, 08, 09, and 10.
-
step 1 :Removing the Door Panel
- Remove the rubber trim in the door pull
- Remove the two T30 Torx screws in the door pull
- Pry off the trim piece inside the door handle with a flat blade screwdriver
- Remove the T30 Torx screw inside the door handle
- Pry off the trim button on the end of the door panel
- Pry out the door panel with a door panel clip tool or putty knife
- Lift the door panel up and off
- Carefully peel off the water shield
-
step 2 :Removing the Window Regulator
- Loosen the two 10mm bolts that hold the window to the regulator
- Raise the window by hand
- Hold the window in place with painter's tape
- Disconnect the window motor lead
- Remove the five 10mm bolts from the regulator
- Pull the window regulator out through the door
-
step 3 :Reinstalling the Regulator
- Insert one of the bolts into the window regulator
- Push the regulator into the door
- Hang the regulator by its bolt
- Insert the four 10mm bolts into the regulator
- Remove the painter's tape from the window
- Lower the window onto the regulator
- Insert the two 10mm bolts that hold the window to the regulator
- Connect the window switch wiring harness
- Connect the window motor to the lead
- Turn the vehicle on
- Run the motor up for 4 seconds
- Disconnect the window switch wiring harness
-
step 4 :Reinstalling the Door Panel
- Put the water shield into place
- Lift the door panel into place
- Push in the door panel clips
- Push on the trim button at the end of the handle
- Insert the T30 Torx screw inside the door handle
- Push on the trim piece inside the door handle
- Insert the two T30 Torx screws in the door pull
- Push on the rubber trim in the door pull
Tools needed
-
Flat Blade Screwdriver
Putty Knife
T30 Driver
10mm Wrench
10mm Socket
Door Panel Removal Tool
Ratchet
Brought to you by 1AAuto.com, your source for quality replacement parts and the best service on the Internet.
Hi, I'm Mike Green. I'm one of the owners of 1A Auto. I want to help you save time and money repairing or maintaining your vehicle. I'm going to use my 20-plus years experience restoring and repairing cars and trucks like this to show you the correct way to install parts from 1AAuto.com. The right parts installed correctly: that's going to save you time and money. Thank you and enjoy the video.
In this video, we're going to be showing you how to replace a front window regulator on this Chevy HHR, this one's a 2008 but it's the same for any 2006 to 2010. The tools you'll need include a small flat blade screwdriver, a T30 Torx driver, a putty knife or door panel clip tool and a 10mm wrench or a socket and ratchet.
First down inside your pull cup here, you'll see a little tab. Grab the tab, pull up a little rubber plate, and then there's two T30 Torx screws in there. Then take a little screwdriver and pry out underneath this little detent here, and then a T30 Torx screw in there. I'm going to use a little fast motion here as I remove those three T30 screws. Right down here there's a little tiny pin, just pry it out with a screwdriver. Now take a putty knife first and get back in there. Pull, use a door panel clip tool if you'd like, find the rest of the pins, kind of look in there at the same time.
Actually, what I eventually found on this is its actually easy once you get the door panel out a little bit just run your fingers underneath the door panel until you come to one of the clips. Then give it a good pull and it comes apart. Even though I'm doing this, looks like very quickly, you want to slowly remove your insulation and water shield here, carefully, and you don't want to rip it, you want the adhesive to pretty much stick to the shield itself. Then what I do is use a piece of painter's tape and just tape it to the back of the door.
You can see our regulator's in fine shape. Lots of times what happens is there are cables here, and those cables will snap and you'll hear the motor running and something grinding or clicking but the window doesn't go anywhere. In that case, you'll probably be, once you get in here, you'll be able to move your window up and down pretty easily. There are two 10mm bolts that hold the window to the regulator: one here and one over there. You'll need to remove those, and even if your window doesn't move they are pretty easy to reach no matter where they are. Loosen that bolt, I'm going to use an extension just to get to this bolt a little easier, and loosen that one up. Grab your window and just bring it up and put it in place. Just a couple of pieces of painter's tape just to make sure it doesn't go anywhere.
Now your power window connection's right here. Push in with a screwdriver and push down some. Now the assembly is held in by five bolts, you can loosen these two nuts up here, remove these two nuts down here, and loosen this bolt here. Speed things up as I do that and remove two of the lower nuts, loosen up the other three, and you might need to loosen up that middle bolt for the window motor a little more. Pull this up and out, and bring your whole assembly right up through there.
Here's our original regulator and the new regulator from 1A Auto. Everything's exactly the same, the motor is slightly different and then one difference is that the original motor has the connection here, this just has a little bit of a pigtail. Nothing major.
What you're going to want to do is transfer all the three nuts and bolts to the new regulator. Speed it up here a little bit as I finish up doing that, transfer the two nuts and the bolt that goes into the motor. Feed the regulator in. Line this up here first. Hang it up right there. The motor bolt down through here, put that stud through there. Now you can reconnect your power window lead there. Speed it up as I tighten up those fasteners, tighten them firm, you don't want to over tighten them though. Remove my tape. The window slides down, you just want make sure it goes into these connectors. Okay, you might want to loosen them up a little bit. Tighten them back up.
Turn our key on. Up and down nicely. Put this back in place.
Here, we're going to kind of move through putting the door panel back on in a little bit in fast motion. If you want to see this in real or regular speed just check out our other videos for the HHR door panel, but you can probably figure it out from taking it apart and what you see here. Put the lock switch back in, clip the cable back on, make sure that the top clips up onto the clips on the top of the door, line up the tabs or line up the clips, push them all in, put your three T30 Torx screws back in, reinstall your little trim panels and that little pin on the edge of the door, and you'll be all set.
We hope this video helps you out. Brought to you by www.1AAuto.com, your source for quality replacement parts and the best service on the Internet. Please feel free to call us toll-free, 888-844-3393. We're the company that's here for you on the Internet and in person.
Shop Products


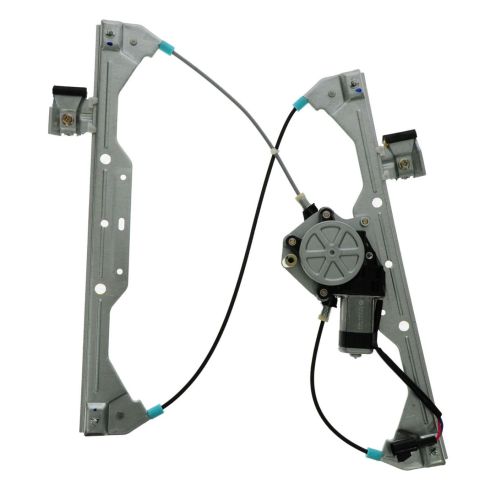
2006-11 Chevrolet HHR Front Driver Side Power Power Window Motor & Regulator Assembly TRQ WRA51598
Part Details:
- Power
- 2
- No
- No
- Galvanized Steel
- Nylon
- Yes
- 7.87 in
- No
- 8

1AWRG00023 Buick Regal Century Oldsmobile Intrigue Window Regulator
Everything that you want to know about part number 1AWRG00023. It's a power window regulator for a Buick Century, Regal, and Oldsmobile Intrigue, years 97, 98, 99, 00, 01, 02, 03, 04, or 05. It fits the driver's side front door, and it includes the power window motor. New Window Regulator from 1AAuto.com.
