How to Replace Window Regulator 1995-99 Toyota Avalon
Created on: 2012-09-10
How to repair, install, fix, change or replace a slow, stuck, cracked or damaged window regulatoron Toyota Avalon, years 95, 96, 97, 98, and 99.
-
step 1 :Removing the Door Panel
- Pry off the mirror base trim piece with a flat blade screwdriver
- Pry off the door handle bezel with a flat blade screwdriver
- Pry up the window switch panel with a flat blade screwdriver
- Disconnect the window switch wiring harnesses
- Pry off the two screw covers at the front edge of the door panel
- Pry off the screw cover in the door pull
- Pry the plastic clip out of the rear edge of the door panel
- Remove the four Phillips screws from the bottom of the door panel
- Remove the two Phillips screws from the front edge of the door panel
- Remove the Phillips screw behind the window switch panel
- Remove the Phillips screw from the door pull
- Lift the door panel up and off
- Disconnect the courtesy light wiring harness
- Carefully peel off the water shield
-
step 2 :Removing the Window Regulator
- Remove the three Phillips screws from the window regulator panel
- Remove the 10mm nut from the regulator panel
- Pull off the panel
- Disconnect the window motor wiring harness
- Unclip the wiring harnesses from the regulator track
- Lift the window by hand
- Remove the two 10mm bolts that hold the window to the regulator
- Tilt the window out of the door
- Remove the two 10mm nuts from the regulator
- Remove the three 10mm nuts from the window motor
- Pull the regulator out through the door
-
step 3 :Installing the Window Regulator
- Slide the regulator into the door
- Fasten the two 10mm nuts onto the regulator
- Fasten the three 10mm nuts onto the window motor
- Tilt the window into the door
- Lower the window onto the regulator
- Insert the two 10mm bolts that hold the window to the regulator
- Connect the window motor wiring harness
- Hold the harness in place with wire ties
- Put on the regulator panel
- Insert the three Phillips screws into the panel
- Fasten the 10mm nut ont the panel
- Connect the window switch wiring harnesses
- Test the window with the switch
- Disconnect the window switch wiring harness
-
step 4 :Reinstalling the Door Panel
- Put the water shield into place
- Connect the courtesy light wiring harness
- Lift the door panel into place
- Insert the Phillips screw behind the window switch panel
- Insert the Phillips screw into the door pull
- Insert the two Phillips screws at the front edge of the door panel
- Insert the four Phillips screws at the bottom of the door panel
- Push on the door pull screw cover
- Connect the window switch wiring harnesses
- Push in the window switch panel
- Push on the door handle bezel
- Push on the screw covers at the front edge of the door panel
- Push on the mirror base trim panel
- Push the plastic clip into the rear edge of the door panel
Tools needed
-
Socket Extensions
Flat Blade Screwdriver
Phillips Head Screwdriver
Wire Ties
10mm Socket
Ratchet
Brought to you by 1AAuto.com, your source for quality replacement parts and the best service on the Internet.
Hi, I'm Mike from 1A Auto. I hope this how-to video helps you out, and next time you need parts for your vehicle, think of 1AAuto.com. Thanks.
In this video, we're going to be showing you how to replace a window regulator on this 1998 Toyota Avalon. We'll show you the passenger's front door; the procedure for the driver's front door is very similar. The tools you'll need are pretty basic: a flat blade screwdriver, a Phillips screwdriver, and a 10mm socket with a ratchet and extension.
You start with a flat blade screwdriver and up here in this corner piece you can pry out lightly and just pull firmly, and that comes up and off. For your inner door handle bezel, kind of pry down here, pry out like that. Then up at the top, pry out like that, that comes off. For this bezel that holds your switches go right from kind of the center, slowly work under it and you can see a clip. Push on that clip and pull that up and out. Then there's two connectors, they both have little buttons. Press the button and pull the connector out. Then there's two little trim tabs here. Just pry them off, again with your screwdriver or pull on them with your fingers. Another one here comes right out. Then on the end of your door is a little clip here. You push the center in and then that pulls out.
Now, there are a number of Phillips screws to remove. There are two right there, one in behind where your switches were, and one in that hole there. Then, there's a few right underneath the perimeter of your door. Speed up here as I use a Phillips screwdriver to remove those screws. On this vehicle there were eight in all, four along the bottom, two in the front, one in behind where the switches were, and then the one at the door at the armrest base.
Now you can just lift the door panel up and off, and then you reach in behind and disconnect the courtesy light. This just has a little tab on it that you press down and pull out. Now carefully peel back the water shield; be careful not to rip it or tear it.
Remove the screws in this panel here. Speed up while I remove those three screws, and then there's a 10mm nut you need to loosen with your wrench or socket and ratchet. That 10mm nut shouldn't come off quite that easily, but it does on this vehicle. That comes off. You're going to want to disconnect this lead here, which is your power window, and then carefully, I'm reaching in behind and squeezing the little pins on this connector. Pull it out. Do the same thing right here. You squeeze these little pins. I'm just going to fast forward. Basically there's a couple clips that hold that harness to the door, you want to remove those. Then there are a couple of, actually harnesses that are clipped to the window regulator track. It's the silver track that's vertical running in the door there. You want to unclip those as well.
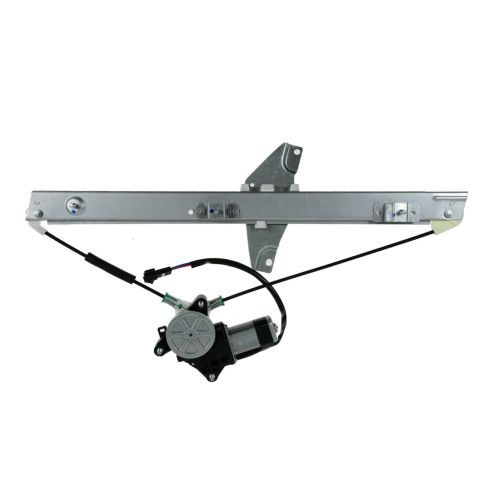
With these regulators, you can see the regulator right here. They're actually cable actuated and usually what happens is . you can't see the cable but it's right back here . the cable will break and you'll actually be able to just grab on to the window. Usually what'll happen is actually you'll hear some grinding, the cable will break, and the window will generally fall down into the door. Then what you can do is kind of grab onto the window. You want to grab onto it or have a helper grab onto it and just lift it into a position where you can remove this bolt, 10mm bolt, as well as that bolt. That separates the window from the regulator. Fast forward as I remove those two bolts I just showed you. See that? You can actually lift the window right up, tilt the front down, and pull the window right out.
Remove a nut down here, and here. Then there are two here that hold the window motor. There's a third one here, it just kind of adheres to the plastic a little bit, and remove this third one. Now the motor comes out. There's a little clip right here holding the cable. Take the motor out. The whole thing just comes right out.
Here's our original and the new one from 1A Auto. You see it's all the same and has the same mounting points. The motor is going to plug in the same, and I'm just going to reverse the direction. Put that in there, put that through there, and put the bottom one there. Take these two nuts that hold it in place. I'm just going to fast forward here. Get the motor into place and start all those three nuts that hold the motor in place, then use my socket ratchet and extension and tighten everything up nice and firm.
Then, take your glass; put the nose in first. With the glass down and in, make sure the nose goes in the track. Then the back of the window goes into the track and then slowly slide it down in place. Now at this point, you have your two bolts. Just kind of maneuver the window a little bit, get the bolts holes to line up with the regulator and start those two bolts in and then tighten them up nice and firm. Now reconnect your harness and then just use a plastic wire tie or something to kind of connect that harness to the door so that the harness doesn't get caught up in the window at all. We're starting to wrap it up here and speed up because I put that panel back on. Just make sure you put it on there correctly. Put in the three screws and then the nut that secures it to the window regulator in the middle as well.
We've got our switch plugged back in and our car on. That's the window. It looks good. Carefully pull the courtesy light harness back through the water shield and stick the water shield back in place best you can. I'm going to reinstall the door panel. First we'll reconnect our courtesy light. Now hang the door panel up on the window sill. Make sure your harnesses come through here. Put this in place. I'm going to fast forward here as I put the screws back in. The two largest screws go in behind the switch plate and under the armrest base. Then you have the two button style screws that go in the front, and then the other four screws that go along the bottom.
Put this little button back in. Put our switches back in. Put the back down first, then press that down in. Trim bezel here, put that on. These two trim buttons here, put those on. Last but not least, put that on. Okay the last part, take this, reset it by pushing it back up through like that and put it in place and push it to lock.
We hope this video helps you out. Brought to you by www.1AAuto.com, your source for quality replacement parts and the best service on the Internet. Please feel free to call us toll-free, 888-844-3393. We're the company that's here for you on the Internet and in person.
Shop Products


1995-99 Toyota Avalon Front Driver Side Power Power Window Motor & Regulator Assembly TRQ WRA51277
Part Details:
- Power
- 2
- No
- No
- Galvanized Steel
- Nylon
- Yes
- 15.75 in
- No
- 8
How To Replace Manual Window Regulator 1980-96 Ford F-150 F-250 F-350
Check out this video from 1A Auto to learn how you can replace the window regulator on your 80-96 Ford F-series truck.
