How to Replace Window Regulator 1995-2005 Chevy Blazer S10
Created on: 2011-02-02
In this video, 1A Auto demonstrates how to replace a power window regulator in a 95-05 Chevy Blazer S10.
-
step 1 :Remove the door panel
- See our other videos for more detailed information
-
step 2 :Remove the window regulator
- Raise and tape up the window.
- Disconnect the wiring harness from the power window motor.
- Use a hammer and punch to remove the rivets mounting the regulator.
- Use a chisel to cheer the head off the rivet.
- Remove the window regulator.
-
step 3 :Install the new window regulator
- Put the regulator into place, working the regulator into the window tracks.
- Use coarse threaded bolts and nuts to mount the window regulator.
- Plug the wiring harness into the window motor.
- Lower the window into the window regulator and secure it.
- Plug in your switch panel and test the window.
-
step 4 :Replace the door panel.
- Once you are sure everything works correctly, replace the door panel.
- Check out our other videos to see more detailed instructions on how to install the door panel.00
Tools needed
-
Hammer
Flat Blade Screwdriver
Phillips Head Screwdriver
Putty Knife
Window Crank Removal Tool
Center Punch
7mm Socket
Chisel
10mm Socket
Door Panel Removal Tool
Ratchet
Brought to you by 1AAuto.com your source for quality replacement parts and the best service on the internet.
Hi I'm Mike Green; I'm one of the owners of 1A Auto. I want to help you save time and money repairing and maintaining your vehicle. I'm going to use my 20 plus years experience restoring and repairing cars and trucks like this to show you the correct way to install parts from 1aauto.com. The right parts installed correctly, that's going to save you time and money. Thank you and enjoy the video.
In this video we're going to replace the front power window regulator on this 2000 Chevy S10; pretty much the same as any '95 to '05. Both the S10 Blazer and the S15 Jimmy and we're going to do the front driver side which is also similar for the front passenger side. Tools you'll need are a flat blade screwdriver; you'll need two of them. A Philips screwdriver, 7 mm socket and driver, a putty knife and a rag, a hammer, a punch, a cold chisel and bolts and nuts with integrated washers to put it back together.
We're going to start by fast forwarding through removing the door panel. It's not that difficult of a job. You remove the switch panel, unhook the switches. I think there are three or four screws that you remove and then pull the door panel away on some pins. If you do want to see this in regular speed just check out our other videos for the door panel removal for the S10 Blazer.
Once your door panel is off then carefully pull back your water shield and once you have that shield pulled back here's your window regulator and it's held on by four rivets actually. We will use a punch to punch out the center and a chisel and then once you have those four rivets off the regulator slides out. Before that you'll want to press on a tab and disconnect your power window motor. What you want to do with these rivets is use a punch first and punch the middle of them out, you can see that's open and now this is called a cold chisel and you just chisel the head of the rivet right off. We'll just speed this up as I'm banging away. Usually, you sheer the head off, this actually just pulls the rivets right out of the door. You can see it's free from the door; you just want to repeat that for the rest of the rivets.
Now my regulators detached from the door and I've got a person helping me and you can see here's a track and there's two arms that go into the track and then if you're to peel here you can see that there's another arm in a track that runs right here. What we have to do is lift the window up and get these two arms out of their tracks by sliding it down and then forward and then this arm comes out afterwards. You want to be very carefully because you can easily get your hands pinched in here that's why I have somebody helping me. I'll have them hold the window at certain times. You can see as I lift up the window I'm going to pull out of my regulator try and show you a good spot. Lift up. Now hold it there, ok now you see me regulator is kind of rotated down and now I pull it out and now you can see here the roller from this arm. Now I just slide this arm right out, bring those together and pull it out. Now what you want to do is probably tape up the window or let it go, just let it slide down. All right like that. Here's the old regulator, the new regulator from 1A Auto you can see everything's all the same. The only slight difference is that the motor has a lead on it but the attaching point is the exact same.
To reinstall what you want to do is you're going to put this one in first into the slides in the front and then you're going to try and work these two into the track at the same time. Lift the window up, make sure you keep your parts out of the way, put this in and then just kind of look up in and you have to do a lot of by feel. I just put that into the track now pretty much get this almost into place and I'm going to have to push it in over. Push the window all the way up and have your person hold it. Now I've got this one here as you can see and I can see that it's in the right spot by looking right through that hole there. Feel and make sure your top one goes into the track in the front. I've got that started, ok and that one is there. Now I've got everything in and now, let go of the window, slowly let your window down and put your regulator and I didn't get the top one it. Slide it back up, got the front in, that one now try letting it down again. Ok and let your window regulator go up into place, keep your hand down. Hold it right there. You want to use a short bolt and a nut with a washer integrated into it. Let it down a little more. Usually easiest to try to all right that's good, a little more ok, that's good; easiest to start these ones down here at the bottom. Go up a little bit, there you go. Now what's a good thing to do is to connect our power here and I'm going to carefully turn on the power. I'm going to hold the regulator. Why I'm doing this is just to get everything out of the way so I can bolt it in. Now put those two bolts in and you can just put the rest of the nuts and bolts in.
As I finish bolting it in here, I'm using bolts in places of rivets obviously because the rivets were sheared off and I'm either using one and a half centimeter M6 10 mm bolts or I'm using quarter inch by one half inch long bolts with 7/16th heads on them. Got everything preliminarily in place. What you want to do is if you stretched out your holes or anything when you were chiseling off the bolts just lift things up into place and tighten them up.
We'll hit fast forward as I just reach in and around. Some of the bolts and nuts are a little hard to get to so you want to put a bolt through from the front side and then use a washer and nut or a nut with an integrated washer on the back side. They're at times a little bit difficult especially I have larger hands so trying to get back in there is a little tough so just fast forward through that.
Get them on there. Ok everything is working good. Unplug our switch; put that harness back in there like that. We'll just fast forward putting that water shield back on. Make sure it's on there good. You can use some tape or masking tape or whatever if you need to and then fast forward through putting the door panel back on. Again if you want to see this in regular motion, just check out or other videos for the S10 door panel, remove and replace.
We hope this helps you out, brought to you by www.1AAuto.com your source for quality replacement parts and the best service on the internet. Please feel free to call us toll free 888-844-3393. We're the company that's here for you on the internet and in person.
Shop Products


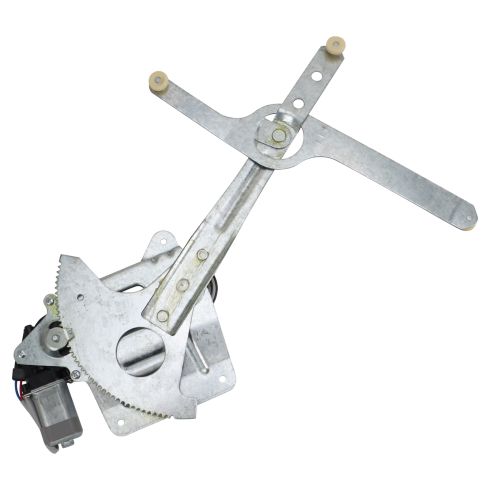
Chevrolet GMC Olds Isuzu Front Driver Side Power Power Window Motor & Regulator Assembly TRQ WRA51148
Part Details:
- Power
- 2
- No
- No
- Galvanized Steel
- Steel
- Yes
- 7.87 in
- No
- 8

How to Replace Window Regulator 2001-06 Chrysler Sebring
How to repair, install, fix, change or replace a slow, stuck, cracked or damaged window regulator on Chrysler Sebring and Dodge Stratus, model years 01, 02, 03, 04, 05, and 06.
